Renderosity Forums / Poser - OFFICIAL
Welcome to the Poser - OFFICIAL Forum
Forum Coordinators: RedPhantom
Poser - OFFICIAL F.A.Q (Last Updated: 2024 Nov 29 7:57 am)
Subject: A basic mini-tutorial for tiling bitmaps (using the tilenode). P5/6 (and probabl

(Don't forget to click on the images to get a bigger view..)
Remember that you can set the Mortar_Width to zero, and put the mortar on the texturemaps. Not much point in doing that here, but it means you could then do larger tile-node tiles with a more complicated tesselation in the texturemap. How about no edge-mortar in the textures, zero mortar-width, the the two sorts of tiles using the same tile-colours but diagonal mortar? Though that sort of diagonal gridding could be done without a tile node or a texture. I suspect the tile-node is a pre-built version of what can be done with a whole shder-tree. Possibly an XOR on two bar patterns which feeds a blender node? Sorry, I'm going into my weird shader-trees mode, but you can get something like XOR out of a black-and-white input set with math nodes. AND is a simple multiply. NOT is subtracting the value from 1 OR would be an addition followed by clipping (Ceiling function?). I know. I'm a freak.
Privacy Notice
This site uses cookies to deliver the best experience. Our own cookies make user accounts and other features possible. Third-party cookies are used to display relevant ads and to analyze how Renderosity is used. By using our site, you acknowledge that you have read and understood our Terms of Service, including our Cookie Policy and our Privacy Policy.


Just noticed my title was too long so "and probably P7)."I may have posted this here before (possibly recently) - if so I apologise for the repeat. But I was tidying up my HD, found this, and couldn't find a corresponding thread in the Poser forum.
Rather than delete the folder containg this tut, I decided to post (possibly re-post) it..
And anyway, I had to do something whilst waiting for the forum to calm down re: P7 & V4 (neither of which I can afford..) - I can't even afford 1 month's DAZ PC membership.
Anyhow...
Some time ago in a thread not far from here, someone wanted to know how to tile a bitmap. At the time, I made some suggestions, but nothing was ever much resolved.
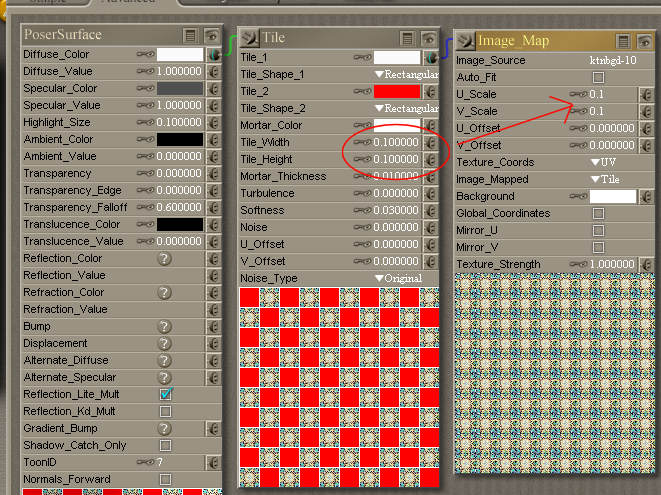
The problem is, that when you apply a texture to a tile, it expands to include the whole surface, so each tile gets a part of the image. (See attached image).
Now, that could be useful, but what if you want the same image on each tile?
In that case you have to do a little manipulation.
Before I continue - this tut assumes that the tiles are square and that the texture to be applied to each tile is also square. If that's not the case, be prepared to do some advanced math calculations to work out exactly how to match them..
And also, kudos to ktn3d for supplying the (free) textures I've used....