Renderosity Forums / Poser - OFFICIAL
Welcome to the Poser - OFFICIAL Forum
Forum Coordinators: RedPhantom
Poser - OFFICIAL F.A.Q (Last Updated: 2024 Nov 29 7:57 am)
Subject: How can you make a dent? Bump map?
Displacement map. Detail independant of mesh density, relies more on image map resolution and minimum shading rate. Create an image file in your editor, start from a neutral gray layer (RGB 102/102/102). Paint positive displacement lighter, negative darker. Blur for smooth transitions. In advanced mat room run this image map through a math functions subtract with value 1 at 1.00, value 2 at 0.500. This will create a distortion free displacement.
Bump maps are generally used for fine detail not reliant on viewing angle accuracy. For major surface modifications use displacement.
If you want deformed doors (like a real deep dent or a bent out corner) you'll need to take the door into something like Blender and add extra geometry. You only need to do it where the damage is to go, so it won't have to ramp up the whole thing (although you could if you want to). Otherwise, displacement is by far the easiest way to go.
Thank you both very much. I don't have blender, and wouldn't know what to do with that. I'll try displacement map.
Can you tell me what is "Positive displacement" vs. "Negative?" Thanks.
Never messed with displacement maps, usually just used what i had or purchased. Really appreciate the help.
Thanks again.
Positive displacement would be raised up off of the geometry (like raised letting). Negative displacement would be inset into the geometry (like engraved lettering).
So if your locker door was a flat plane, using a math node as DeathMetalDesk recommended, you could add a dent using negative displacement, and/or add the raised vents that school lockers usually have.
http://www.renderosity.com/mod/tutorial/?tutorial_id=2295 is a good tutorial for learning about displacement
Poser Pro 2012 SR3 on Win10 x64 w/Reality.
Poser Display Units = inches.
If they have enough polys you can deform them with the Morph Brush...
----------------------------------------------------------------------------------------
The Wisdom of bagginsbill:
"Oh - the manual says that? I have never read the manual - this must be why."“I could buy better software, but then I'd have to be an artist and what's the point of that?"
"The [R'osity Forum Search] 'Default' label should actually say 'Don't Find What I'm Looking For'".
bagginsbill's Free Stuff... https://web.archive.org/web/20201010171535/https://sites.google.com/site/bagginsbill/Home
Displacement will be dependent on the quality of the UV mapping, and since they are a flat color it may not be up to the task. I think I would to it with polys, the doors would most likely be bent in specific ways rather than just dented (some free corners bent outward, middle bowed inward etc) so I think it's a job for polygons.
Thanks for the correction vilters... didn't have a chance to fire up photoshop when I made my post so my suggestions were coming from a somewhat foggy place. The actual values are dependant on the color space you are working in. 127 or 128 sounds about right. Looks like I've been using 102 from one of my reference swatches with no noticeable difference to displacement results... Shrugs.
I agree with obm890. I personally would create a subdivided proxy for the doors and create the deformations within a modeler (as OP has indicated that the obj is low poly, probably several large polys). Or use the putty tool. I doubt that subdivision would cause much in the way of distortion in the original uvs, being such as they are it's probably planer or projection normal mapping. Unfortunately OP has already stated that he has little modeling experience (or so I gather). Hence...
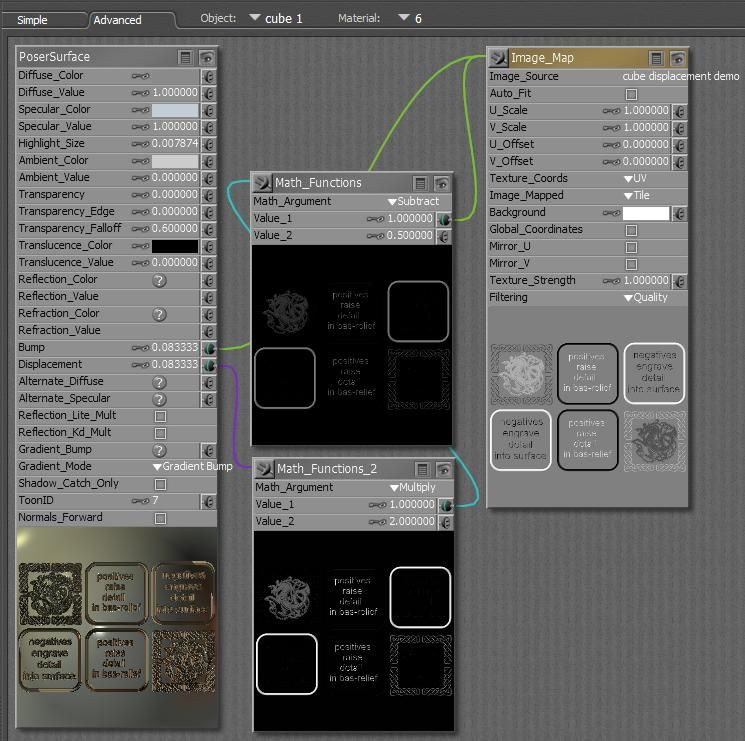
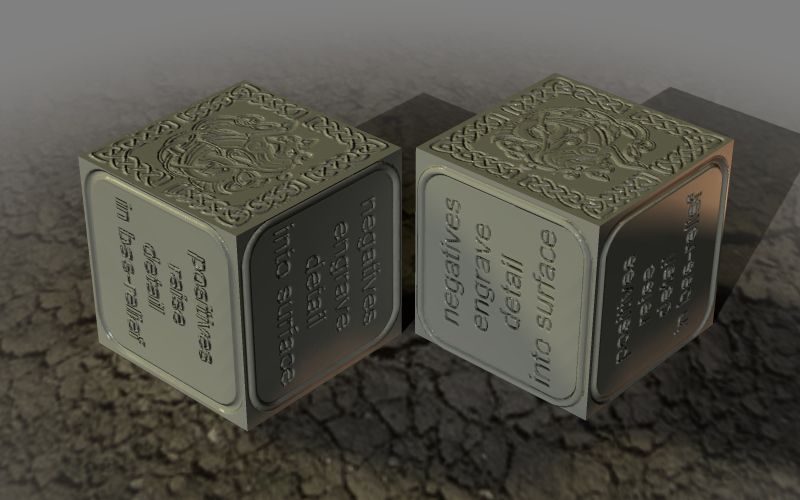
Here is an example of using math nodes to shift the zero point for displacement to mid grey (127, 127, 127). Everything darker than mid grey engraves into the mesh, everything lighter raises detail like bas-relief.
The upper math node moves the displacement center point to mid-grey, the lower math node expands the range to encompass displacement values from -1 (black) to +1 (white).
 and rendered...
 My inclination would be to do the gross deformation by modeling, and then add fine detail with displacement.
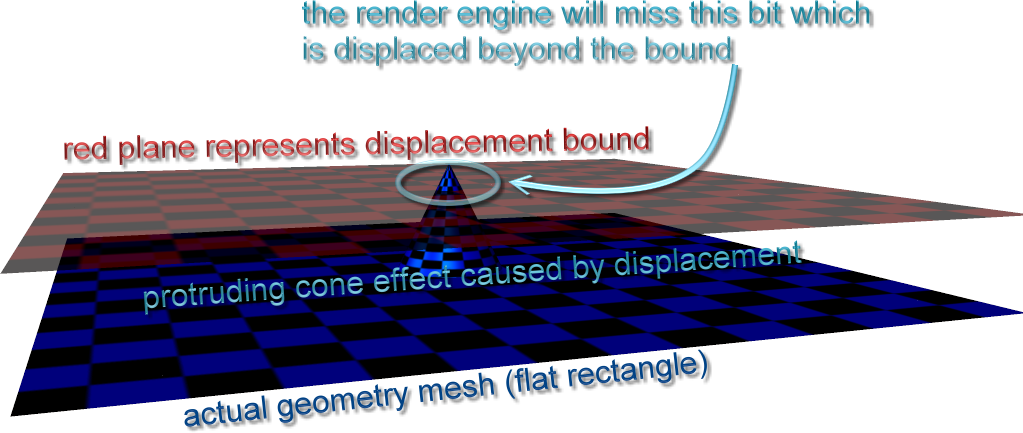
When you use displacement materials, remember to adjust the render setting called minimum displacement bound. If left at zero, any areas displaced will be missing in the render. Use 1 if you don't know how much to allow.

Poser 12, in feet.
OSes: Win7Prox64, Win7Ultx64
Silo Pro 2.5.6 64bit, Vue Infinite 2014.7, Genetica 4.0 Studio, UV Mapper Pro, UV Layout Pro, PhotoImpact X3, GIF Animator 5
Thanks again for all your suggestions. I may have found an easy way. :) I used the hi res primitive square and parented it to the door (after re-sizing). Set the old door to transparent. I then used the morph tool to dent primitive square. Looks okay, amazingly. Still playing with it, but i think it will be fine. Thanks so much.
Privacy Notice
This site uses cookies to deliver the best experience. Our own cookies make user accounts and other features possible. Third-party cookies are used to display relevant ads and to analyze how Renderosity is used. By using our site, you acknowledge that you have read and understood our Terms of Service, including our Cookie Policy and our Privacy Policy.


I'm trying to damage my school locker project. I want the doors to look bashed in or kicked, so dented.
I thought maybe the morph tool, but the lockers are so simple, they don't really have much of a mesh to manipulate (if I'm saying that correctly.)
Thanks.