lululee opened this issue on May 16, 2006 · 7 posts
lululee posted Tue, 16 May 2006 at 7:55 PM

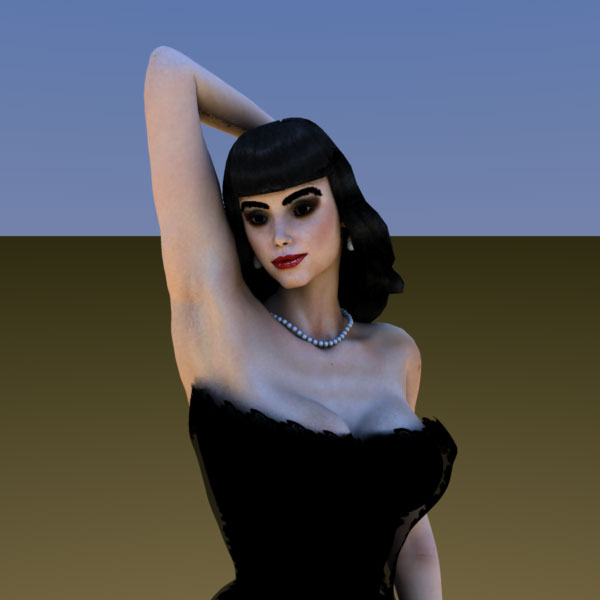
Here is my first render in CararraPro. Not a great render, but a start.
First I would like to know how to get the transparency maps to show up?
Second, How do I get the brown in the background to disappear? It seems to be part of the scene.
cheerio lululee
anastasis20 posted Tue, 16 May 2006 at 8:14 PM
How are you bringing the figure into Carrara? Native import or Transposer?
Transposer usually brings something in if transparency maps are in the figure (I don't use native imp, sorry).
If all else fails you'll have to bring them in yourself and try putting them in the Alpha channel, in the texture room - thats just my preference for the alpha channel though - something about polygon edges not showing up in the shadows - there was a thread about it here ages ago.
The background: in the Assemble room click on Scene and see what comes up, above it - it's either a gradient background/drop or the ground from a sky Atmosphere. You can switch either of those off easily enough.
lululee posted Tue, 16 May 2006 at 8:29 PM
I brought the character in from Poser with the Transposer in Cararra Pro.
I'll try turning off the bakground.
Wah! Being a newbie is no fun. Oh well, steady on.
cheerio lululee
anastasis20 posted Tue, 16 May 2006 at 8:42 PM
Thats odd - Miki & Koji get the transparency maps for their eyelashes and eyes okay - some kind of multi-channel mixer with multiply operators, seems like a strange way to do things. Have a search around here for Transposer issues and over at: www.eovia3D.net - thats also a useful place.
Mind you, once you've set everything up to your liking click on the shader tab in the Assemble room, click and hold the shader for your character and drag it into the shader browser. Then you can simply drag and drop the shader whenever you bring that character into Carrara (make sure to drag it onto all bodyparts that have a separate shading domain)
bevans84 posted Tue, 16 May 2006 at 9:10 PM
Turn on "light through trans" in the render settings.
steama posted Tue, 16 May 2006 at 11:34 PM
Quote - The background: in the Assemble room click on Scene and see what comes up, above it - it's either a gradient background/drop or the ground from a sky Atmosphere. You can switch either of those off easily enough.
Click on Scene in the Assemble Room then Atmosphere it depends if you are using 'Sky' or 'Realistic Sky' on your ground control options.
If you are using a 'Sky' the ground will stay on but you can edit it a bit by selecting the Sky 'edit' button. Play around with the sliders and see if you can lessen the ground effect for your scene to something you may be satisfied with for your scene. Background or Backdrop should be set to none by default, thus there is nothing to turn off (the Sky 'Edit' options is where you would minimize the ground effect).
However If you are using a 'Realistic Sky' when you select the Atmoshpere tab you will have the option to turn off the ground. Then all you have to contend with is the horizon. To get the effect you are after against the sky backgroud you may need to adjust the position of your figure and camera angle.
Good Luck,
Stan
steama posted Tue, 16 May 2006 at 11:53 PM
Quote - However If you are using a 'Realistic Sky' when you select the Atmoshpere tab you will have the option to turn off the ground. Then all you have to contend with is the horizon. To get the effect you are after against the sky backgroud you may need to adjust the position of your figure and camera
In the 'Realistic Sky' edit button you can greater lessen the horizon effect by adjusting 'haze altitude and haze distance sliders'.