
Fidelity2 opened this issue on Sep 13, 2006 · 11 posts
Fidelity2 posted Wed, 13 September 2006 at 4:50 PM

AgentSmith posted Wed, 13 September 2006 at 9:10 PM
Total Illumination;
The sun in that image is coming directly at the camera, which means your 3D view is going to see a lot of dark areas unless you create extra lighting aiming in the opposite direction, to lighten up those dark areas.
(In the real world, you would have bounced light doing this).
Contact Me | Gallery |
Freestuff | IMDB
Credits | Personal
Site
"I want to be what I was
when I wanted to be what I am now"

tom271 posted Wed, 13 September 2006 at 9:12 PM
It's called experience......... people forget that....... It will take, at least the mayority of us, to get exactly what we want...years....
but do keep on trying thats how we get there....
----------------------------------------------------------------------------------------------------------------------------
AgentSmith posted Wed, 13 September 2006 at 9:17 PM
Volumetrics are tricky, and imo normally weak looking, all by themselves.
I normally use a round spotlight. I'll position it and aim it how I think I want it, then in the spotlights Light Lab, I make sure that Visibile Object, Volume and Infinite Light are all activated, and I take the intensity up fairly high, so I can more easily see it to begin with, and then later on I'll start backing the Intensity down, until it gets down to where I want it.
I usually set my Edge Softness to 25. But that is not essential.
After that, I duplicate the spotlight, convert it to a cone, and apply a volumetric (fog) material to that. the cone I will increase in size until it entirely covers any area where light/volumetrics would be.
Contact Me | Gallery |
Freestuff | IMDB
Credits | Personal
Site
"I want to be what I was
when I wanted to be what I am now"
AgentSmith posted Wed, 13 September 2006 at 9:37 PM
Also, you may want to try in the Light Lab of the spotlight, turning the Intensity pretty far down (3-10), and switching the Falloff to None.
Contact Me | Gallery |
Freestuff | IMDB
Credits | Personal
Site
"I want to be what I was
when I wanted to be what I am now"

Stephen Ray posted Wed, 13 September 2006 at 10:16 PM

The light needs to Cast Shadows, Set the light render options to Visible Object, Volume and Infinitive.
I use Ranged Falloff. This gives me control over how far the light is cast. When volume light over laps other lights in the scene weird things can happen. I also use gradients to set color and help control how far the light range is. ( but this can be very tricky ) Like AS said you will need some front light to make the viewed ( front ) of the objects visible. Range falloff will help keep the normal front lights from overlapping the back volume light.
Use a smoke object ( lick a giant sphere for the hazy smoke in the scene.
Volume light renders are very time consuming, so set the scene up with the back spot light using normal light.
Then afterwards set the light to volume and do plop renders to check the volume light in different areas.
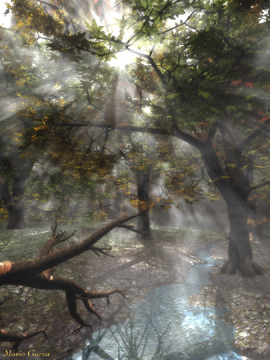
Here's a scene I did awhile back which is close to what you are after.

skiwillgee posted Thu, 14 September 2006 at 6:30 PM
Tks, AS, I've use the spot light visible stuff but never discovered the fog in a cone thing. I've got to try that.

diolma posted Fri, 15 September 2006 at 1:56 PM
"After that, I duplicate the spotlight, convert it to a cone...."
Hi AS:-)
Errrmm... How do you convert a spot;ight to a cone???
(Have just loaded up Bryce 5.0 and trawled all over it, but can't find out how to convert one type of object into another...)
TIA,
and
Cheers,
Diolma

IO4 posted Fri, 15 September 2006 at 2:06 PM
On the Edit panel, with the object selected that you want to change, look along the top right hand side and you should see a small double ended arrow (well, there is in 5.5 so I'm assuming it's there in 5.0 - please correct me anyone if I'm wrong) - click the arrow and the range of primitives and light objects should appear - whilst still holding the mouse button down move along to the object you want to change to,and whilst you are hovered over it release your mouse button. The object should change instantly.
diolma posted Fri, 15 September 2006 at 3:51 PM
Many thanks, IO4 - I'd never even noticed that little double-ended arrow before! I've only just upgraded from Bryce 3, but I just checked and it was there too!
And I thought I'd read the Bryce 3D manual from cover to cover (several times). Mind you, the pages are falling out of the manual....
Thanks again, nice to learn a new trick:-)
Cheers,
Diolma
AgentSmith posted Tue, 19 September 2006 at 7:03 AM
That can be a fun (yet well-hidden) button.
I've imported a poser figure, selected all its parts, and changed them all to metaballs, or cubes, or....you get the idea. ;o)
Contact Me | Gallery |
Freestuff | IMDB
Credits | Personal
Site
"I want to be what I was
when I wanted to be what I am now"