PapaBlueMarlin opened this issue on Mar 09, 2007 · 43 posts
PapaBlueMarlin posted Fri, 09 March 2007 at 5:46 PM
Attached Link: http://www.physicalc-software.com/tutorials/ibl/

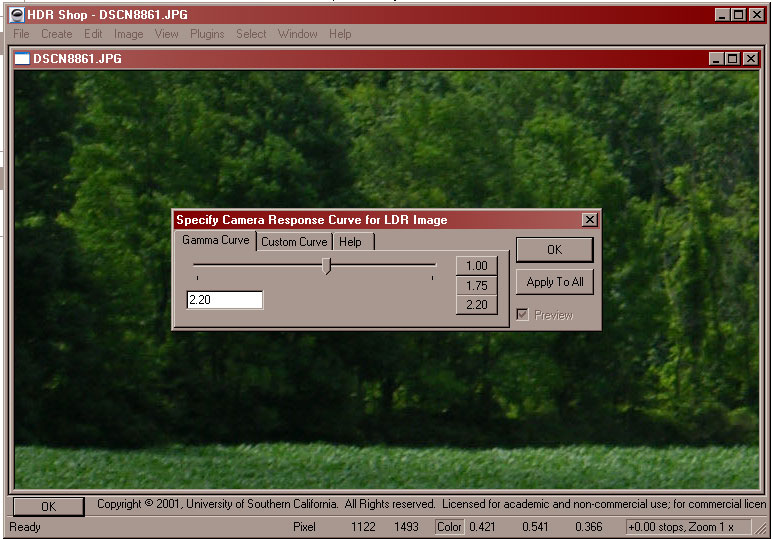
First, in HDR Shop load the image that you want to create you image-based lighting from. Go to File --> Open and select your image. A pop up will appear, just click "OK".
PapaBlueMarlin posted Fri, 09 March 2007 at 5:47 PM

PapaBlueMarlin posted Fri, 09 March 2007 at 5:49 PM

PapaBlueMarlin posted Fri, 09 March 2007 at 5:49 PM

PapaBlueMarlin posted Fri, 09 March 2007 at 5:53 PM

PapaBlueMarlin posted Fri, 09 March 2007 at 5:53 PM

PapaBlueMarlin posted Fri, 09 March 2007 at 5:55 PM

PapaBlueMarlin posted Fri, 09 March 2007 at 5:57 PM

PapaBlueMarlin posted Fri, 09 March 2007 at 5:58 PM

PapaBlueMarlin posted Fri, 09 March 2007 at 6:00 PM

PapaBlueMarlin posted Fri, 09 March 2007 at 6:04 PM

PapaBlueMarlin posted Fri, 09 March 2007 at 6:05 PM

PapaBlueMarlin posted Fri, 09 March 2007 at 6:06 PM

PapaBlueMarlin posted Fri, 09 March 2007 at 6:08 PM

PapaBlueMarlin posted Fri, 09 March 2007 at 6:10 PM

PapaBlueMarlin posted Fri, 09 March 2007 at 6:11 PM

PapaBlueMarlin posted Fri, 09 March 2007 at 6:12 PM

PapaBlueMarlin posted Fri, 09 March 2007 at 6:13 PM

PapaBlueMarlin posted Fri, 09 March 2007 at 6:14 PM

PapaBlueMarlin posted Fri, 09 March 2007 at 6:15 PM

PapaBlueMarlin posted Fri, 09 March 2007 at 6:17 PM

PapaBlueMarlin posted Fri, 09 March 2007 at 6:18 PM

PapaBlueMarlin posted Fri, 09 March 2007 at 6:19 PM

PapaBlueMarlin posted Fri, 09 March 2007 at 6:20 PM

PapaBlueMarlin posted Fri, 09 March 2007 at 6:23 PM

PapaBlueMarlin posted Fri, 09 March 2007 at 6:24 PM

JHoagland posted Fri, 09 March 2007 at 6:25 PM
Very nice tutorial. It reminds me a lot of Eric Van Dyke (Traveler)'s Poor Mans HDRI tutorial. But, your images use a later version of Poser. ;)
VanishingPoint... Advanced 3D Modeling Solutions
PapaBlueMarlin posted Fri, 09 March 2007 at 6:32 PM
Attached Link: http://www.renderosity.com/mod/gallery/browse.php?user_id=27965
I haven't seen that tutorial before, but yes it's basically the same principles. This tutorial was made using Poser 6, but it works for Poser 7 as well. I haven't tested it in Poser 5.For examples on how HDR Shop images might appear, you can check out my gallery here to decide whether it is something you desire to implement into your renders.
Hope this tutorial is helpful...
RAMWorks posted Fri, 09 March 2007 at 9:57 PM
Indoda posted Sat, 10 March 2007 at 6:48 AM
Great tutorial - should it go into the tutorial section of the site makes it easier to find later? Thank you for sharing all this information.
The important thing is not to stop questioning.
- Albert Einstein
Indoda
MariaM05 posted Sat, 10 March 2007 at 11:04 AM

dphoadley posted Sat, 10 March 2007 at 12:04 PM
PapaBlueMarlin posted Sat, 10 March 2007 at 12:06 PM
Attached Link: http://www.renderosity.com/mod/gallery/index.php?image_id=1217007&member
Try to reimport your background. When it tells you that it will change the dimensions of the preview window, click OK. The background you selected has no natural light. It's still okay, but it means that you will have to change the color of some of the lights and possibly reposition a few.It's what I did for the image in the link - so it can still look natural.
PapaBlueMarlin posted Sat, 10 March 2007 at 12:13 PM
Attached Link: http://gl.ict.usc.edu/HDRShop/
HDR Shop is a program from which you can create light files that can be imported into poser.PapaBlueMarlin posted Sat, 10 March 2007 at 12:19 PM

MariaM05 posted Sat, 10 March 2007 at 12:46 PM
Ok, so then i did two more... to see if i knew what u was talking about...
MariaM05 posted Sat, 10 March 2007 at 12:48 PM

MariaM05 posted Sat, 10 March 2007 at 12:48 PM

dphoadley posted Sat, 10 March 2007 at 12:53 PM
Would this method also work on background images pasted to primitimes, such as flattened cubes or curved surfaces? With a bsckground image pasted to a primitive, I can use displacement and bump values to enhance the 3d effect.
DPH
PapaBlueMarlin posted Sat, 10 March 2007 at 1:17 PM

DP:
It could be done that way, but remember your background image is blurred to provide depth of field. Plus, too many curves could cause the lights strange angles on your background. But feel free to experiment and see if it works for you.
MariaM05 posted Sat, 10 March 2007 at 1:36 PM

MariaM05 posted Sat, 10 March 2007 at 2:19 PM

PapaBlueMarlin posted Sat, 10 March 2007 at 5:31 PM
Much better! I think you're getting the hang of it :)