vkirchner opened this issue on Nov 12, 2007 · 9 posts
vkirchner posted Mon, 12 November 2007 at 9:24 AM
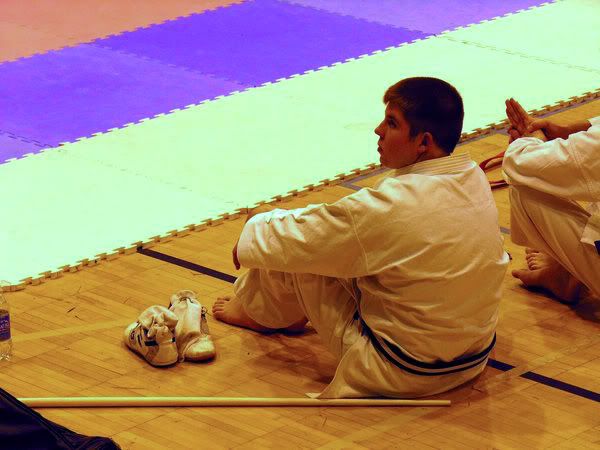
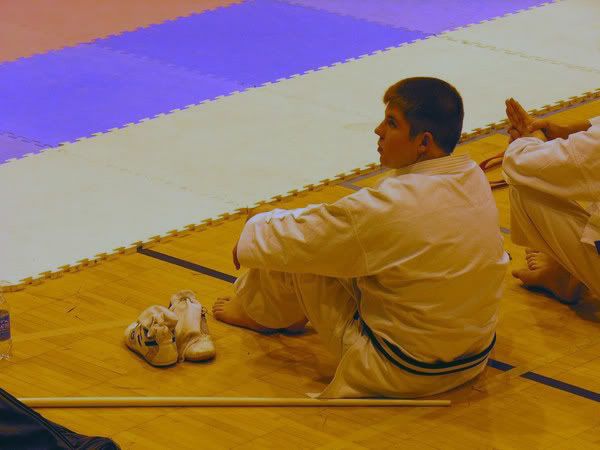
I am not a professional photographer by any stretch of the imagination, I am a lowly Dad trying to take better images of his children in their quest for manhood. The problem I have is, how to improve images taken under sodium vapor lighting. The boys, 17 and 19 compete in Karate. Every single auditorium we go to uses the same style of lighting, which gives the images a ghastly yellow cast which I cannot improve. They competition has 4-10 rings going on at the same time, so you have to move around to get a clear shot of the various age groups and directions that they will perform. The lights also change so much based on where you are at within the auditorium, that it can range from a jaundice color to the ghastly color I spoke of. I have tried every setting on my Nikon Coolpix 8800, and every thing I know about Photoshop, which is not much. Would someone suggest a white balance setting for this light, or point me in a direction to learn more. I have searched the forum before I added the post, but I did not find anything that helped my plight. Thank you. Vince
Onslow posted Mon, 12 November 2007 at 11:08 AM
You have identified the problem correctly - white balance is the key.
Your camera does shoot in RAW format and this will probably be the easiest solution to your problem. By shooting in RAW format the white balance is not set in the camera, it is set later when you process the image on a pc.
If you are willing then the place to start is to learn how to shoot in RAW format, and how to process your files to get the finished image you want.
Did your camera come with software that will process the RAW files into Tiff's or Jpegs ?
If it did great, you have got what you need. A quick read of the manual and a few trial shots should be enough to get you started. Once the files are in Tiff or Jpeg format you can treat them the same way as you would any image in photoshop.
The subject you want to capture is ideal because I am guessing the contestants will be wearing white. Their white suits will be your reference in processing the RAW file to get the colour balance correct. The RAW processing software will have an eye dropper tool with which you can custom set a white balance. You simply take this and click it on a part of the image which is white i.e. the contestants suits . Voila - all the other colours will fall into place automatically .
If you were shooting a scene with no white in it would need to introduce some by means of taking a test shot of a white card so you could get a white balance reading from that.
hth
R
PS As a quick fix for images you already have shot in other formats use a photoshop levels or curves adjustment layer. You will see an eye dropper in the pop up adjustment window. The one you want this time is the grey one. Click it on the white clothing. Not as goood as shooting RAW, but a quick fix to make the best of what you have. Change layer blend mode to colour.
And every one said, 'If we only live,
We too will go to sea in a Sieve,---
To the hills of the Chankly Bore!'
Far and few, far and few, Are the lands where the Jumblies
live;
Their heads are green, and their hands are blue, And they went to
sea in a Sieve.
Edward Lear
http://www.nonsenselit.org/Lear/ns/jumblies.html
vkirchner posted Mon, 12 November 2007 at 12:11 PM

vkirchner posted Mon, 12 November 2007 at 12:11 PM

inshaala posted Mon, 12 November 2007 at 12:34 PM
There are two things which come to mind for me.
Have you tried the Levels "Auto Colour" setting? Sometimes that get's rid of white balance problems.
No idea why this works (i was playing around one day and stumbled on this) but if you create a new file in photoshop (the bigger the better) and put on the horizontal axis (use the shift key) aspectrum gradient and on the vertical axis a white to black gradient on a different layer set to Luminance... Save as a psd file and keep it open. Then open up the picture you want to change... go to Image>Adjustment>Match Colour - use the colour "map" you have as the "source" and play around with the sliders.
This is what i got with the sliders set to the middle position and "Neutralise" turned on:

This is what i got just using the default "auto colour" setting on the "levels" layer:

But i have to say, nothing beats using a Raw conversion tool with a white balance adjustment 
"In every colour, there's the light.
In every stone sleeps a crystal.
Remember the Shaman, when he used to say:
Man is the dream of the Dolphin"
Rich Meadows Photography
Tanchelyn posted Mon, 12 November 2007 at 1:29 PM

For the images you uploaded, it's clear that the blue channel is way too dark. So it would be better to restart from raw.
But as it is, one of the best investments you can make is a plugin from Harald Heim's called ColorWasher. Easy to use and really outstanding in quality.
http://www.thepluginsite.com/products/photowiz/colorwasher/index.htm
Yes, $50, but there is a demo.
This was done with it in one, two three. Say what you want white (or neutral) and done.
There are no Borg. All
resistance is fertile.
vkirchner posted Mon, 12 November 2007 at 2:14 PM
Thank you so much for the help, that is the best I have ever seen one of the images look from there. Inshaala - I have larger images to work with, I tried the auto color setting but I tried no adjustment on it what so ever. Possibly I did not complete the operation to the best it could calculate. As for option 2, it went right over my head and gained speed. :-} Tanchelyn - $50 is better than ruining a lifetime of images. Possibly Santa is listening and I am on the good list so I can get that for Christmas, I will check with Mrs. Claus tonight and see. I will try the demo software on the rest of the shots and see what I can do. I have several when they received their medals that I would like to improve. Does the colorwasher software work on movies, I took a few video clips that I would like to improve if that is possible? I can always extract the frames, batch process the images if that is allowed, and recompile them back into a new movie. :-))
Tanchelyn posted Tue, 13 November 2007 at 2:34 AM
I have no experience with movies. But if it can be done in Photoshop, then it can be done with ColorWasher.
You'll see it's really simple to use. Only in some exceptional cases you need to tweak a bit yourself. And you always get interaction from the plugin itself as it tells you (box with text) what you're about to do. It even tells you if it would like to get a larger area to sample from.
Of course, if you could go back to that place and take a shot of a white sheet of paper under those same lighting conditions, it would be even better. You could use that photo to "calibrate" colorwasher as the plugin remembers the last settings you used.
I have been beta-testing it some years ago, when it went from v1 to v2 and I was confident that I could outperform it. I only found one pic after a long search that I could handle better. And most times the plugin was outperforming me.
Even today it's one of the only plugings I still have installed.
There are no Borg. All
resistance is fertile.
vkirchner posted Tue, 13 November 2007 at 7:59 AM
Tanchelyn - Yes, I tried a small sample last night with a seven image animated gif of one competitor bowing to receive their medal. I needed to create the individual frames to correct the color. The compress them back into a movie. Still not a bad arrangement with actions and batch processing. PS. - Mrs. Claus said I was a good boy, so I could order it for Christmas. :-))