momodot opened this issue on Nov 26, 2009 · 17 posts
momodot posted Thu, 26 November 2009 at 12:20 AM

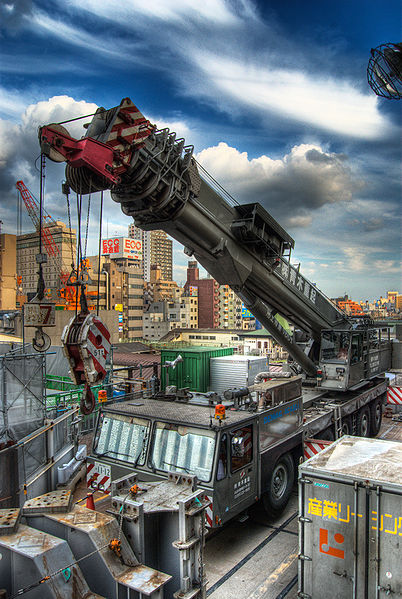
Here is an example from the Wikipedia entry on Tone Mapping.
Quest posted Thu, 26 November 2009 at 6:24 AM
Based on what I can find on this HDR photo process this image ("Machinery") was done using Photomatrix Pro by photographer Heiwa4126...his photostream can be viewed on Flickr…here (this particular image can be found on page 22). Acccording to this web site the artist used three exposures: -2EV, 0EV,+2EV. Photomatrix Pro is a stand-alone software package but it distributes a free software trial and a Photoshop plugin trial for CS2, CS3, CS4 which can be gotten at the bottom here.
momodot posted Thu, 26 November 2009 at 10:15 AM
I have done pseudo HDR with multiple exposures like that but is there anything to fake it digitally from one exposure?
vintorix posted Thu, 26 November 2009 at 6:31 PM

momodot,
re: pseudo-HDR
I can make a tutorial but only if I encounter enthusiasm! ;)
momodot posted Thu, 26 November 2009 at 7:10 PM

Above is what I got by taking the original and doing a 50% opacity overlay then a 15% unsharp mask and then Shadow/Highlights effect. Is that similar to yours?
momodot posted Thu, 26 November 2009 at 7:21 PM

vintorix posted Thu, 26 November 2009 at 7:40 PM
In general terms yes but a bit more complicated. It involves using the lab color mode and the high pass filter along some tricks with the smart filter. I make a thorough tutorial in the weekend!
momodot posted Thu, 26 November 2009 at 9:57 PM
Thank you... that will be appreciated.
stew451 posted Fri, 27 November 2009 at 11:27 AM
Count me in, I am interested in learning about this technique also.
vintorix posted Sat, 28 November 2009 at 7:44 AM
Photoshop "HDR" tutorial
A tone mapped picture may be the RESULT of HDR manipulations but is not itself HDR, that is nothing that not Photoshop can handle. If something is missing from the original raw material just put it back again.. or add something entirely new, :)
For example Pawel Wewiorski aka bolandrotor professional photographer HDR expert par excellence got second place in a HDR competition with a picture that was done from only one image. Where after one of his fellow competitors remarked, "It's interesting how a non-HDR image places in the top 3 in an HDR challenge!"
http://forums.dpreview.com/forums/read.asp?forum=1005&message=32166859
Adobe Lab color space
Just as tone mapped images is made up by manipulating HDR photos we can do something similar by manipulating Lab images. Lab color space like HDR has a much larger dynamic range than computer displays, printers or even human vision. So the first thing we do is making a copy of your original and change the color mode to Lab. Then right-click on the new layer and choose "Convert to a smart object".

vintorix posted Sat, 28 November 2009 at 7:47 AM
Go to Image>Adjustments>Shadows/Hightligts. Check the "Show more option" box.
Adjust controls until you are satisfied with the result. Start with Shadows-amount and Highlight amount. Then Tonal width and radius and Color corrections at last,

vintorix posted Sat, 28 November 2009 at 7:53 AM
create a new "curves" adjustment layer and set like this,

vintorix posted Sat, 28 November 2009 at 7:56 AM
Go back to your duplicated layer and choose "Filter>Other>High Pass", type in a value between 1 and 2. (You will not see the picture at this point). A new "High pass" icon is created.

vintorix posted Sat, 28 November 2009 at 7:57 AM
Right click on the "High pass" icon and choose "Edit smart filter blending option".
Set Mode to Linear Light and Opacity to 60. FIN! :)

momodot posted Sat, 28 November 2009 at 9:58 AM
Cool! Thank you!!
stew451 posted Sat, 28 November 2009 at 10:27 AM
Thank you, this will come in handy!
retrocity posted Mon, 30 November 2009 at 10:51 PM
i'm gonna make this "sticky" for awhile so it doesn't get lost...
Thanks for the mini tut :)
scott