
MistyLaraCarrara opened this issue on Sep 02, 2010 · 20 posts
MistyLaraCarrara posted Thu, 02 September 2010 at 3:22 PM
Thanks.
asking before going crazy with it.
i want to make 2nd skin clothes with a wee bit distance from the rest of the skin. it doesn't line up with the body part edges.
is there a neutral for specular maps, too?
♥ My Gallery Albums ♥ My YT ♥ Party in the CarrarArtists Forum ♪♪♪ 10 years of Carrara forum ♥ My FreeStuff

hborre posted Thu, 02 September 2010 at 3:38 PM
White is not neutral in a displacement map, it gives height to your mesh.

geep posted Thu, 02 September 2010 at 3:42 PM
Attached Link: http://www.drgeep.com//p5/mr/mr.htm

Remember ... "With Poser, all things are possible, and poseable!"
cheers,
dr geep ... :o]
edited 10/5/2019

Seaview123 posted Thu, 02 September 2010 at 4:05 PM
Dr. Geep, you are my hero! I've been trying to figure out how to do this for a while! Thanks for explaining this so us "Poser Manual" impaired folks could follow along!

seachnasaigh posted Thu, 02 September 2010 at 4:52 PM
Black (0,0,0) is "neutral". If you think of black as 0, then positive values (+1 max) create raised detail (bas-relief); negative values (-1 min) engrave.
I often use a map with grey (127,127,127) as the neutral; multiply it by two, then subtract one, and you have a range from -1 to +1. With a single map, some areas will be engraved, while others are raised, and after manipulation the map background is 0 (black), so you don't get the "exploded diagram" effect as Geep warns about in his tutorial.
Gimme a little time and I'll post screenshots.
Poser 12, in feet.
OSes: Win7Prox64, Win7Ultx64
Silo Pro 2.5.6 64bit, Vue Infinite 2014.7, Genetica 4.0 Studio, UV Mapper Pro, UV Layout Pro, PhotoImpact X3, GIF Animator 5
seachnasaigh posted Thu, 02 September 2010 at 6:36 PM
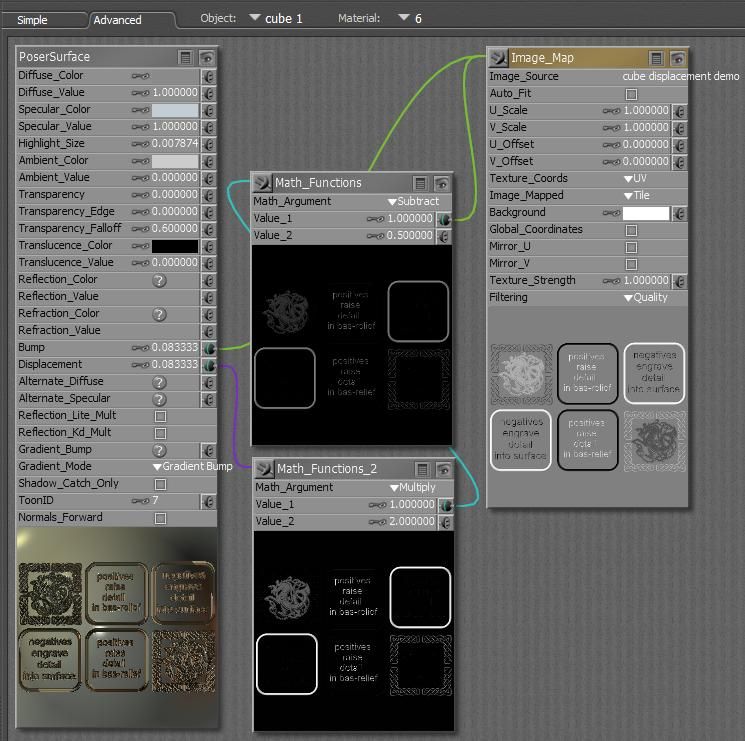
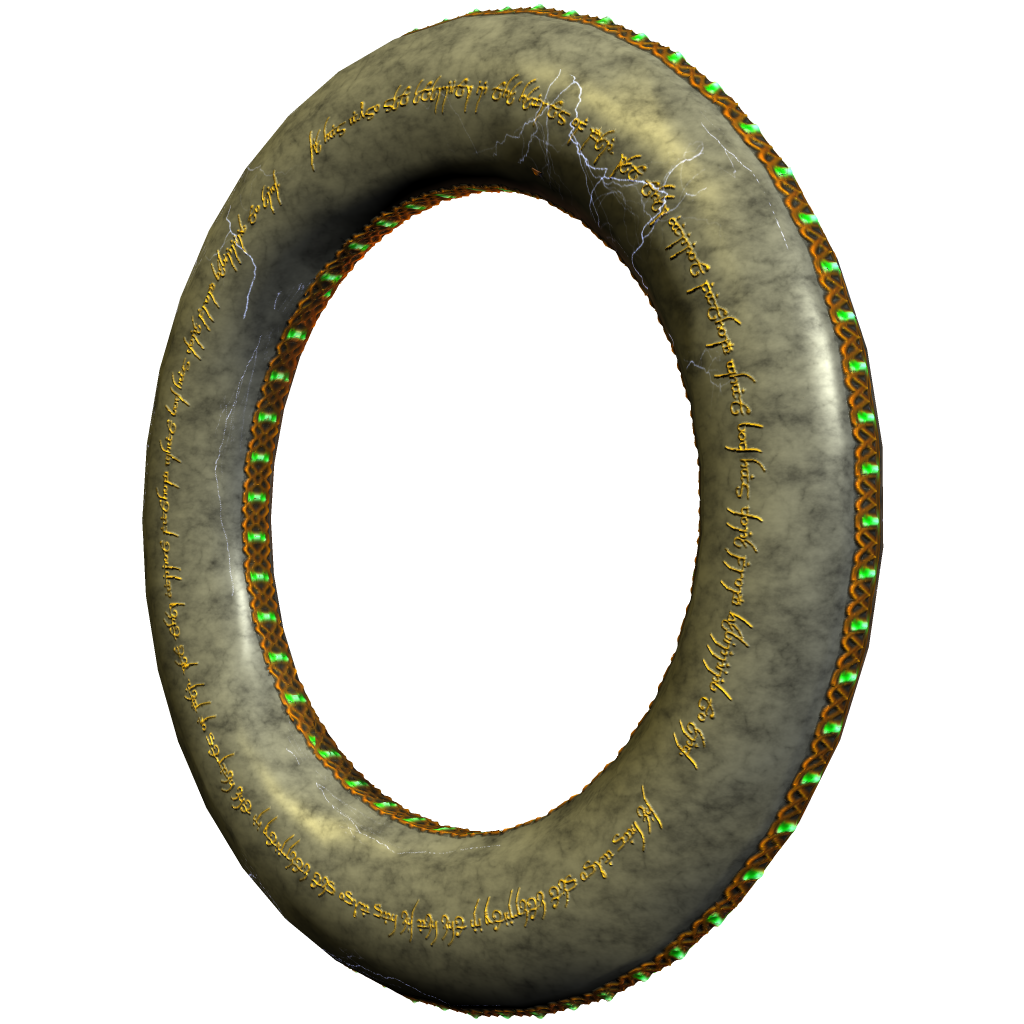
First image shows the material setup to use a displacement map with black producing full negative displacement, grey being neutral, and white producing full positive displacement. The displacement value is 0.08333, but the actual range of displacement values will be from -0.08333 up to +0.08333
The idea is that you can simultaneously have both engraved and raised detail on the same polygon. ^^
Here is a test render of a simple cube demonstrating the technique:
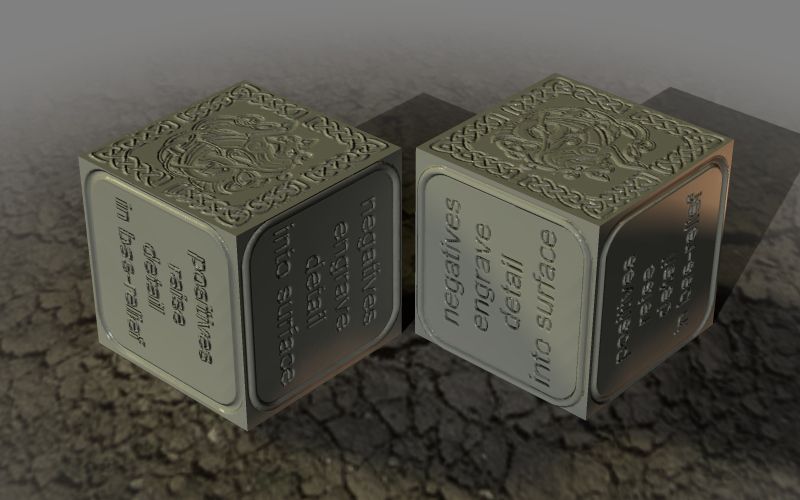
If you only want to do one or the other, use a black background image with grey-to-white detail. If you want to engrave, set the displacement value to a negative number; if you want raised detail, set the displacement value to a positive number. The displacement value should be limited to between -1 and +1. inclusive.
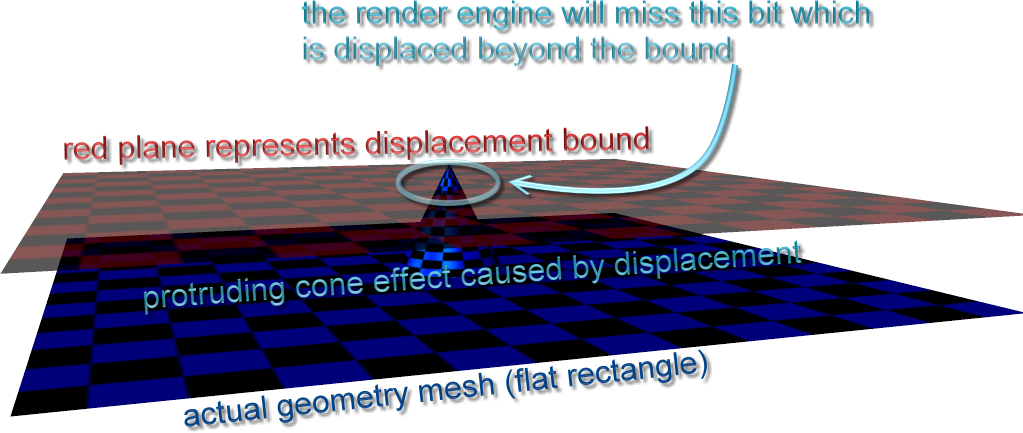
Make sure in the render settings that you have ticked the use displacement maps box, and in the manual render settings, ensure that the minimum displacement bound is equal to -or greater than- your largest displacement value for any material in your scene. If you don't, FireFly may miss some pixels rendering because they are displaced beyond the range it was set to look.
negative displacement engraves:
positive displacement raises detail:
Poser 12, in feet.
OSes: Win7Prox64, Win7Ultx64
Silo Pro 2.5.6 64bit, Vue Infinite 2014.7, Genetica 4.0 Studio, UV Mapper Pro, UV Layout Pro, PhotoImpact X3, GIF Animator 5
seachnasaigh posted Thu, 02 September 2010 at 6:41 PM
Misty, to do second skin clothing, you could try painting in a fade-to-black gradient right along the seams where the body parts meet.
Poser 12, in feet.
OSes: Win7Prox64, Win7Ultx64
Silo Pro 2.5.6 64bit, Vue Infinite 2014.7, Genetica 4.0 Studio, UV Mapper Pro, UV Layout Pro, PhotoImpact X3, GIF Animator 5
MistyLaraCarrara posted Fri, 03 September 2010 at 8:38 AM
Thank you so much!
♥ My Gallery Albums ♥ My YT ♥ Party in the CarrarArtists Forum ♪♪♪ 10 years of Carrara forum ♥ My FreeStuff
ErickL88 posted Fri, 03 September 2010 at 10:53 AM
Great tutorials here, thanks :)
Just one more question.
If I have, lets say, a white (or an almost) shirt and want a black patch on it, maybe with a bit of structure on it, too. So that it would look like fabric as well.
How would I need to set it up, please?
MistyLaraCarrara posted Fri, 03 September 2010 at 11:18 AM

I'm experimenting using Lisa Botanicals (DAZ) to make body art, and then using the render as a second skin layer. It's a tough trick to center the art on their back because of the way the skin texture wraps.
♥ My Gallery Albums ♥ My YT ♥ Party in the CarrarArtists Forum ♪♪♪ 10 years of Carrara forum ♥ My FreeStuff
seachnasaigh posted Fri, 03 September 2010 at 6:57 PM
Attached Link: discriminator filters to drive color and displacement
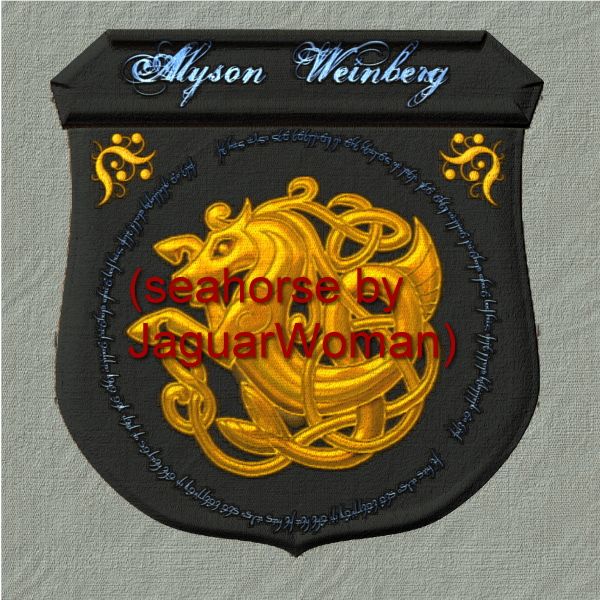
To ErickL88, you can make a texturing image with the shirt off-white and the pocket black, and make a bump/displacement map from the same raw (still has separable objects) image. The pale blue image at bottom gives a rippled woven cloth look by driving the bump input. Personally, I have a habit of composing textures using discriminating filters - it looks hideous in the material room, but can be easily and quickly modified by switching out component images. I can also use higher res images for sharp detail and lower res images for the rest, all on the same texture.
This demo used three images to compose the texture. The color is determined by the nodes highlighted (gold title bar). The rest are creating the combined displacement. The hotlink shows this screenshot at full size.
The pow math nodes (as in exponential power function) make a nearly black/white filter from the original color detail images.
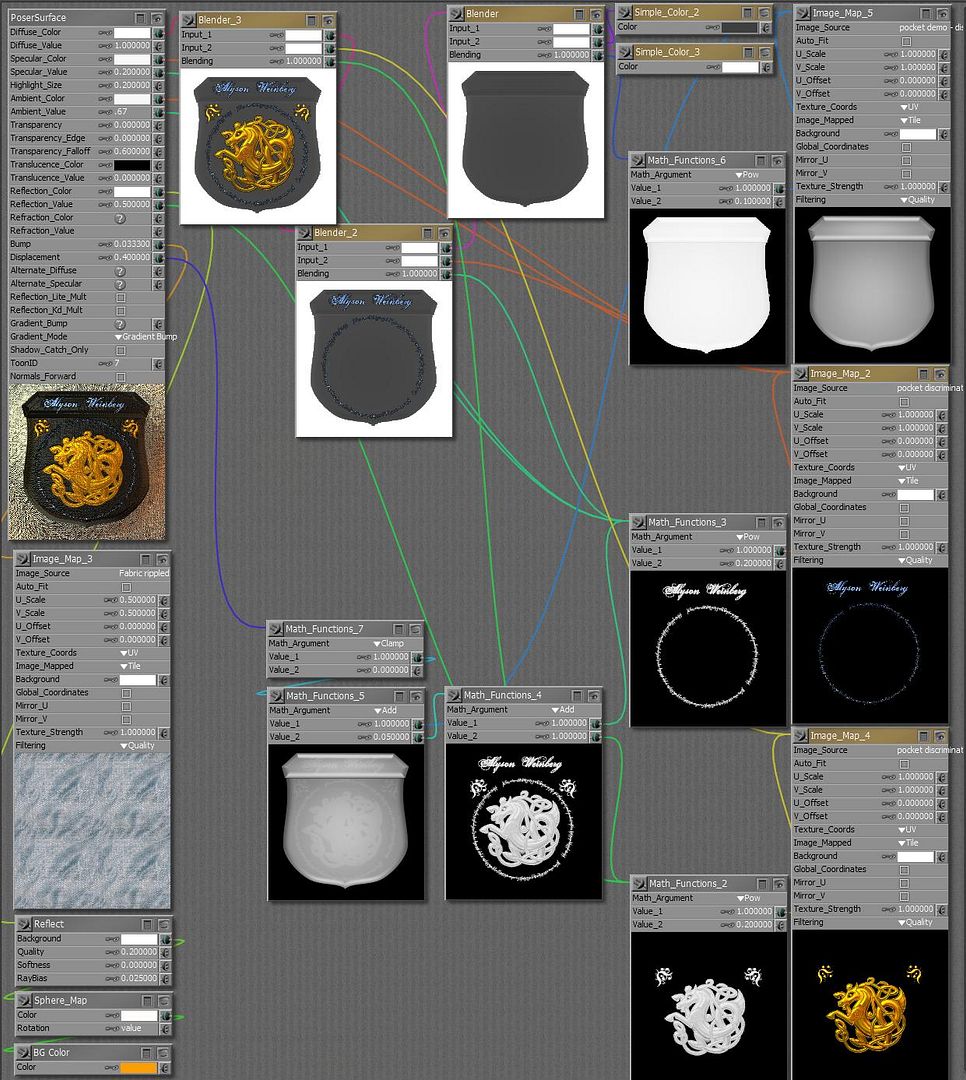
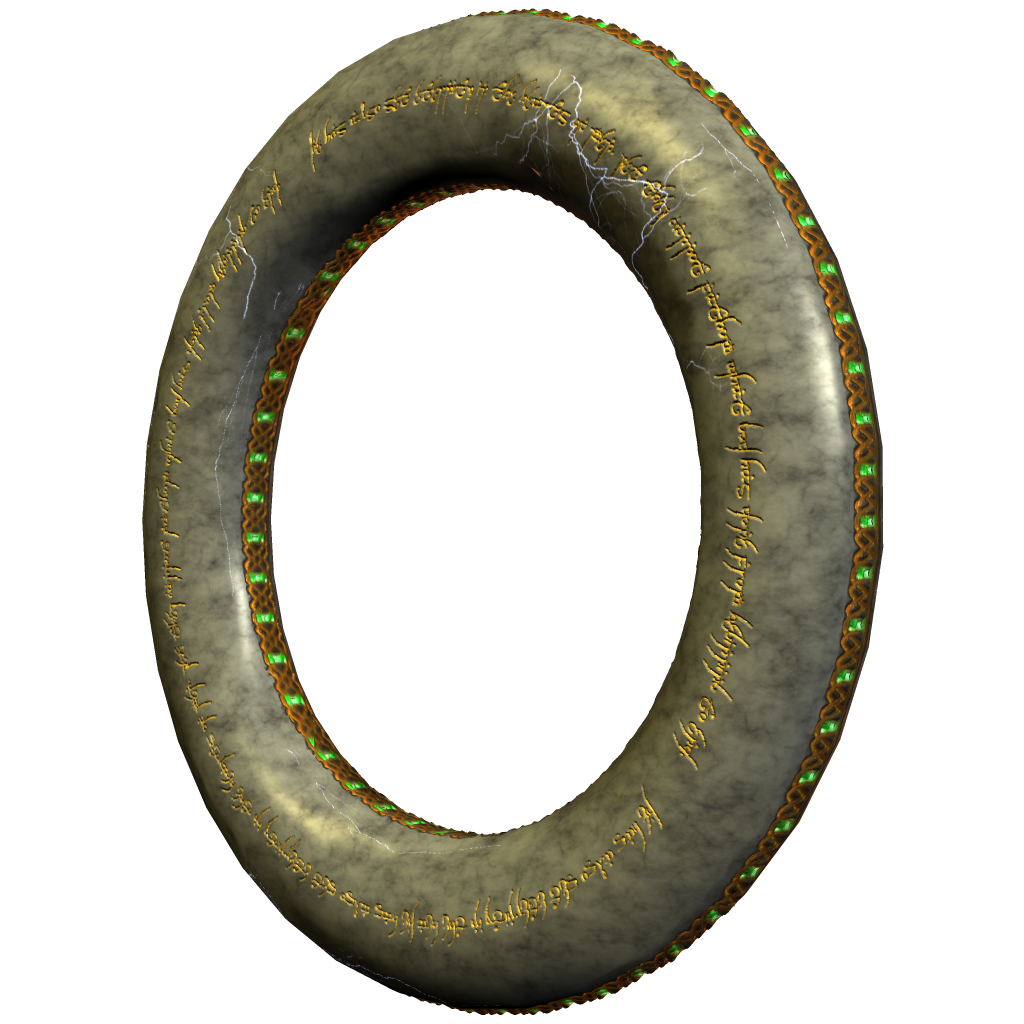
The "model" is a single square, but now it appears to have a pocket with embroidered details.
Considering that this is just a pocket on a shirt, the number of polygons it would take to get this detail would be huge, a major liability when rendering in Poser.
Poser 12, in feet.
OSes: Win7Prox64, Win7Ultx64
Silo Pro 2.5.6 64bit, Vue Infinite 2014.7, Genetica 4.0 Studio, UV Mapper Pro, UV Layout Pro, PhotoImpact X3, GIF Animator 5
seachnasaigh posted Fri, 03 September 2010 at 7:07 PM
Misty, you can use the same raw image (.psd, .ufo) of the tube top to make a displacement map. You may want to experiment a bit with a "3D path object" in the photo program, using a rounded bevel on the tube top object, to get a gentle displacement transition.
You could also use displacement for the vinery, but I would go light on it, and rely mostly on bump. Are you having difficulty because the seam split is down the center of the back, along the spine?
Poser 12, in feet.
OSes: Win7Prox64, Win7Ultx64
Silo Pro 2.5.6 64bit, Vue Infinite 2014.7, Genetica 4.0 Studio, UV Mapper Pro, UV Layout Pro, PhotoImpact X3, GIF Animator 5
ErickL88 posted Sat, 04 September 2010 at 5:08 AM
WOW!
I would have never imagined to get such an amazing answer.
Thanks SO much, seachnasaigh!
This will take a bit of time, to sort out all that, but I'll eventually end up with a bit more understanding, of how things are working in the material room.
Thanks again.

Cyberwoman posted Sat, 04 September 2010 at 11:01 AM
Yes! Thank you! I was just having trouble with a displacement map last night... turns out I was using white where I should have been using black. Thank you again!
~*I've made it my mission to build Cyberworld, one polygon at a time*~
Watch it happen at my technology blog, Building Cyberworld.

Michael314 posted Sun, 05 September 2010 at 3:51 AM
Hello,
even if the is the Poser specific forum, I would like to add that it is software dependent.
Black is neutral for Poser, grey (128,128,128) is neutral for Carrara (and most likely DS as well).
Other software may use even different settings.
Best regards,
Michael
imax24 posted Mon, 06 September 2010 at 11:04 AM
Quote - Hello,
even if the is the Poser specific forum, I would like to add that it is software dependent.
Black is neutral for Poser, grey (128,128,128) is neutral for Carrara (and most likely DS as well).
Other software may use even different settings.
I was going to say, 50% gray in Poser is NOT neutral. It raises the surface a fraction of an inch, which is quite noticeable where one displaced body part ends and a non-displaced one begins. It also can cause render poke-throughs in snug clothing even if you don't see it in preview.
So, if black is neutral and white raises the surface in Poser, how does one create a a displacement depression? There is no blacker than black, is there?
I would use displacement for facial ornaments, etc., where expressions will not carry a prop piercing with it. (Because the nose, chin, cheeks are not separate body parts and the piercing is parented only to the main head).
Displacement is quite effective in this situation. Put the facial ornaments on a layer above the facial texture in Photoshop or the equivalent, Save As a jpg (which merges the layers in the copy). Then make displacement map with the ornaments in white. In the Mat Room, make sure Use Displacement is checked on the face material zone, and play around with the dial to get the right amount of "raise" off the surface. A very small amount is usually best. (Again, you have to render to see the effect).
seachnasaigh posted Mon, 06 September 2010 at 8:17 PM
Quote - ...50% gray in Poser is NOT neutral.
True, but I can use grey as neutral if I manipulate the map with math nodes to both expand the range and re-center the range of values.
Quote - So, if black is neutral and white raises the surface in Poser, how does one create a a displacement depression? There is no blacker than black, is there?
There is! ^^
The original map consisted of shades ranging from black (=0), through grey (=1/2) to white (=1).
I used math nodes to spread the range of values and to re-center it; after manipulation, the values now range from -1 ("blacker than black"), center at 0 (black), and continue to +1 (white).
The negatives engrave, zero leaves the surface unchanged, and the positives raise detail.
If on a given material you only need to engrave -with no need for simultaneously raising detail- then it is easier to simply plug in your displacement map, but set the displacement value to be negative.
Poser 12, in feet.
OSes: Win7Prox64, Win7Ultx64
Silo Pro 2.5.6 64bit, Vue Infinite 2014.7, Genetica 4.0 Studio, UV Mapper Pro, UV Layout Pro, PhotoImpact X3, GIF Animator 5
imax24 posted Tue, 07 September 2010 at 12:42 PM
That's quite a workaround, especially for those who might be intimidated by math nodes. Wouldn't it just be easier for Poser to make 50% grey the neutral point? Did the coders think no one would ever want to use displacement to lower the surface?
MistyLaraCarrara posted Thu, 09 September 2010 at 3:38 PM

♥ My Gallery Albums ♥ My YT ♥ Party in the CarrarArtists Forum ♪♪♪ 10 years of Carrara forum ♥ My FreeStuff

cyberscape posted Thu, 09 September 2010 at 11:06 PM

http://www.renderosity.com/mod/bcs/index.php?ViewProduct=64988&vendor=288865
It makes a conforming bodysuit out of the figures original geometry and allows for extra versatility in second skin outfits.
In the pic above, V3 is wearing the bodysuit with transparencies, reflection and displacement.
IMHO, the second skin has more depth this way.
BTW, the displacement map I used here has white for the wrinkles, gray for the suit and black for the zipper. I set the displacement at 0.2
-------------------------------------------------------------------------------------------------------------
AMD FX-9590 4.7ghz 8-core, 32gb of RAM, Win7 64bit, nVidia GeForce GTX 760
PoserPro2012, Photoshop CS4 and Magix Music Maker
--------------------------------------------------------------
...and when the day is dawning...I have to say goodbye...a last look back into...your broken eyes.