
Sharkbytes-BamaScans opened this issue on Jun 15, 2012 · 39 posts
Sharkbytes-BamaScans posted Fri, 15 June 2012 at 8:26 PM
Okay, so you just purchased Generation X Genesis and aren’t quite sure what to do with your new-found toy? Hopefully, this tutorial will help you out in converting all those Vickie 4 characters you have sitting around into something that you can use with Genesis. This tutorial will cover three (possibly four) areas which I’ve found quite useful in creating my characters.
Very little is needed for all this to work:
DazStudio – I use version 4.0 and I’m not sure if it’ll work with earlier version. I, do, have it on reliable authority that is does not work with 4.5
Generation X Genesis
V4 and M4 Shapes for Genesis – you can get along without this and use V5 or the genesis basic female shape; but the resulting character will not look exactly like the V4 version of the original character. In the screenies at the end, I’ll try to show some of the results you can get using the Iconic Shapes package for Genesis
Notepad ++ for file management. This isn’t necessary but it facilitates editing large amounts of files at the same time. It’s free and you can get it here:
For the purpose of this tutorial, I’m going to install a new character(for me) into DazStudio as it helps me organize my workflow in my brain for the purpose of writing this tute.
Tutorial:
1. Load your base Victoria 4.2 into a new scene.
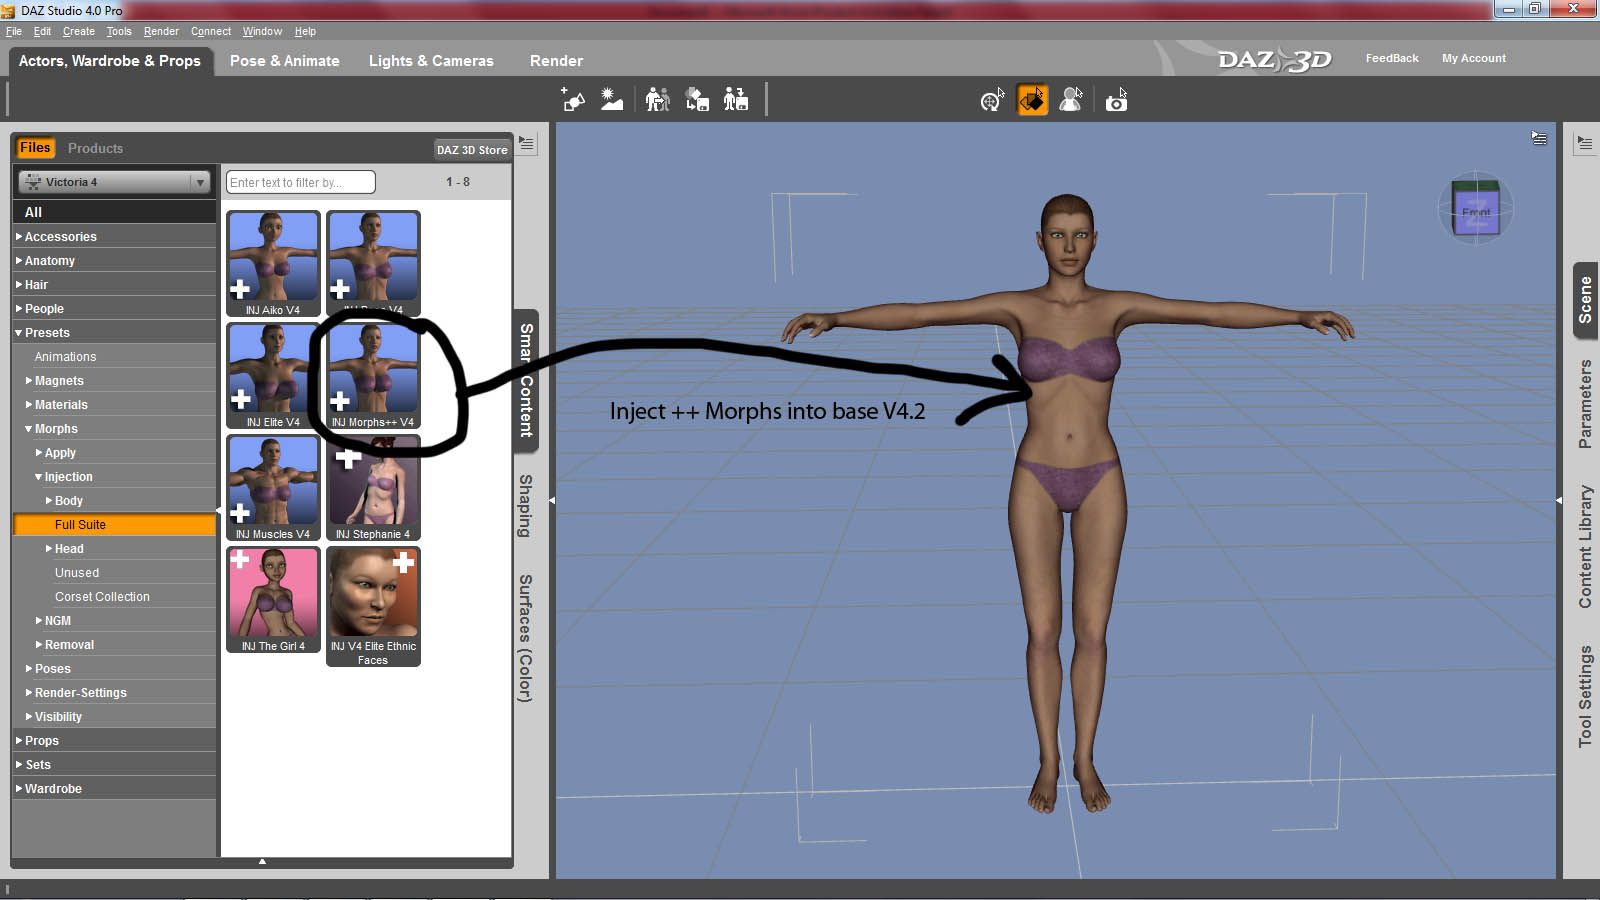
For my sample I’m using the Neela for V4 character by DTG that I got some time ago and just never had the time to use. Since all the original character calls for are the V4 ++ morphs, that’s all I’m going to load into my base Vickie.
3. I go ahead and add the texture for the character when I’m injecting her morphs. You’ll see why in a couple steps. You don’t have to if you don’t want to; but, doing so will allow us to later use a neat function of GenX that will help our Smart Content stay pretty.

4. Then I add on some random hair that will accentuate her face. Note: This is NOT a must and you’ll have to delete the hair from the scene in a later step; but, I find that when I’m making the icons, my characters all look kind of homely without any hair.
5. Then I pose her in a way that will show off her body and face adequately for the purposes of thumbnail creation.
6. Now, since I’m going to be making four individual morphs for Genesis, I’m going to make three individual thumbnail renders. One render for a full character and for a body-only morph. One thumbnail for her breasts(need a good close-up render of the torso from the breasts up) and one for her head only.
8. I make my quickie renders. I turn the slider down to “1” on Quality vs. Speed and then I make a custom frame size of 147x185. You’ll want to save these in a spot you can easily get to.
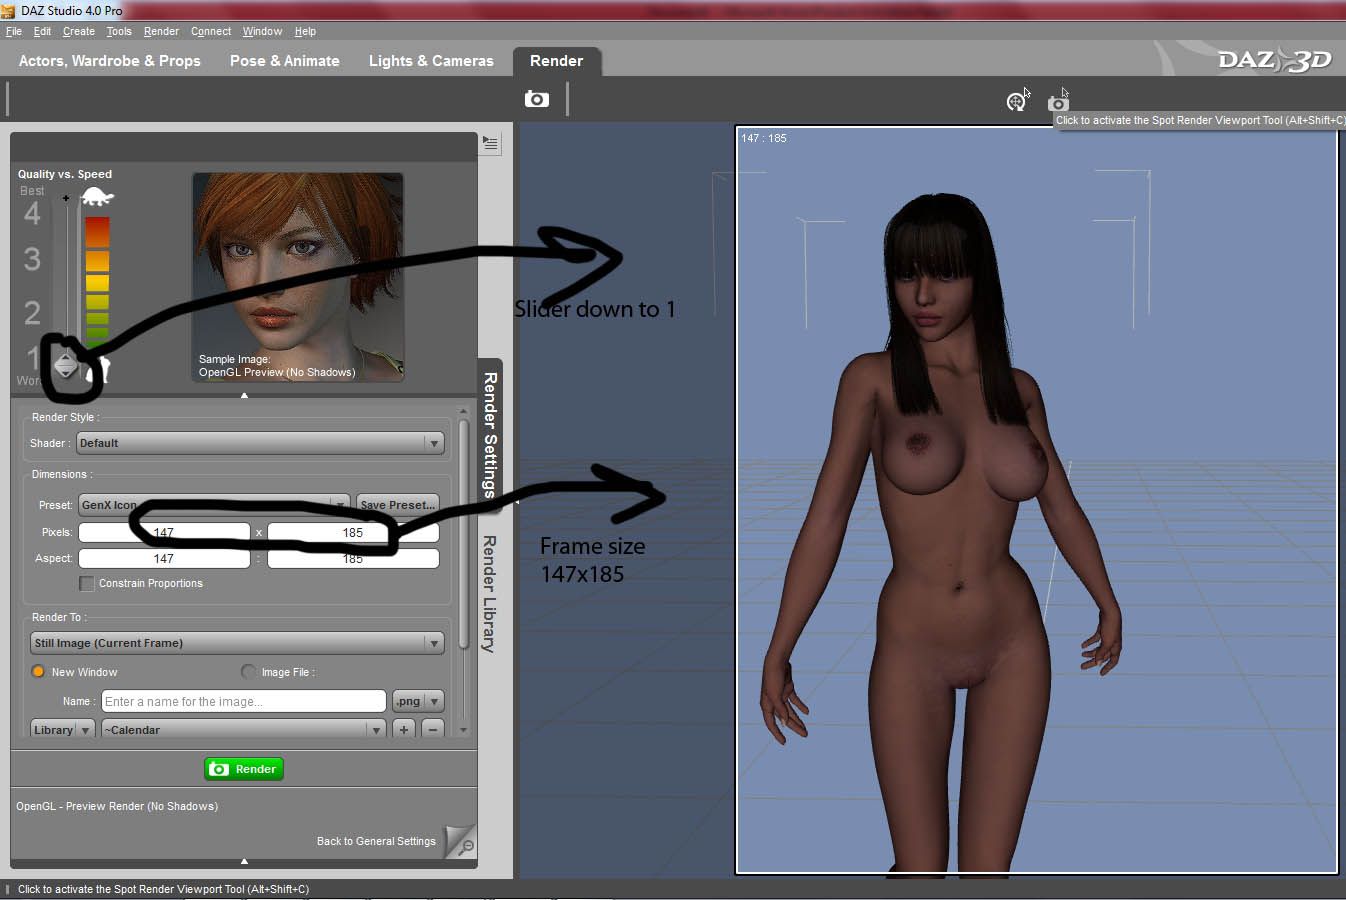
You’ll want to place your character in the bottom/left corner of the frame, zoom in or out whatever is needed to see what it is you’re making the thumbnail of. I give about ½ the frame horizontally, and leave a blank spot of about and 1/8th at the top of the frame. Like this:
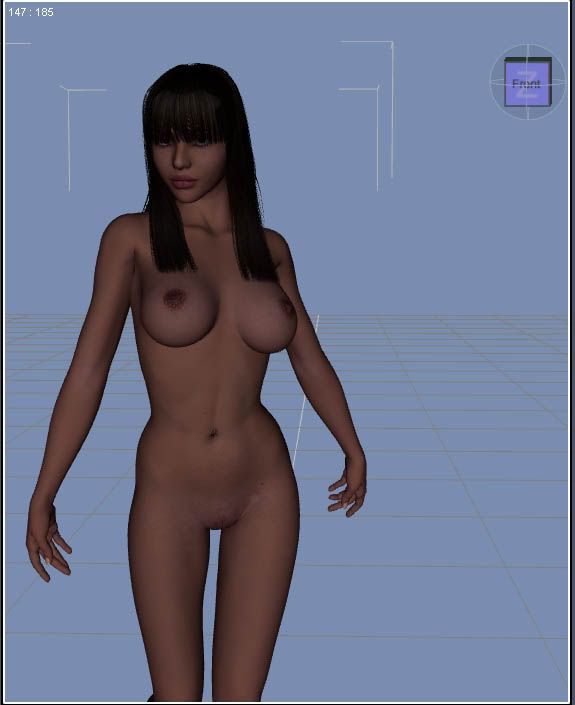
Now I make my three renders. One full-body shot, one head shot and one of just her breasts. Save them all in an easy location. I save mine in the folder we’re going to be working in from here on out. This would be your My LibrarydataDAZ 3DGenesisBaseMorphsD3D Gen XVictoria 4 folder. This is the folder where GenX saves all your converted morphs.
9. Delete the hair out of the scene and export your V4 as a cr2. Name it something you’ll remember and put it in a place where you’ll remember where it is. Now, if your DazStudio cr2 exporter doesn’t remember your file paths, just follow the errors prompts on the cr2 exporter. I say this because my D|S doesn’t have these paths saved and I have to put them in manually every time.
10. Create a new scene, you’re done with Vickie and don’t need her in the scene anymore.
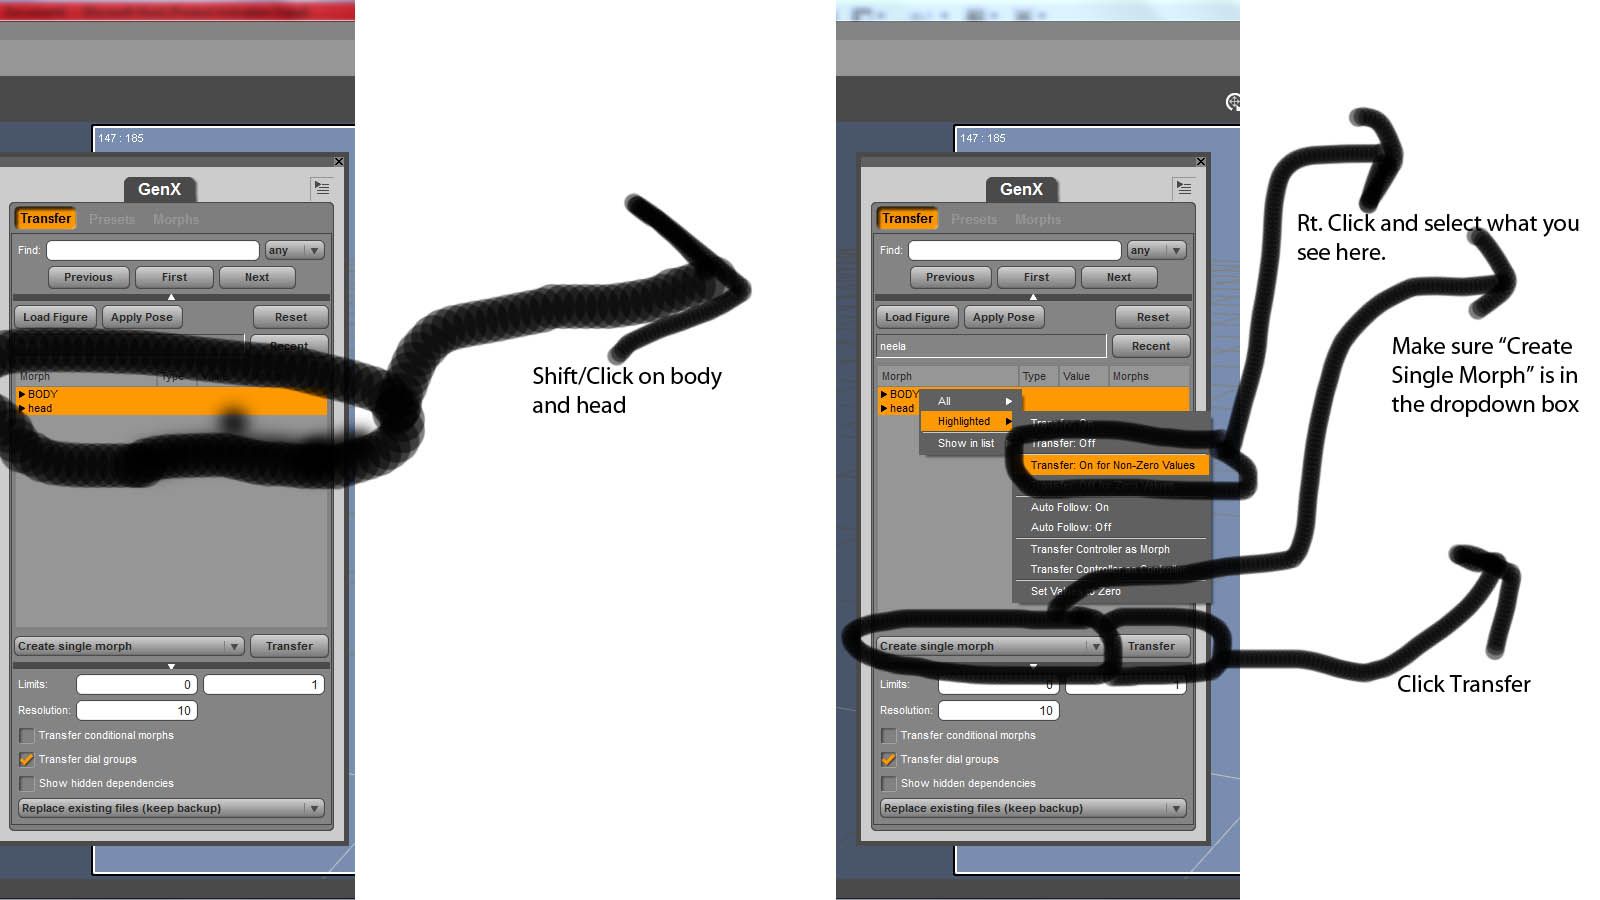
11. Now, we actually start working with GenX. Click on Window|Tabs|GenX and you’ll see the GenX screen pop up. First thing we want to do is load that cr2 you just saved. So click on the “Load Figure” button. In the screen below you’ll see a bunch of lines. The two we’re concerned with the most are “body” and “head.” We’re going to make our full character morph first, then we’ll make a body only, then a breast only, then a head only morph. This is how I do it. You’re certainly free to organize your morphs whatever way you want.
11A. Shift/click on both the body and head lines in the middle box. Then right click and choose “All|Transfer: On for Non-Zero Values”
11B. On the dropdown below the center box, make sure the selection for “Create Single Morph” is showing.
11C. Click the “Transfer” button
12. Next we’ll get another popup screen. This is where we name our morph, where it will show up in our SmartContent and what it’s pic will be. Right at 11c(above) we see the following screen: (pic 6) The best way I’ve found for naming and organizing my morph conversions is to adopt a naming strategy and stick to it. That way everything is easy to find when you go to shaping your characters. So, on this screen, to go with MY naming/categorizing scheme I’m going to enter this into the next boxes:
Box1: Neela
Box 2: I delete what’s in there and write in where I want this morph to show up in my smart content. Since it’s a full character morph I name it Characters ”/2nd Party/Real World/White”
Box 3: Since it’s a full character morph I leave the region as Actor
Then I click on the file button and browse to the full body icon I made in step 8 and select the correct icon pic.
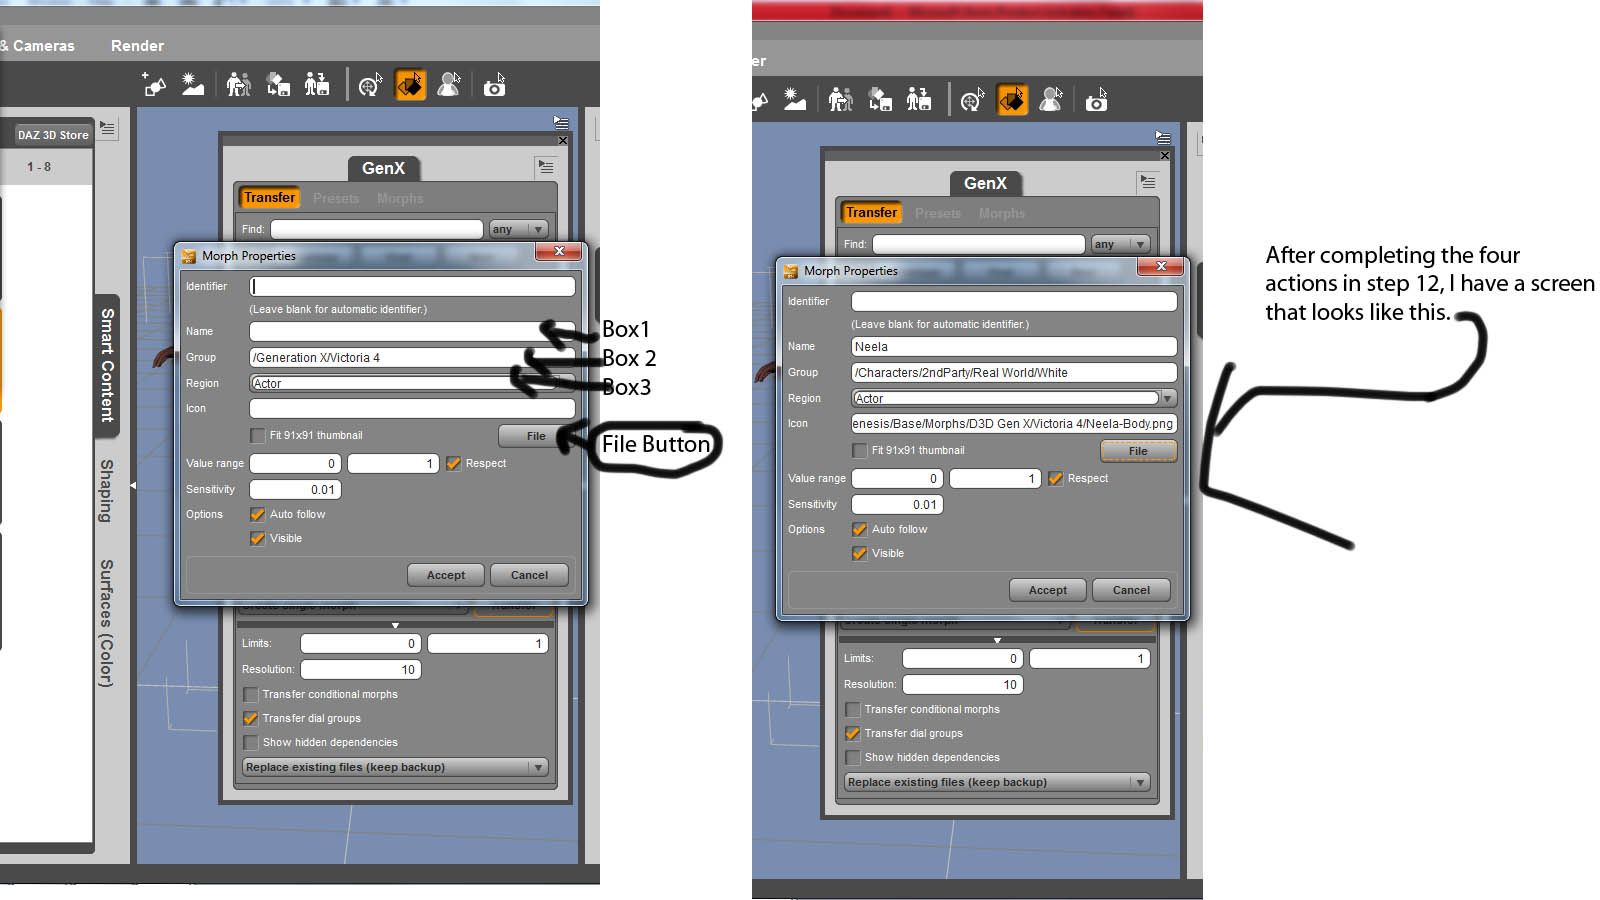
Click “Accept” and GenX works it’s magic.
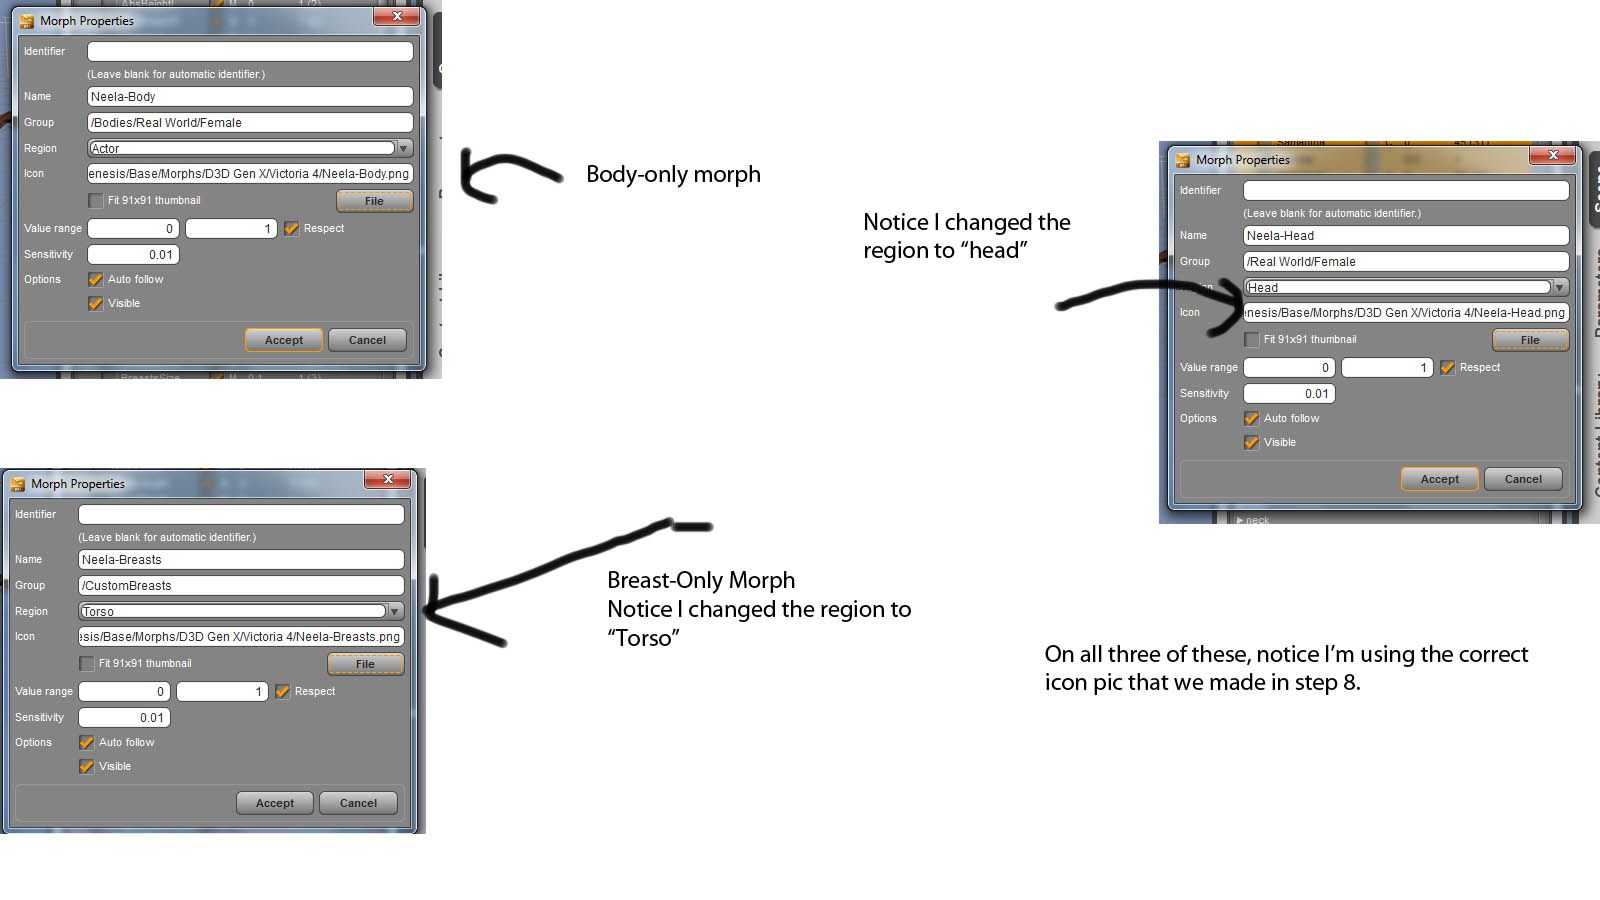
13. Now for the individual body part morphs. I’ll go over this rather quickly since some actions were explained in previous steps.
First we need to deselect the morphs we previously transferred. So, on the GenX main screen, “body” and “head” should still be highlighted. Right click and select “All|Transfer Off”
Now, click the arrow to the left of body and that will expand the morph list to show every single morph that was in the cr2. Even a ton of zero value morphs. We are only going to worry about the morphs that have a value other than zero in the “Value” column. You want to shift click the whole list of morphs in the body area and then right click and select “Highlighted|Transfer: On for Non-Zero Values”
First I go through and uncheck the far left box for everything that deals with the areola, breasts and nipples. I do this since it’s a body-only morph. Then I repeat this step and only I uncheck everything that deals with the body OTHER than the areola, breasts and nipples. This will give me my breast-only morph. For the head morph, make sure that no body morphs are checked in the far left box and make sure your head morphs ARE checked.
14. The next pic shows my screens for how I set up my custom body, breast and head morphs in the second screen where we named and categorized our morphs in step 12 above.
15. Now, we are essentially done with our custom morphs. They ALL get saved to the My LibrarydataDAZ 3DGenesisBaseMorphsD3D Gen XVictoria 4 folder. This folder can get quite gnarly if you use GenX a lot or if you do large suites of morphs like NBM or ++Morphs. I’ll go over how to work with these suites in my second tutorial. So, what I’ve done is organize this directory according to what kind of morph it is.
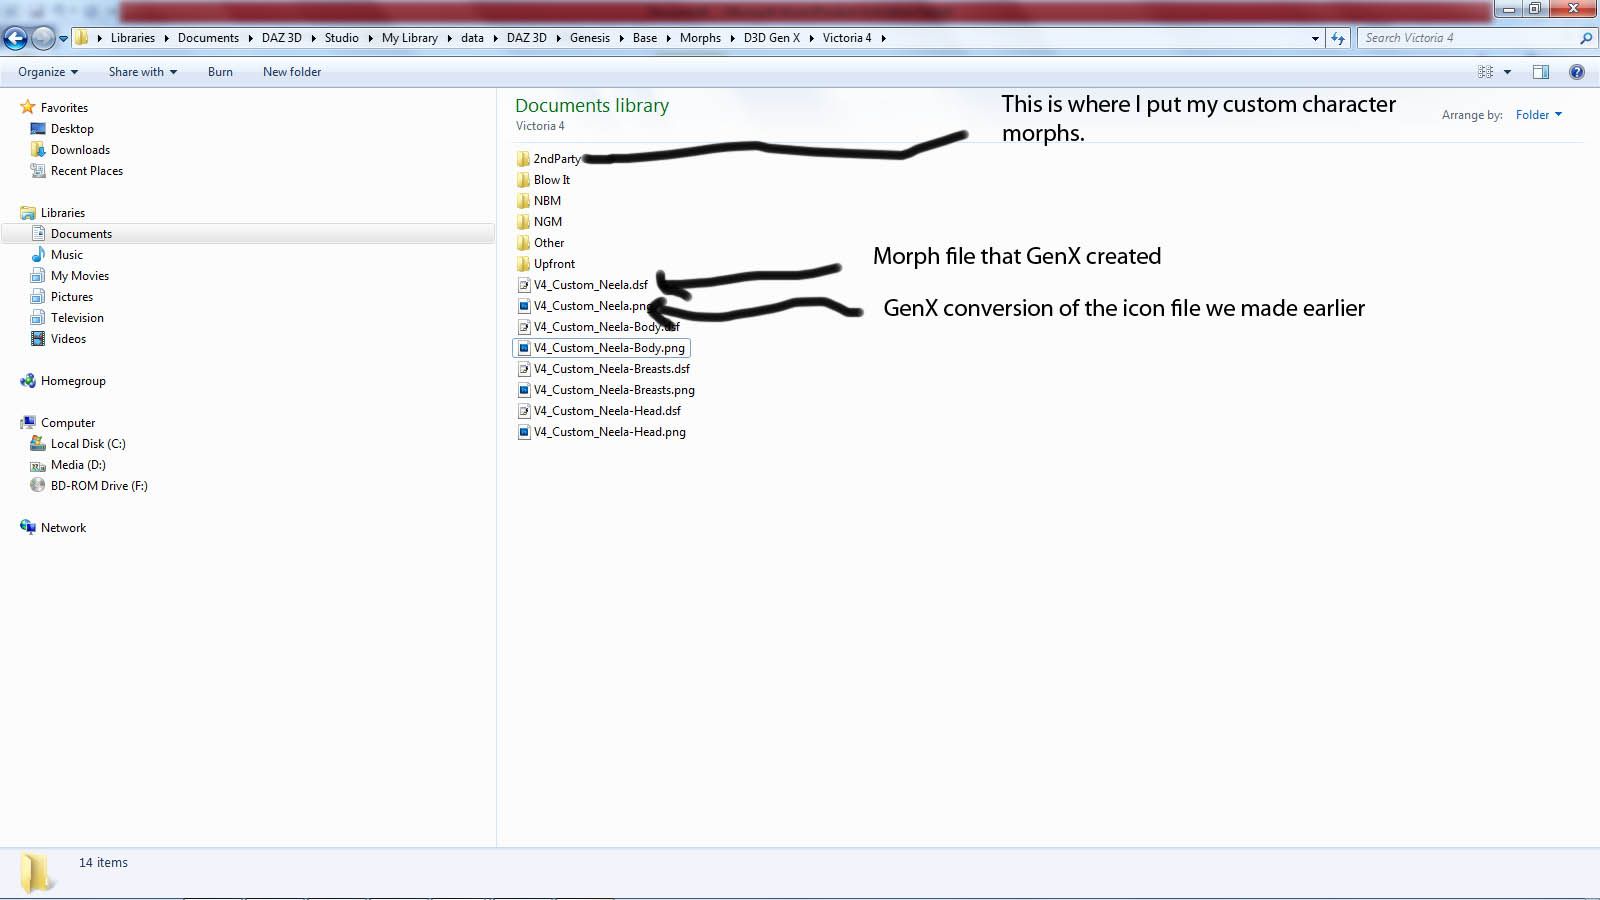
Now, once you’re down to the Victoria 4 folder, any subsequent folders you make are irrelevant. They’ll always show up in DazStudio where we told them to in step 12. One hitch in this is that GenX thinks that the icon for the morph is where it is now. It will always save new copies of your icon in the GenX folder for V4 or M4 depending on who the morph was for. So, we have to tell DazStudio where that icon is when we move it. Since I move all my 2nd party characters to a folder named “2ndParty” we have to edit the dsf file to reflect this location change. One thing extra, using spaces in your directory and file names sucks for editing later. I avoid unnecessary work by avoiding spaces. Use dashes or underscores or no spaces at all to make things easier.
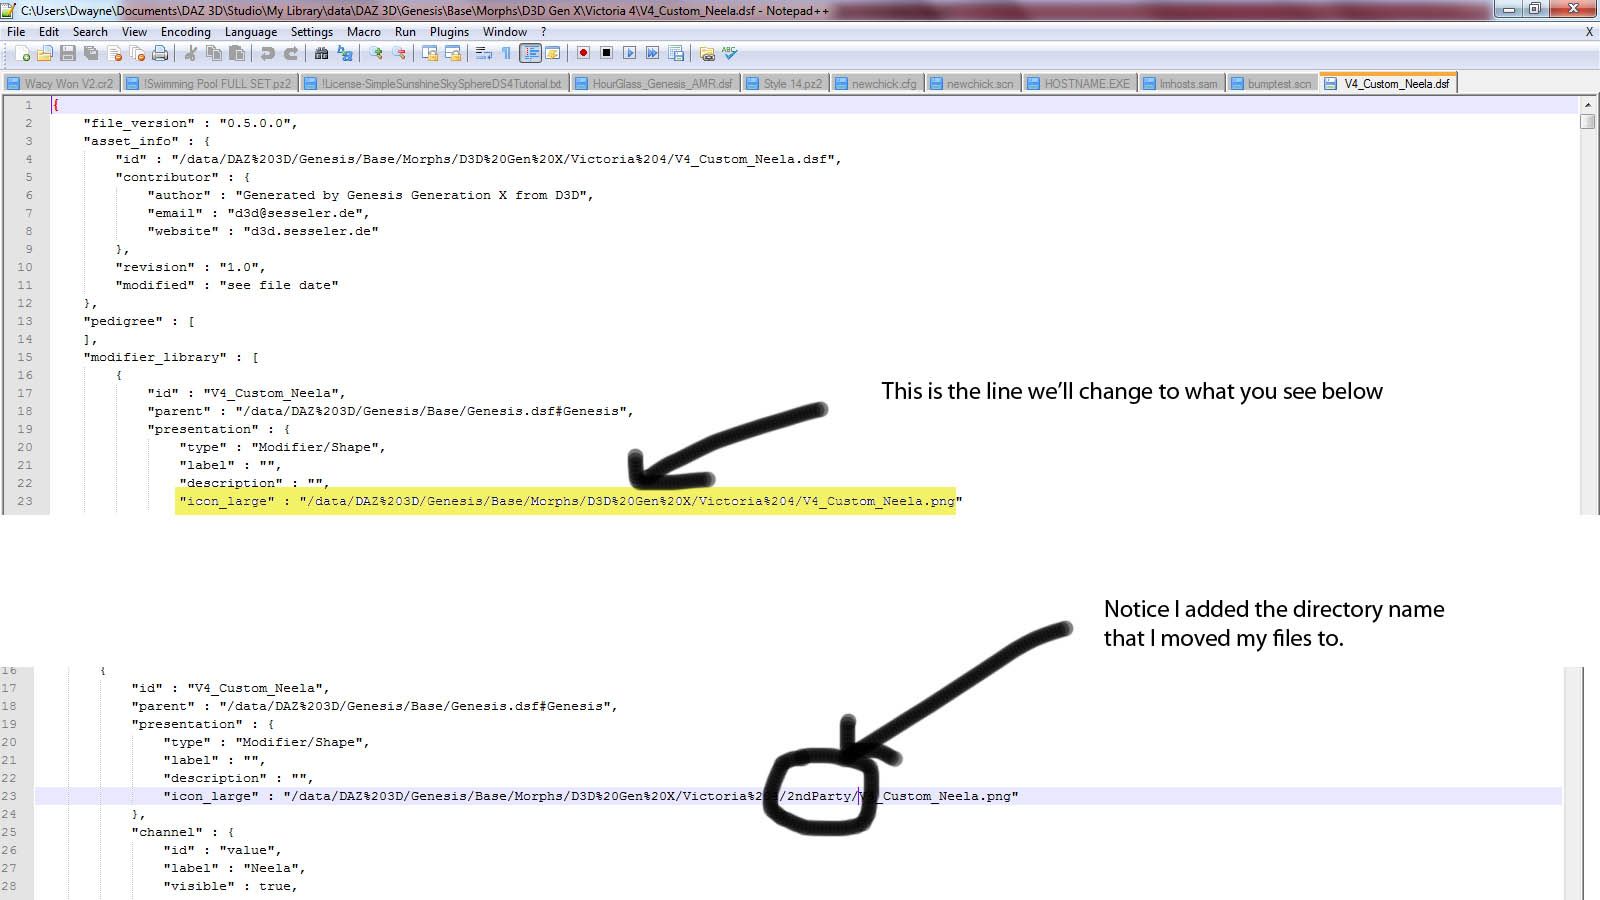
16. Next step, edit the dsf file. Just refer to the screenshot and you’ll see what I do. Open the dsf file with notepad, or write, or notepad ++ if you downloaded already. See the next screenshot to see what I edited in the dsf file.
17. We need to do this with the next 3 dsf files that we made too. This is where the power of notepad++ comes into play. Since we already have a file open in notepad++. Simply highlight the entire “icon large” line that we edited in the previous step and copy it.
Now click up top on “Search|Find in files”
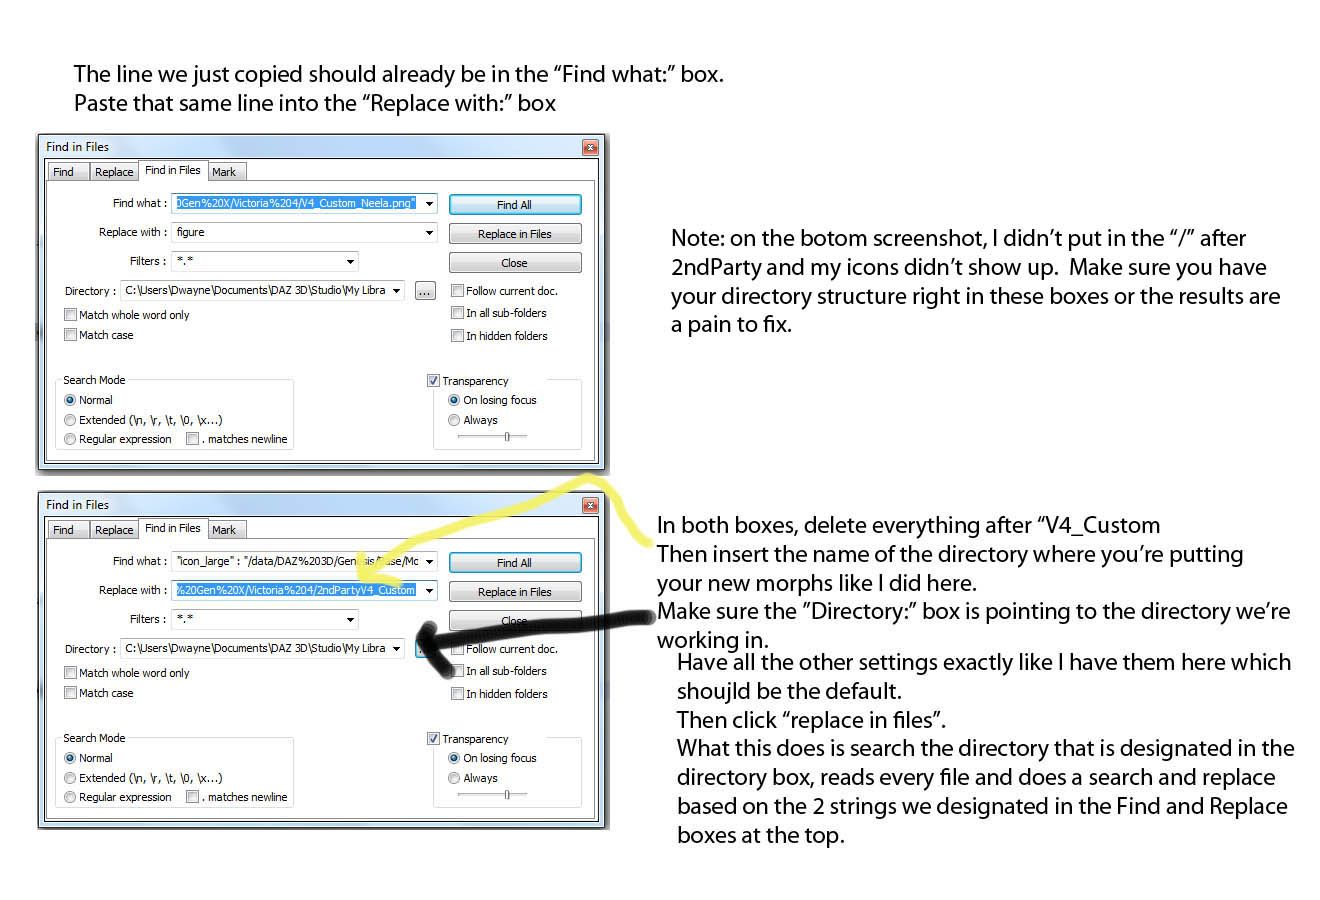
You’re free now to move your files and their corresponding icons to the directories you made for them.
Last step – test our results.
Load up Vickie and repeat steps 1 through 4 above.
Load a blank Genesis and add the same hair and texture
Slide the Victoria 4 slider to 100%
Dial in your custom morphs
All of these will be located on the shaping tab in the structure you created
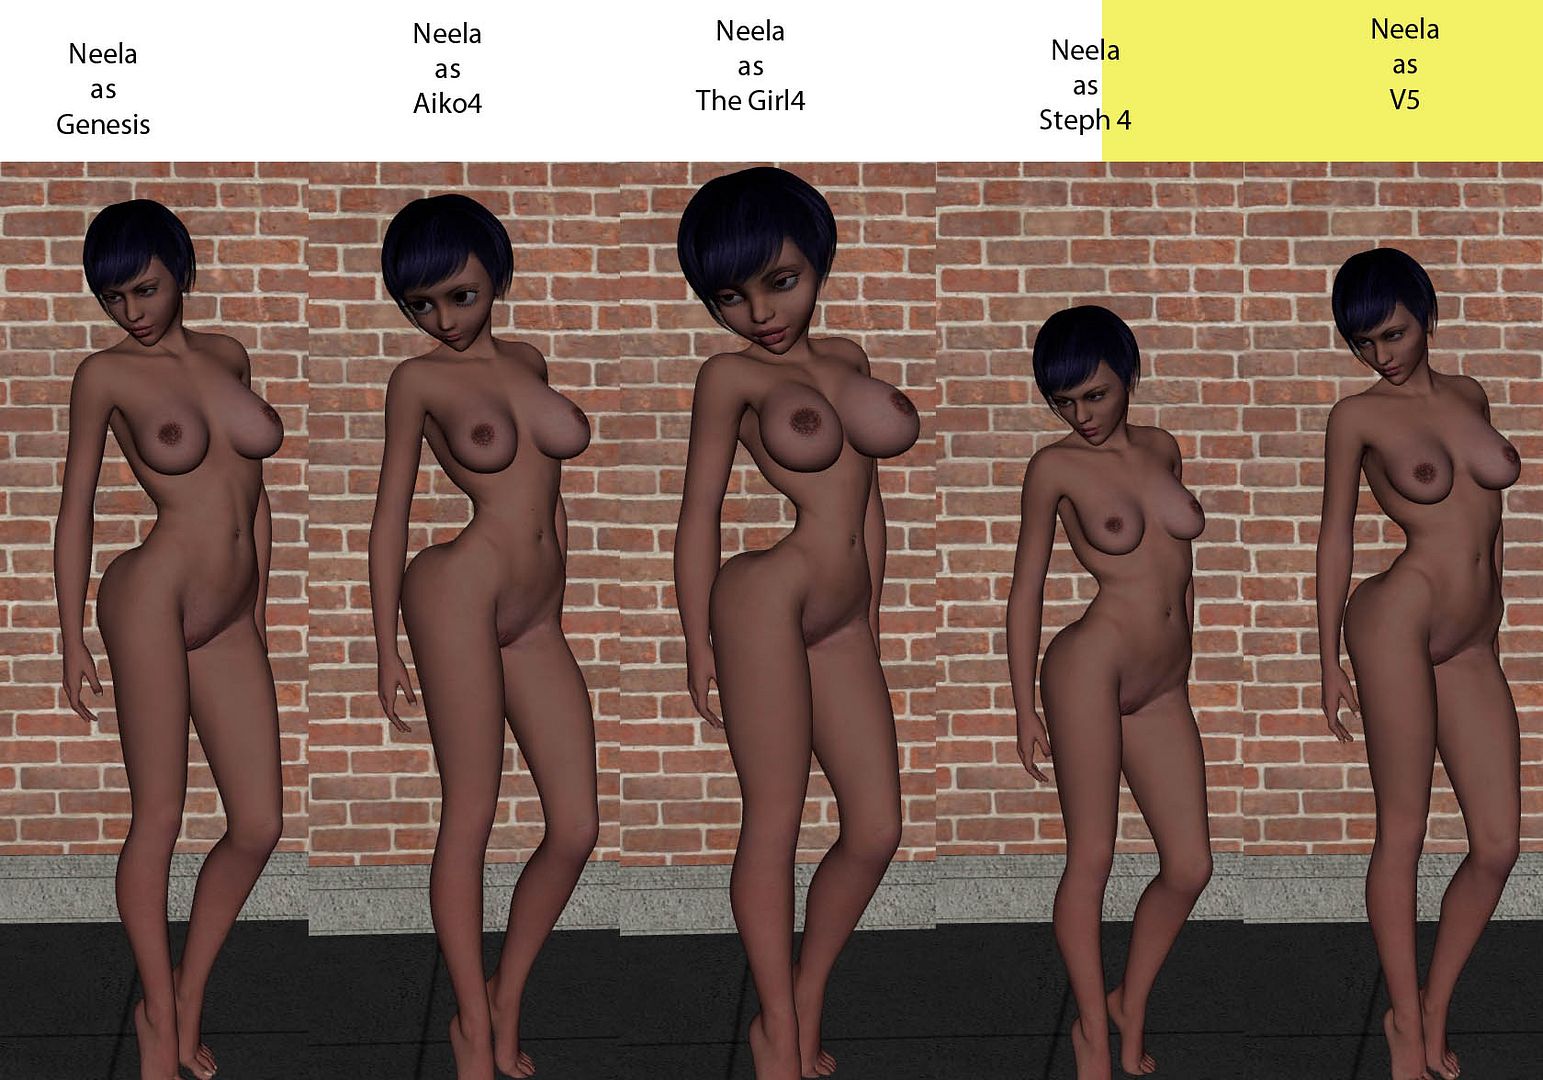
Note: GenX is based on the V4 body shape, so not having V4 shape for genesis can give you some odd results. You CAN use whatever stock shapes you have like V5, Basic Female, or any of the Iconic Shapes for Genesis. Even Freak works.
Look at them side-by-side and see that they’re as identical as you’re going to get.
The last shot I’ve added to this tutorial is some of the things you can do once you have these morphs in your smart content. If you’re reading this tute, you should know the power of Genesis and the amazing combinations that you can make with it. In this last pic, it took me sliding 10 sliders to get five renditions of the same character; and it took me about 15 seconds to do it. Dare ya to do that with Poser.
Hopefully, you found this tutorial informative if not actually helpful. I'll try to whip up a tutorial on using Generation X Genesis to convert entire suites of morphs like NBM for V4 into Genesis morphs soon.
Cheers,
BamaShark
Still desperately searching for the whereabouts of #SDC out in the world of IRC.