xpdev opened this issue on Jan 10, 2014 · 14 posts
xpdev posted Fri, 10 January 2014 at 1:07 AM

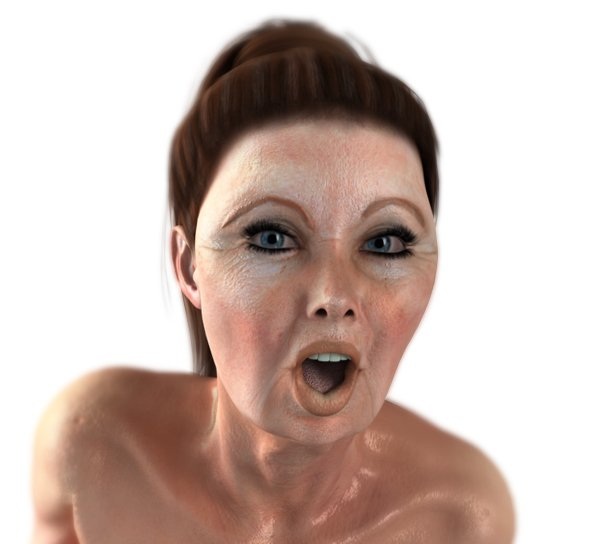
can anyone suggest the right way to get effect made aging (wrinkles) on the skin of any character?
Is there something like maps or other?
Thank you.
example below.
Poser Pro 2014 SR 1 on Windows 7 64
bit
I use IDL, Gamma Correction and EZSkin for all
final renders.
vilters posted Fri, 10 January 2014 at 4:51 AM
Displacement maps are the best to go for such detail.
Poser 1, 2, 3, 4, 5, 7,
P8 and PPro2010, P9 and PP2012, P10 and PP2014 Game
Dev
"Do not drive
faster then your angel can fly"!
xpdev posted Fri, 10 January 2014 at 6:30 AM
I'm sure the solution is the Displacement maps ...
I do not know if there is something ready somewhere on the markets and i'm not able to find something somewhere
helps ?
thanks
Poser Pro 2014 SR 1 on Windows 7 64
bit
I use IDL, Gamma Correction and EZSkin for all
final renders.
DarkElegance posted Fri, 10 January 2014 at 7:39 AM
Quote - I'm sure the solution is the Displacement maps ...
I do not know if there is something ready somewhere on the markets and i'm not able to find something somewhere
helps ?
thanks
RDNA has a lovely set that goes with the OXYGEN system. abit pricey but from the looks well worth it.
https://www.darkelegance.co.uk/
Zev0 posted Fri, 10 January 2014 at 7:59 AM

xpdev posted Fri, 10 January 2014 at 8:33 AM
Thanks ZEV0
" but the MR version is "
what do you mean ?
Poser Pro 2014 SR 1 on Windows 7 64
bit
I use IDL, Gamma Correction and EZSkin for all
final renders.
Zev0 posted Fri, 10 January 2014 at 8:51 AM
Merchant Resource. Basically it contains a layered psd with al the overlays that you drop onto your texture in photoshops CS or gimp. The Merchant Resource also gives you permission to use the overlays in products to be sold.
xpdev posted Sat, 11 January 2014 at 2:20 AM
Where i can find it ?
Poser Pro 2014 SR 1 on Windows 7 64
bit
I use IDL, Gamma Correction and EZSkin for all
final renders.
Zev0 posted Sat, 11 January 2014 at 2:50 AM
Click on the "My Daz store" link on the bottom of my post.
luckybears posted Sat, 11 January 2014 at 7:42 PM
Displassment is the way but make map greyscale and make the dsplacement a minus figiure or you could have the head exploding. Make the wrinkles white and applya guasian blend or in your graphice package to soften the edges. If the wrinkles are dark and the rest whitei t will not work. Wrinkles must be lighter and apply a negative dispacement figure.
Zev0 posted Sun, 12 January 2014 at 12:23 AM
Wrinkles actually make use of both negative and positive details. But agreed, must be based off a neutral colour EG grey (keeping base value identical to actual mesh so no exploding occurs) so both - and + details can be shown.
xpdev posted Sun, 12 January 2014 at 3:08 AM
Quote - Click on the "My Daz store" link on the bottom of my post.
You mean your product "Skin Overlay Merchant Resource Bundle" right ?
Poser Pro 2014 SR 1 on Windows 7 64
bit
I use IDL, Gamma Correction and EZSkin for all
final renders.
Zev0 posted Sun, 12 January 2014 at 3:37 AM
There is the bundle and also the separate Gen4 or Gen5 vesions. So you can choose what works for you.
MikeMoss posted Sun, 12 January 2014 at 11:34 AM
Hi
The other option is to work with your texture map to add the wrinkles to it and then create a displacement map.
To be convincing the texture map needs to show the wrinkles so if you have a texture with smooth skin just putting in the displacement map alone probably won't give you the results you want.
Search online for a good resolution photo that shows the kind of skin texture around the eyes and mouth that you want.
Crop the areas and import them into Photoshop along with your texture.
Position the areas around the eyes and mouth, forehead, whatever, over the texture you are using, on an overlay.
Use Transparency to get them exactly where you want.


Use the eraser tool to blend in the edges, and make any color adjustment necessary to blend the wrinkle image with the face texture and save it.
Once you have a texture that has the wrinkles then use the overlay to create a displacement map by removing the color and experimenting around until you get the result you want when you apply it in Poser.
I usually find that it takes very little displacement to make it look right; it's easy to overdo it.
This will work for any texture on any figure so you aren't limited in what figures you can use it on.
Mike
If you shoot a mime, do you need a silencer?