-
Marketplace
-
Free Stuff
-
Galleries
-
Community
Forums General
- News
- Deals
- Poser
- Contact
Renderosity Forums / Poser - OFFICIAL
Welcome to the Poser - OFFICIAL Forum
Forum Coordinators: RedPhantom
Poser - OFFICIAL F.A.Q (Last Updated: 2025 Feb 03 12:46 am)

Subject: Converting my Cyber Boots to fit the Poser guys - a mini tutorial

Hi it's me again. First thanx for the great tutorial. It worked at first for me then when I tried to do it again the objects, lets say male jeans came out blocky like not smooth even though when I inported the new obj file diredtly into Poser 4 it was smooth??? I was able to do it with the men dress shirt an it came out fine, but now I don't know what in the world I am doing wrong. I change the two lines in the cr2 file indicating were the new obj file was. Like I said it worked for the shirt I did, but now when I open it up into my sceen to put on my figure it's not smooth? I really don't understand what is going on. I looked at the obj file in two other 3d programs, Amapi 6 and Bryce 5, they are smooth, why is poser making the object bumpy? Please help before I tear my hear out??? Thanx Lunar
Report Post
-
- Renderosity Page
- Renderosity Communities
- Blender 3D
- iClone
- Poser Users
- Poser Software
- Become an Affiliate
- Memorials
-
About
- About Us
- Contact Us
- Team
- Policies
- Terms of Service
- Copyright Policy
- Refund Policy
- Licenses
- Standard License
- Extended License
Privacy Notice
This site uses cookies to deliver the best experience. Our own cookies make user accounts and other features possible. Third-party cookies are used to display relevant ads and to analyze how Renderosity is used. By using our site, you acknowledge that you have read and understood our Terms of Service, including our Cookie Policy and our Privacy Policy.
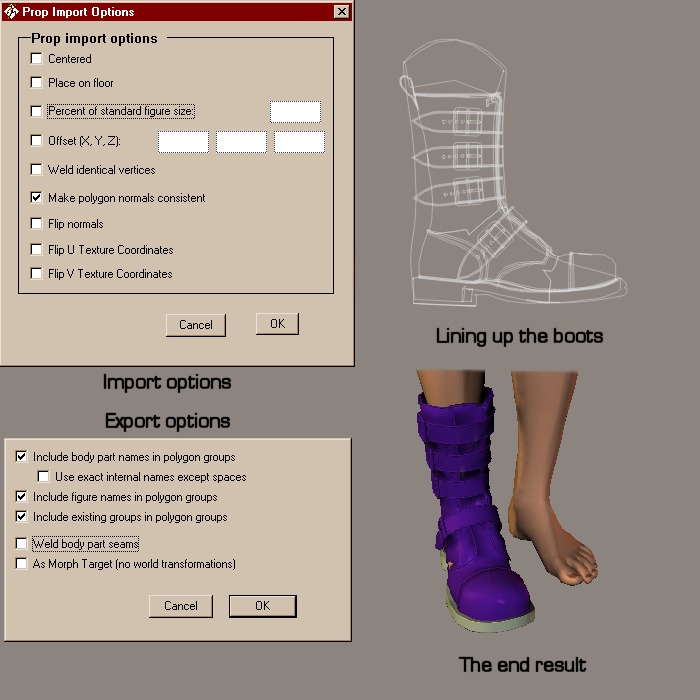
I only have 15 megs of free webspace, so I have to be miserly with it ;) This little tutorial will save me some webspace, and should serve as a relatively painless introduction to creating new figures using existing .cr2 files. Okay, converting the P4Fem Cyber Boots to fit the P4Male... You're going to be using the following files (assuming that you've already downloaded and installed my P4Fem Cyber Boots): Runtime/Geometries/gpscreations/P4FcyberbootR.obj Runtime/Geometries/Poser4Clothes/Shoes/cowBootR.obj Runtime/Libraries/Character/Clothing-Male/Cowboy BootR.cr2 Okay... File > Import > Wavefront OBJ Navigate to Runtime/Geometries/gpscreations/ and load P4FcyberbootR.obj Check the screenshot for the import options you need to select/deselect. File > Import > Wavefront OBJ Navigate to Runtime/Geometries/Poser4Clothes/Shoes and load cowBootR.obj Select Outline as the document display style, then use the Left and Front cameras to help you scale and move the P4FcyberbootR object until it fits neatly over the cowboy boot. The numbers that I settled upon were: Scale 115% xScale 107% xtran -0.007 ytran 0.010 ztran 0.005 When you're satisfied, delete the cowBootR object and then; File > Export > Wavefront OBJ > Single Frame Make sure P4Fcyberboot is checked in the Hierarchy Selection window as the object you want to export, then save this new object into the gpscreations folder as P4McyberbootR.obj (see screenshot for export options). Now open up the Cowboy BootR.cr2 file in you favourite text editor (if this is the first time that you've dabbled with .cr2 editing, you might want to make a backup copy of the original file just to be on the safe side). Look for the following line; figureResFile :Runtime:Geometries:Poser4Clothes:Shoes:cowBootR.obj which appears twice near the beginning of the file. You need to change both occurrences to figureResFile :Runtime:Geometries:gpscreations:P4McyberbootR.obj Now save the file as Cyber Boot MR.cr2 (both notepad and wordpad allow you to save the file with the .cr2 extension intact. If the program that you're using insists on changing the extension to .txt you'll have to change it back by renaming the file in Explorer.) Go to whichever library you saved the .cr2 into and you'll see 'Cyber Boot MR' beneath a 'shrugging guy' icon. Load up the new figure, then try conforming it to the P4 Male. If you like the result, change the material settings to something more appropriate and resave the boot to the library. Now all you have to do is repeat the process for the left boot and hey presto, a pair of Cyber Boots for the P4 Male:) The conversion principle should be the same for Mike, but as I don't have the Michael Clothing Pak, I'm hoping that somebody who does will be able to suggest a suitable .cr2 and some conversion numbers. Well, here endeth the longest post I've ever made :) I must have re-read this thing half a dozen times, but I'm sure some goof or omission will have slipped through. I'll be keeping an eye on this thread for the next few hours, so if you're confused/bemused/perplexed by any of the above, post a question and I might be able to clarify things. Hope this turns out to be useful. gps