Renderosity Forums / Poser - OFFICIAL
Welcome to the Poser - OFFICIAL Forum
Forum Coordinators: RedPhantom
Poser - OFFICIAL F.A.Q (Last Updated: 2024 Sep 19 11:01 pm)

Subject: My first hair painting...


If you are doing the painting in a program that supports layers, don't forget to create a duplicate layer of your finished hair painting, to make a 'cast shadows' layer. You may have to adjust the shadows to 'fit' the curves of the body, but it does add that extra bit of realism to the pic.
RosemaryR
---------------------------
"This...this is magnificent!"
"Oh, yeah. Ooooo. Aaaaah. That's how it starts.
Then, later, there's ...running. And....screaming."

I like the overall technique you have used. The main body of the hair is first class.
Coppula eam se non posit acceptera jocularum.

If you're using Photoshop there is a built in effect, "Drop Shadow". You can vary the angle, distance and density to help it blend naturally with the render. There are also various plugin effects which offer similar or sometimes better effects. I guess there's something similar in PSP.
Coppula eam se non posit acceptera jocularum.
Layer effect "Cast Shadow" works quite well, as SamTherapy said. The shadows will then be a dependent part of the hair layer..which can be useful.
Personally, I like to create a whole new layer (Copy layer, select by layer transparency, fill with a grayish tone...) in order to do further manipulations that are separate from the hair layer... like 'moving' the shadow in places, to follow the 'surface' of the skin, rather than have it track the hair at all points.
But it's up to your preference/abilities. The main point I really wanted to make was to have shadows...that being one of the things that get forgotten when people first start doing hair in post-render painting.
RosemaryR
---------------------------
"This...this is magnificent!"
"Oh, yeah. Ooooo. Aaaaah. That's how it starts.
Then, later, there's ...running. And....screaming."
There are hair brushes, which you can buy. However, if you have PhotoShop 7 or above, you can adjust the brushes which come with the program and get a lot of mileage from them. First, load all those extra brush sets. [ and ] will shrink or enlarge the brush size on the fly so you can change between strokes. You can take a bunch of little slashes or dots and change their dispersion and angle and all sorts of stuff. After you have played enough with what you have, and understand how the brushes work, then you can more readily decide among the Marketplace brush sets. (Those are good for adding pearls or magical stars or other things which don't come in PS itself.) First, a couple of general comments about the image: you appear to be missing a portion of tree trunk above her right shoulder (something is cut off abruptly there). Also, if you are using a richly-textured photo for the sky above the trees, you should use the cloning/healing tools to bring some of that texture below the tree branches, too. So some tips on your hair above. Remember that highlights are based upon your light sources. With trees in silhouette, it would seem that most light is behind her, except that some light is coming from the front. Can't tell from the eyes with the fake painted-on highlights (it is in the texture map, and I have complained about this practice often). Determine where your light sources are. Paint from dark to light, and put the light hairs where they would catch the light. The hairs you have going over her face all read much the same for length and thickness of clumps. Vary the strand size. If all the hair is 18" from crown to tip, then the ones falling over her forehead should be longer, too. Unless her hair is dyed, the eyebrows and head hairs are usually the same colors. (Beard color might be darker, but eyebrows match for the most part.) HTH, Carolly
Privacy Notice
This site uses cookies to deliver the best experience. Our own cookies make user accounts and other features possible. Third-party cookies are used to display relevant ads and to analyze how Renderosity is used. By using our site, you acknowledge that you have read and understood our Terms of Service, including our Cookie Policy and our Privacy Policy.
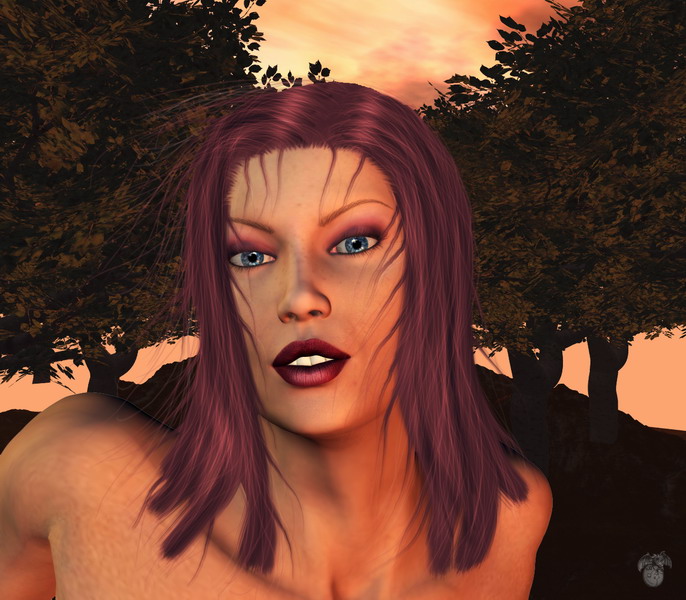
I just bought a Wacom Grapihre 3... and tested it with the wonderfull tutorial from Crasher... The pose isn't really beautifull (the right shoulder...), but what i wanted to do is the hairs... I see there are two errors (haireline on the left and the hairs on the top...)... but i would like to know if i'm on the right way or not... And naturally, how i could improve my hair painting... Thnaks a lot !!!