Sat, Oct 5, 6:15 AM CDT

Renderosity Forums / Poser - OFFICIAL


Welcome to the Poser - OFFICIAL Forum

Forum Coordinators: RedPhantom

Poser - OFFICIAL F.A.Q (Last Updated: 2024 Oct 05 5:47 am)


Subject: 57 Chevy from http://www.3dcafe.com to Poser / Texture


Sickboxx ( ) posted Sat, 12 November 2005 at 8:44 PM · edited Sat, 05 October 2024 at 6:11 AM

Hello!

I was looking for an 57 Chevy for a nice Render, and I found, to my surprise, on http://www.3dcafe.com --> Free Stuff --> Vehicles a 57 Chevy!
For FREE!!!
Now If got a problem...because the car has no texture and in the material room, it is just one big block of Model (you can't even put a different color on the doors... allways the whole model will get changed).
BUT...in 3d Studio Max... I can go into the element level... and THERE I can manipulate everything of the car.

My Question:
What do I have to do to make this seperation work in Poser, so I can texture those elements individually ?
Is there a way?

THX for reading

Sickboxx


pakled ( ) posted Sat, 12 November 2005 at 8:49 PM

to be honest, you might drop by the 3ds max forum. In other programs (I only know Wings, and to a limited extent, Blender), you select faces, and apply colors, or differentiate areas that will take a given texture.
Once you've determined that, you UVMap it..I'm on real shaky ground with UVMapping (done it twice, now..;), and can apply jpg textures to the given area. There's also a UVMapping forum here, and tutorials galore, on how to do it right.
Since it's a car, you could probably get by by setting textures for the body, and use the color button (or whatever that paint can thang is called) to apply 'car colors' to it.
good luck, Jim..

I wish I'd said that.. The Staircase Wit

anahl nathrak uth vas betude doth yel dyenvey..;)


Robo2010 ( ) posted Sat, 12 November 2005 at 8:57 PM · edited Sat, 12 November 2005 at 9:03 PM

You can use the grouping tool in Poser. Take each part of the vehicle for certain texturing. Then export as "Obj" file, then import the "Obj" file.

Message edited on: 11/12/2005 21:03


wheatpenny ( ) posted Sat, 12 November 2005 at 9:15 PM
Site Admin

Assign materials to the different material zones in Max then export it and select the option to preserve texture coordinates. That sould export it with separate material zones accessible in Poser.


Jeff

Renderosity Senior Moderator

Hablo español

Ich spreche Deutsch

Je parle français

Mi parolas Esperanton. Ĉu vi?


Robo2010 ( ) posted Sat, 12 November 2005 at 9:53 PM · edited Sat, 12 November 2005 at 9:54 PM

file_304217.jpg

Grouped and textured in Poser(6). Only did partial of the car. Now, I have a project on my hands. Had problems with grouping on the hood. Those parts on the hood are to be chrome.

Message edited on: 11/12/2005 21:54


stahlratte ( ) posted Sat, 12 November 2005 at 11:27 PM

I imported the Chevy into Wings and then exported every single part separately back into Poser.
Was a lot of work but the only thing that worked for me.

Image hosted by Photobucket.com

stahlratte


YngPhoenix ( ) posted Sat, 12 November 2005 at 11:42 PM · edited Sat, 12 November 2005 at 11:50 PM

You can export the model as a wavefront object first. Then load it into UVMapper and select Edit- new UV Map. This way the individual groups are already listed and all you have to do is select by each group and assign it a material name. Then save the model (I always use a different name when saving just in case I need the original). This will save you a lot of time.

Message edited on: 11/12/2005 23:50


wheatpenny ( ) posted Sun, 13 November 2005 at 12:07 AM
Site Admin

Here it is after being loaded in Rhino, assigning materials, then re-exporting it and loading it in poser


Jeff

Renderosity Senior Moderator

Hablo español

Ich spreche Deutsch

Je parle français

Mi parolas Esperanton. Ĉu vi?


YngPhoenix ( ) posted Sun, 13 November 2005 at 1:41 AM · edited Sun, 13 November 2005 at 1:46 AM

file_304219.jpg

Here's an example of it after exporting to wavefront object then loading it into UVMapper to assign materials. Once done save model and import into poser. Just find a method that you would be comfortable using and just have fun(this image is not the greatest and is only to show you the above said method)

Message edited on: 11/13/2005 01:46


bevans84 ( ) posted Sun, 13 November 2005 at 4:27 PM

file_304220.jpg

I loaded in in POVRay which let me export it in obj format with the grouping intact. I'm working on it in Shade now, there's a few things that aren't correct. The dashboard isn't correct, the headlights, and the body parts need to be just a tad smaller so it will show seams at the hood, doors, trunk, etc. Need to work on the chrome also. I would appreciate tips on realistic chrome.


stahlratte ( ) posted Sun, 13 November 2005 at 5:28 PM

"I would appreciate tips on realistic chrome."

I used a reflection map:

Image hosted by Photobucket.com

(Rendered in Poser ProPack. No Postwork)

stahlratte


lmacken ( ) posted Mon, 14 November 2005 at 12:27 AM

file_304221.jpg

I open Dudley's 'econocar' in Shade 7 using Poserfusion (just to remove the bumpers/trim), and save as an OBJ. Back in Poser 6, Import it and copy the material from the original (with or without 'Make polygon normals consistent'). The original materials are reversed in order, and renamed generically. The texture map is a bitmap flooded with the Coral Red color, so UV mapping shouldn't be a problem, yet it has this camouflaged effect. Any thoughts?


flyerx ( ) posted Mon, 14 November 2005 at 2:36 AM

Attached Link: http://mysite.verizon.net/sfg0000/

file_304222.jpg

You can use PoseRay http://mysite.verizon.net/sfg0000/

Load the model and in the materials tab press Groups->Materials and the model will have materials based on the groups. See attached image of new materials with random colors.

Then set the material properties and save the model as an OBJ file for later use.

good luck

FlyerX


Robo2010 ( ) posted Mon, 14 November 2005 at 7:53 AM

I just downloaded PoseRay. New to the program. Wondering how do you export to Obj file (Save)? I went into Obj output tab and their is nothing about export.


bevans84 ( ) posted Mon, 14 November 2005 at 8:46 AM · edited Mon, 14 November 2005 at 8:54 AM

file_304223.jpg

You just save the file in the obj tab, it saves as an obj.

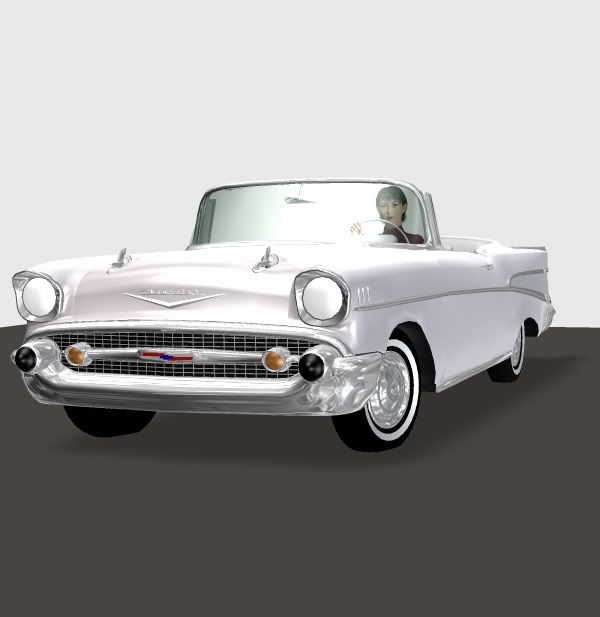
Pretty much done with it now. It exported from Shade to Poser with the grouping, but each material setting will have to be reset.
This rendered in Shade 8 in 37 seconds with ShadeGrid. Seems like everytime I export an obj from Shade for Poser I have to go the the Material room and reverse normals for each material group, but only if you're rendering in FireFly. The P4 render engine doesn't seem to have a problem.

Message edited on: 11/14/2005 08:54


Sickboxx ( ) posted Mon, 14 November 2005 at 9:12 AM

file_304224.jpg

Hello! Thx flyerx for that tip. PoseRay really did the trick! THX A LOT! There is still some grouping to do to texture the inner sides of the doors and the tachos. But, MAN, I am a big step nearer to my goal. Renderosity.com IS the best commonity ...cool ideas from you other guys too! There ARE many ways to Rome! THX pakled THX Robo2010 THX bevans84 THX stahlratte THX lmacken THX martian_manhunter THX YngPhoenix You guys are the best!


bevans84 ( ) posted Mon, 14 November 2005 at 9:29 AM · edited Mon, 14 November 2005 at 9:33 AM

Just noticed that I used POVRay in my post when I meant PoseRay. That's what happens when you get old. :) I've got POV-Ray here, I wonder what it does?

Message edited on: 11/14/2005 09:33


Privacy Notice

This site uses cookies to deliver the best experience. Our own cookies make user accounts and other features possible. Third-party cookies are used to display relevant ads and to analyze how Renderosity is used. By using our site, you acknowledge that you have read and understood our Terms of Service, including our Cookie Policy and our Privacy Policy.