Renderosity Forums / Poser - OFFICIAL
Welcome to the Poser - OFFICIAL Forum
Forum Coordinators: RedPhantom
Poser - OFFICIAL F.A.Q (Last Updated: 2025 Jan 11 12:18 am)
Subject: Using a belt in the cloth room?
I've tried something similar. The results weren't perfect, but there are a few things that might help: - Make sure that the belt is double-sided. The inside of the belt should have its normals facing the tabard. - You could try modeling the belt closely around the tabard in frame 1 and have it shrink to fit the figure in the end frame. Then you can try to constraining vertices in the tabard to the belt. - Since the belt has rather sharp edges, it might be a good idea to enable the "object vertex against cloth polygon" and "object polygon against cloth polygon" options. Maybe increase the amount of calculations per step from 2 to 4 or 5. Good luck!
The pen is mightier than the sword. But if you literally want to have some impact, use a typewriter
Thanks for the thoughts. The belt is a double sided object with thickness, but I found that it had split vertices around one edge; I've welded those, and subdivided it a couple of times to smooth the sharp edges. I did try the additional collision options, but maybe in conjunction with the smoother belt and increasing the steps it might work better. I'll give this a try later on. Another thought that occurred was to do it in stages - export the partially cinched tabard, and run another simulation on that starting with a smaller belt.
Try selecting the belt via material settings and make it either a one of the 4 settings (regids decorated and so on)in the bottom left corner of the screen. I did it and it worked, but forget which of the 4 I used. I'm pretty sure it was rigid decorated, which I know you also should use for buttons.
Try selecting the belt via material settings and make it either a one of the 4 settings (regids decorated and so on)in the bottom left corner of the screen. I did it and it worked, but forget which of the 4 I used. I'm pretty sure it was rigid decorated, which I know you also should use for buttons.
Another suggestion (I was working on a very similar thing recently, and this worked for me): I used a several-stage approch (I forget how many now, 'cos I was experimenting saving cloth, trying different way etc for quite a while, but I got there in the end.. But the basic thing that I (eventually) did was use the torus as the constriction object for the 1st stage. Took some time getting the right settings for the torus, but because the torus is rounded it squeezed the cloth better. Exported the cloth as .obj, imported and started again. kept the torus in its final setting, made it invisible, used a single-sided belt ('cos I was just playing around) and didn't bother to add the belt to the "collide with". It worked quite well... Cheers, Diolma
Englishbob, I've run into similar problems in the cloth room. Apparently Pose conciders "closed" areas as faces, in this case the upper and lower opening of the belt. If a cloth passes thru one "face" of an object Poser then disregards collision with other faces of the same object. One thing that has worked for me is to make the belt a non-closed object. Create a small break in the belt and either overlap it or just have the ends meet. mike

"excremental improvement" - no sh*t! LOL! Looking good! That tabard starts to look very nice indeed. And one of the advantages of starting with a simple flat plane is the UV mapping: it'll mimic real cloth perfectly.
The pen is mightier than the sword. But if you literally want to have some impact, use a typewriter
That was the original idea behind it, yes, you got me there. ;) I wanted to go on to make some, er, less ventilated clothing using just pre-mapped planes as you would with real cloth. But it's going to be uphill all the way, and since I know next to nothing about sewing I'm starting at a disadvantage. :/
Privacy Notice
This site uses cookies to deliver the best experience. Our own cookies make user accounts and other features possible. Third-party cookies are used to display relevant ads and to analyze how Renderosity is used. By using our site, you acknowledge that you have read and understood our Terms of Service, including our Cookie Policy and our Privacy Policy.


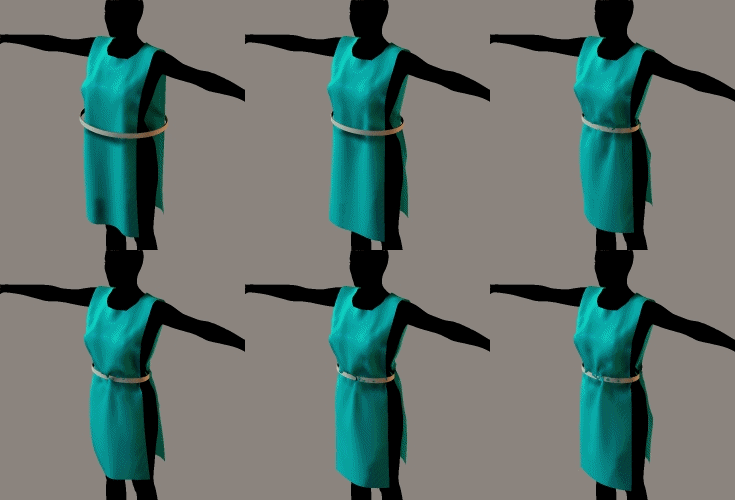
Has anybody tried this, and were you successful?I have this simple tabard, I suppose you'd call it, made from a flat plane. That was draped in the cloth room, exported and used as the cloth for the next step. A simple belt shrinks during the simulation, the intention being to gather the tabard in around the waist. But no matter what I do, the tabard always passes through the belt.
I've tried different collision settings, and different cloth settings, with no joy.
In the animation above, the belt is at its final size at the end of the simulation, and you can see that the cloth hasn't settled fully. So I tried another run, with a lot of settling frames after the belt finishes shrinking, and in that one the tabard passed right through the belt and returned to its original shape. :(
Any ideas?