Renderosity Forums / Photoshop
Welcome to the Photoshop Forum
Forum Moderators: Wolfenshire Forum Coordinators: Anim8dtoon
Photoshop F.A.Q (Last Updated: 2025 Feb 11 11:38 am)
Our mission is to provide an open community and unique environment where anyone interested in learning more about Adobe Photoshop can share their experience and knowledge, post their work for review and critique by their peers, and learn new techniques while developing the skills that allow each individual to realize their own unique artistic vision. We do not limit this forum to any style of work, and we strongly encourage people of all levels and interests to participate.
Sharpen your Photoshop skill with this monthly challenge...
Checkout the Renderosity MarketPlace - Your source for digital art content!

Subject: Creating a Sine Wave?

Attached Link: Sine brushes
Sorry, got my wires crossed. Ignore the brushes“Music is harmony, harmony is
perfection, perfection is our dream, and our dream is
heaven”
Henri Frederic Amiel
Thanks anyway. Those ARE cool brushes, just not what I need for this project. Thanks again ZannZen. :o)
Kort Kramer - Kramer Kreations
I've tried but I guess I must not have the touch, it get too rough and too uneven. maybe I'll try using more guides.
Kort Kramer - Kramer Kreations

Attached Link: Sine wave in photoshop
I found a bit of javascript to get a sine wave into photoshop. I've only tested it in CS2. for a bit of control you can edit the values of width and phase. I used height 400, width 1000 and phase 80. set your brush size and colour before you run it or you can comment out the stroke command (5th line from the end) After you run it you can try the fish transform to get an increasing or decreasing amplitude. [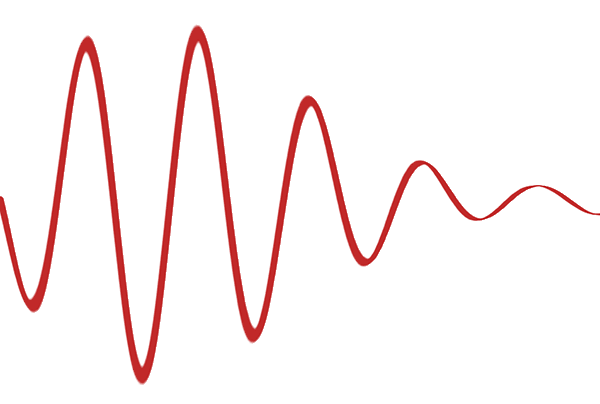](http://s119.photobucket.com/albums/o128/prixat/?action=view¤t=sne.gif)regards
prixat


You'd need the line to remain the same thickness hey? I was thinking you could make a uniform wave with the filter wave and then go to edit /transform/skew, perspective or transform but this would make you line thicker at the end where the waves are higher...
Lucie
finfond.net
finfond.net
(store)


You can also do this using the pen tool and still get the mechanical result.
Start with an image larger by scale than what your finished image will be.
(allows for more control)
Go to "View / Show / Grid".
(You can adjust the gridline size & sub-divisions under "edit / preferences")
- use your pen tool set for paths.
Click on the far left on a vert/horz cross line, same on the far right.
-switch to "add anchor point tool"
Set a point on evenly counted verticle lines on the same horizontal line.
-still using the add anchor tool
click once on the first added anchor, move it with your down keyboard arrow key to a cross line you desire, repeat this with the others in between the end points.
When this is done, check the handle controls on each anchor and make them spaced apart evenly / horizontally.
You can then right click on the screen, select "Stroke Path". This will paint the path with whatever width-color-and style you have set for your brush.
Right click on the screen and choose "delete path".
You can now turn off the grid by reversing the process mentioned above.
With some practice, this is a very easy, reliable and controlable process.
Have fun
ICM
___
Ockham's razor- It's that simple

Vanderlee has some great plugins. My favorite is Camouflage, so far the best for making a variety of camo textures for clothing.
Poserverse The New Home
for NYGUY's Freebies

Privacy Notice
This site uses cookies to deliver the best experience. Our own cookies make user accounts and other features possible. Third-party cookies are used to display relevant ads and to analyze how Renderosity is used. By using our site, you acknowledge that you have read and understood our Terms of Service, including our Cookie Policy and our Privacy Policy.

Anyone know how to do this in Photoshop or Illustrator? I am working with CS1 and have used the wave and zig zag tools, but am not getting the effect I want. This is going to be for a logo and aI need it to be long with the peaks and valleys starting off low then increasing in size. The attemps so far have produced either a very uniform wave, or uneven results, not very effective for a slick logo. Above is the best I could come up with in Photoshop so far, using the Zig Zag filter, but is still not quite what I am looking for. Anyone have any ideas, or a link to a tutorial? Thanks. ~kortKort Kramer - Kramer Kreations