Renderosity Forums / Photoshop
Welcome to the Photoshop Forum
Forum Moderators: Wolfenshire Forum Coordinators: Anim8dtoon
Photoshop F.A.Q (Last Updated: 2025 Jan 14 1:57 am)
Our mission is to provide an open community and unique environment where anyone interested in learning more about Adobe Photoshop can share their experience and knowledge, post their work for review and critique by their peers, and learn new techniques while developing the skills that allow each individual to realize their own unique artistic vision. We do not limit this forum to any style of work, and we strongly encourage people of all levels and interests to participate.
Sharpen your Photoshop skill with this monthly challenge...
Checkout the Renderosity MarketPlace - Your source for digital art content!

Subject: Obi-Wan Kenobi, You're My Only Hope
I found this, which I think has something to do with it, but I don't understand it.
http://www.persimmongrove.org/IFFSnoop/IFFSNew1.html
I'm sure everyone has different ideas on this. Since the color you are trying to get rid of is white you can use the magic wand tool with contiguous unchecked at top. Click on the white edge. It will select all white areas throughout the image. You can then use the quick mask to erase the selection of white that will happen with mostly on collar. Go back to normal mode when happy with selection and hit delete key.

Attached Link: http://www.ononesoftware.com/detail.php?prodLine_id=4
their forum rules allow me to post links to items, if somebody asks. I thought I had mask pro installed, but apparently not. maybe somebody else can mask the image using it. I daresay several of the pros use this all the time.
I still like to know what the guy at
http://www.persimmongrove.org/IFFSnoop/IFFSNew1.html
meant though. So if anybody could demystify it it would be greatly apprishiated!
The orginal file is here,
http://www.filedropper.com/pc180029
yeah, it was knockout that I had. it was o.k., but
I hadda uninstall it for some reason. maybe the selection process was brain-dead
or something. like having to do two lasso selections; one inside the feather edge and
one outside the feather edge. it'd be worth buying maskpro just to avoid that IMVHO.
the persimmon guy is referring to some novice 3d users' problems with poser and other
apps that produce a 3d render with a z-buffer (mask, alpha channel). if they do it right
there's no problem, but if they use the wrong render settings, they'll get an halo of
the same colour as the render background/backdrop.
re: the persimmon guy at
http://www.persimmongrove.org/IFFSnoop/IFFSNew1.html
Thank you Nancy, for your time! But if you go to the end of his tutorial you see that the manual jobb of deleting the Halo is done by the smudging tool, INSIDE the model. Somehow he has arranged so he can edit the mask by EXPANDING it, while seeing the result.
It seem to me that that techique would be useful, not only for getting rid of halos, but many other things as well.


These are the steps I took in my method;
Import image to Photoshop. In the layer palette add a plain black background so that the imported image layer is just above it. Selecting the image make a copy layer of it placed on top of the original image. In the menu chose Image->Adjustments->Brightness/Contrast and slide contrast to +100. Do this three times. Then again in the menu chose Image->Adjustments->Threshold and click “OK”. You now have reduced the image to black/white. This will be used as a mask to trap light areas around the hair. But we must first get rid of the none-essential areas that we don’t want taken out such as the face, neck and sweater. We do this by using a hard brush to fill those areas with solid black. Once we have all the light areas around the hair we then need to convert the layer to an alpha mask in the channel palette by selecting the Red channel and making a copy of it. Using the magic wand we select the black area behind her shoulder and then using Ctrl+Shift+ click on alpha channel we add the alpha mask to the selection. We invert the selection pressing Ctrl+Shift+I and use this to lift the entire person from the background. This will get most of the highlight from the hair out but leaves some artifact colors. We select a dark color from the subject’s hair and using a small brush we paint over the off-colored artifacts. We then set blur at 25% and using a small brush we finely blur the outskirts around the hair. Finally, we flatten our image.
The ultimate answer. Quest answered the quest. :)
What can I say? The last word is said and the question was settled definitely once and for all for all eternity, at last coming to rest after this long serie of process or progress. Totally free and devoid of any ambiguity, uncertainty or obscurity. The quest finally came to its end! I have scored the earth from high to low without finding such a detailed and thorough explanation. Before now that is. Despite that cutting out and replacing object must be the most common task you do in Photoshop.
What is wrong with the world is that masters don't take the time or has the patience to show the others who are still on the way to enlightenment.
On behalf of all the beginners in the world, I thank you.

Were you calling Obie Juan Kanobe or Obie Don Quixote ?? If the latter the "You suck at photoshop" series is both informative and fun to watch - I think there are at least six of them.
Here's the first...
http://www.youtube.com/watch?v=U_X5uR7VC4M
good conversion btw ... now, about the glare on the glasses frames ...

haha, nay, that would be too easy. I am a beginner since 4 months, not a COMPLETE idiot. By the way I found out the persimmon guy's method: Make a copy of the black background and paste it in a layer ABOVE. Using the smudge tool set to 65% strength with a 3 to 5px brush, paint in the lower layer. In the end merge the (untouched) layer down.
This method does not give quite as good finish (as you can see), but as it is a manual method it might come in handy as a complement to Quest's solution.


With this you get a very smooth edge
Finito

Quote - Hi,
Why so complicated?
Here's my solution for the problem.
- Make a Vektormask for Layer 1 and select it
- Choose black as your pencil colour and set the pencil to smooth.
- Draw around your figure with different thickness of your pencil
- Make a new black layer
With this you get a very smooth edge
Finito
that method would take you hours when drawing around the hair. in effect, It would be no different from trying to use the lasoo tool to draw around your subject and invert selection to select the background and remove it.
Unless I misunderstood what you're method.
Dell XPS M1730
Intel Core 2 Duo T9500 2.6Ghz
500GB (2x 250GB) RAID 1 Sata HDD
4GB RAM
Nvidia GeForce 9800M GTX SLI
Privacy Notice
This site uses cookies to deliver the best experience. Our own cookies make user accounts and other features possible. Third-party cookies are used to display relevant ads and to analyze how Renderosity is used. By using our site, you acknowledge that you have read and understood our Terms of Service, including our Cookie Policy and our Privacy Policy.
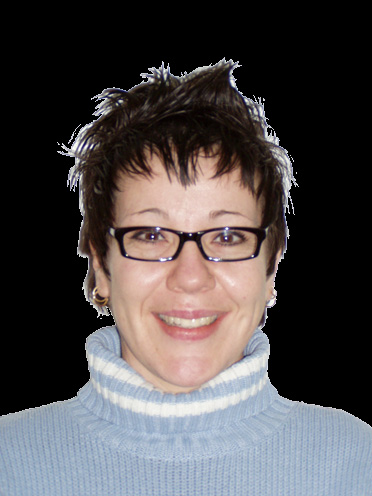
I have tried every trick in the book without succeeding to remove the ugly white halo around the hair in this portrait I am beginning to despair. The worst of it is that I once saw a guy who had a way with the smudge tool… But I cannot for the life of me remember how. I am really from another forum at here at Renderosity but I have to ask, can it be done?