Renderosity Forums / Poser - OFFICIAL
Welcome to the Poser - OFFICIAL Forum
Forum Coordinators: RedPhantom
Poser - OFFICIAL F.A.Q (Last Updated: 2025 Feb 01 6:51 am)
Subject: Poser 7 / Newbie/ Question / Material Room_node settings
There was a thread at RDNA on this but RDNA is down "temporarily". I'll try to summarize it. I can't get a screen shot to work unfortunately, probably because I'm using a KVM switch. :(
For each material in the ghost including the hair and clothes, do the following in the material room:
Set the Diffuse_Value and Specular_Value to 0 so that lighting doesn't affect the end result.
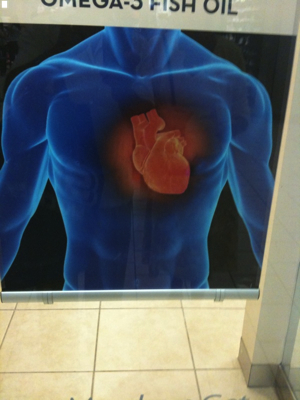
Move whatever was plugged into the Diffuse_Color input to the Ambient_Color, and set Ambient_Value to 1. This means that any color or texture is always visible. In the case of the blue torso, set the Ambient_Color to blue.
Create a new Math_Functions node with Math_Argument Subtract and both Values set to 1. Plug this into the Ambient_Value input.
Create a new Edge_Blend node with Inner_Color set to white, Outer_Color set to black. and Attenuation set to 0.5. Plug this into Value_2 of the Math_Functions node and also the PoserSurface Refraction_Value input.
Create a Refract node with Index_of_Refraction set to 1 and plug it into the Refraction_Color input.
This gives you an X-ray effect but the back of the figure is still visible. To fix that, in the pose room uncheck the Visible in Raytracing checkbox for each figure that comprises the ghost. Now the trace rays don't see the back side.
I imagine that the red heart was rendered separately and composited in Photoshop.
This is almost totally transparent. The issue is you have nothing behind the figure to see. The Poser background color is not "seen" by raytracing. Only objects in the scene can be seen by raytracing refractions.
If you want the same gray to be used for when the refraction sees nothing, load that into the Background color parameter of the Refract node.
I can see in your closer render that the edges are blue. It's just that the transition from fully refractive (transparent) to fully blue is delayed because the Attenuation in your Edge_Blend is .5. That means that the transition to the Outer_Color is slow. Almost everything is using the Inner_Color. Try increasing Attenuation to 1 or even higher.
Also, if you make the Inner_Color something less than full white, then the figure as a whole will not be 100% transparent, but more opaque.
The Edge_Blend is not being used for color here, but we don't have a numeric Edge_Blend node. So we use shades of gray to represent numbers. Black is 0, White is 1. Shades of gray are numbers between 0 and 1.
Renderosity forum reply notifications are wonky. If I read a follow-up in a thread, but I don't myself reply, then notifications no longer happen AT ALL on that thread. So if I seem to be ignoring a question, that's why. (Updated September 23, 2019)
The original thread where this technique was first discussed (and refined to be simpler than it started) is here:
http://www.runtimedna.com/forum/showthread.php?t=32342
Page 2 is where I showed the technique you're using now.
Renderosity forum reply notifications are wonky. If I read a follow-up in a thread, but I don't myself reply, then notifications no longer happen AT ALL on that thread. So if I seem to be ignoring a question, that's why. (Updated September 23, 2019)
Quote - Here is a closer look. Though it looks better on a rendered image it still lacks the transparency I was looking for.
Sorry, I went to bed... unforgivable, I know! I would just add two things:
Firstly, raytrace effects are one of the things you can't see in the Preview window - you have to do a render.
Secondly, (as bb himself teaches) the faster your test renders are, the more results you will get to see (assuming you are not The Doctor, and your time is finite!) So it makes sense to use the lowest possible render settings that will suit what you are testing.
For the purposes of these tests I would suggest changing:-
- Irradiance caching to 0 (not needed)
- Pixel samples to 1 (aliasing doesn't matter)
- Min shading rate to 4 or higher (texture detail is unimportant)
- Smooth polygons off
"If I were a shadow, I know I wouldn't like to be half of
what I should be."
Mr Otsuka, the old black tomcat in Kafka on the Shore (Haruki
Murakami)
Privacy Notice
This site uses cookies to deliver the best experience. Our own cookies make user accounts and other features possible. Third-party cookies are used to display relevant ads and to analyze how Renderosity is used. By using our site, you acknowledge that you have read and understood our Terms of Service, including our Cookie Policy and our Privacy Policy.


Hi, This is my first post; sorry if I am in wrong place.I have spent hours unsuccessfully trying to replicate this transparent-blue render of a male figure that I saw in a store window ad. Photo is attached; if someone can please tell me the proper node settings to achieve this result, I would highly appreciate it. I am a bit of a newbie to Poser; the more details the better. Thanks in advance for your kind efforts.