Renderosity Forums / Poser - OFFICIAL
Welcome to the Poser - OFFICIAL Forum
Forum Coordinators: RedPhantom
Poser - OFFICIAL F.A.Q (Last Updated: 2024 Sep 22 4:04 pm)

Subject: newbie needs help with background distortion
ok, one way is to load the prop promotive square to your scene . scale it up and position it as the backdrop. Apply your background picture to it in the material room.
You can get GIMP for free, or photofiltre, or several other paint programs. There is a version of GIMP thats a bit easier to use than the main Gimp program. Look at Gimp Portable.

See if auto fit where you attached the image (background?) is turned on or not. If the background image doesn't match the resolution output, you can also expect something to get distorted. Since you can't postwork, change the dimensions of the image in poser.
Another useful tip for you is to not attach the image to the background, but to the one sided square prop. Use the x and y scales to get it into proportion with your background image and the main scale to get it to fit in your render area. Then you can just move the prop around or rescale it as you need to.
WARK!
Thus Spoketh Winterclaw: a blog about a Winterclaw who speaks from time to time.
(using Poser Pro 2014 SR3, on 64 bit Win 7, poser units are inches.)
first, thank you very much for the tips.
then if you guys do not mind, I would like to ask some questions.
what is Prop Promotive Square and where to find it?
what is the One Sided Square Prop? is it the same thing with Prop Promotive Square? how do I locate it in Poser ?
I will get the GIMP now.
thank you again for your helps!


See below:
Hope this helps.
Privacy Notice
This site uses cookies to deliver the best experience. Our own cookies make user accounts and other features possible. Third-party cookies are used to display relevant ads and to analyze how Renderosity is used. By using our site, you acknowledge that you have read and understood our Terms of Service, including our Cookie Policy and our Privacy Policy.
I am new with Poser so I guess it is not surprising that I have this problem.here is the detail.
I finished positioning and posing all chars and the only thing left was the background.
I imported the background image into Poser and everything seemed fine until I rendered it.
As soon as I chose to render, Poser popped up a question telling me that the ratio of the background and that of my screen do not match and asking me whether to change to fit.
I chose to change but then the final image after the rendering has a big problem, that is, the dimension of the background image had been changed.
actually, the background image Shrinked, distorting the elements of the image and losing its original impression.
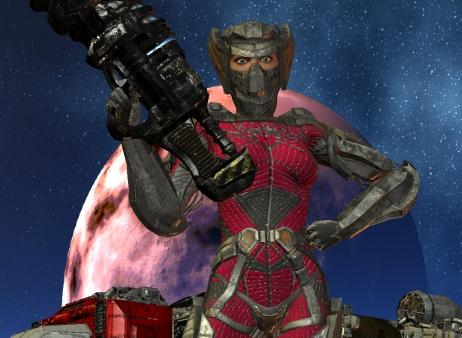
I attached an image to show the problem. the moon from the background image lost its original shape after rendering, because the dimension of the background image being changed by Poser before rendering. the original shape of the moon is totally round, but after rendering, it changed dramatically.
what can I do?
please help. I use Poser 6. I have No software for postwork.
thank you very much.