Renderosity Forums / Carrara
Welcome to the Carrara Forum
Forum Coordinators: Kalypso
Carrara F.A.Q (Last Updated: 2025 Jan 04 8:20 pm)
Visit the Carrara Gallery here.
Subject: uv mapping
UV fun!
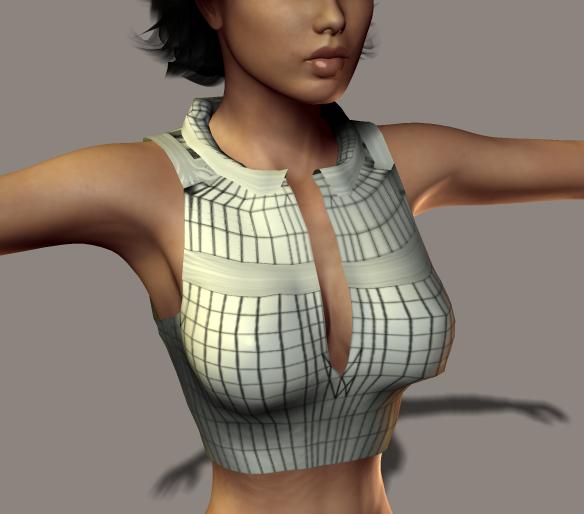
It looks there is a boundary issue where a single polygon or polygon strip takes up the whole UV map itself, or shares the exact same coordinates with others and is trying to merge the results by stretching the UV - you can see the stretched UV texture lines within the strip.
I see the same thing happening on the tops of the sleeves and the collar. You might try engaging the "Show Wrapping" and "Merge Candidates" in the UV room to discover them.
Other option: While in the UV room, try highlighting the effected polygons on the model and the perform Operation => Detach Polygons and move the results. This by itself will not fix it but will help you identify the area so you can fix it.
A helpful thing to do in the future, if you haven't already done it, is to name the selections/polygons so you can use the Detach Polygons tool and easily move things around the map space and then reselect them easily later on too. For example HalterFront, HalterBack, CollarTopOutside, CollarInsideNeck etc.
Sorry for the generalities. If you post a screen grab of the UV space with all of the polygons showing I can help a little better.
Mark
Thanks for your suggestions. I see that you have tutorials at http://www.markbremmer.com/3Bpages/tutorials.html
I will see if I can learn what I need with some of those (looks like I probably can - thanks!)
Oh, that practice thing. :-D
Looking good. If possible (if the grid texture actually represents the actual polygons) you may want to eliminate more of the triangle polygons if the clothing will actually be folding. Triangles fold unpredictably whereas square/quad polys are a little easier to control.
There are some excellent ways to make dynamic cloth using triangular polygons based on quads but for bending linked to skeletons, quads work better.
Mark

Here is my first attempt to texture my first (successfully) mapped model. I ultimately want to go for a uniform top for a science fiction setting along the lines of Rocky Jones, Space Ranger. I used a civil air patrol insignia as the stand-in for the Science and Exploration Agency badge. I also need a lot of practice painting the UV map, but right now I'm just trying to get the process down.
I'd like to have a lower-polygon version that is used for bending/conforming and a higher-polygon version used for dynamic cloth. Ideally, they'd use similar texture maps that look identical on the model.
Nice progress. Diamond shapes are ok if they only have 4 vertexes and are merely a distored quad.
For dynamic cloth, using triangles within a quad structure is a good tactic. However, what makes this method really work well is if the triangles have the longest side (the division of the quad) randomly flipped to the other diagonal. There are some programmatic ways to do this in other applications that Carrara does not have. But this method is kind of a purist method, and while I think it has the best results, the results may not be worth the effort in Carrara. At least until Carrara gets dynamic cloth! :D
Privacy Notice
This site uses cookies to deliver the best experience. Our own cookies make user accounts and other features possible. Third-party cookies are used to display relevant ads and to analyze how Renderosity is used. By using our site, you acknowledge that you have read and understood our Terms of Service, including our Cookie Policy and our Privacy Policy.


First time trying to UV Map a model and edit the texture map.I am trying to make a simple top for Vic4. I have uv mapped the top. For some reason, there is a big void zone in the middle of the model, where the UV map has horizontal gash lines instead of the squares that match the model mesh. In the uv mapping programs, that zone is nowhere near the edge.
I made the model in Carrara. I have tried UV Mapping it in UV Mapper classic and in Carrara itself. Same results.
I have tried just about every possible command in UV Mapper classic and Carrara. There must be an order to do things in, or a box that needs to be checked or unchecked, or something.
I attach a picture of the uv map projected to the model.