Renderosity Forums / Poser - OFFICIAL
Welcome to the Poser - OFFICIAL Forum
Forum Coordinators: RedPhantom
Poser - OFFICIAL F.A.Q (Last Updated: 2025 Feb 03 12:46 am)
Subject: Another use of the grouping tool...
Question about doing that: I am fighting whit the tool. Please can you answer me some question: you only can pick just a part, example want to make socks first klicking on foot, make a new prop, after that klick on toes, make a new prop, after that create a new prop and save it? (Sorry I have the german version, dont know the english names for it) But it this the way it works? Thought you can add polyg. as much as you want! A answer would help me a lot - going crazy about this sh.. thing
Attached Link: http://www.dacort.com/
moenchen, check the grouping tool tutorial at http://www.dacort.com/You can create a new group, then use 'include material' if there is a material such as 'leather'. Beware using the dreaded group tool however if you are doing anything for sale. It has bugs and the store may reject items on which the group tool has been used because 1) it embeds geometry in the cr2 file (a bunch of v and vt lines where there should only be deltas which violates copyright if it's not your object) and 2) Causes bugs in pro pack in the form of missing parts or holes in the mesh.
"Your work is to keep cranking the flywheel that turns the gears
that spin the belt in the engine of belief that keeps you and your
desk in midair."
Annie Dillard
moenchen, if I understand your question correctly, your problem isn't the grouper tool but rather how you export it. If you want the item to be solid (all one piece) then export them together. If you want the item to be poseable than you'll need to do a few more fancy things involving the hierarchy and the joint editor.
Here's a nifty trick for ill fitting hair (often hair pieces that don't quite fit right and tend to fly off when using third party poses). Position the hair where it needs to be on the figure in its DEFAULT position--select the hair, then select the grouping tool. Click "New Group". Type in the name you want to call your modified hair piece or prop. Click "Select all." Click "Spawn new Props" or "Create Prop." Delete the original prop or hr2 file. Parent the new object to the figure's head. Save the new object in the Hair or Prop library. This technique can be used for resetting the default (all zeroes or 100 percents on the parameter dials) by rescaling or moving the original item, using the grouping tool to select everything, and then spawning a new prop and deleting the original from the work space. This way--a bizarrely placed or scaled prop will return to the defaults YOU define when you either RESTORE ALL or RESTORE ELEMENTS.
Yes--in fact it will make an exact duplicate of the hair in its morphed state. I should have clarified that the method was for hair and prop objects imported into Poser (like 3DS and OBJ files) which need to be moved and rescaled to work correctly with the figures. If someone is planning on creating a hr2 or pp2 file, it's a good practice to set the default of the base prop or hr2 file (before the morphs are added) to the size and location one would reasonably expect the object to appear in a particular scene--especially with parented props. Zygote came up with a fantastic solution to put the Victoria hair on the Millenium Girls--they simply created a morph that displaces the whole object in space (morphs and all) to fit the characters' heads--that too is a novel workaround for keeping the defaults.
Privacy Notice
This site uses cookies to deliver the best experience. Our own cookies make user accounts and other features possible. Third-party cookies are used to display relevant ads and to analyze how Renderosity is used. By using our site, you acknowledge that you have read and understood our Terms of Service, including our Cookie Policy and our Privacy Policy.


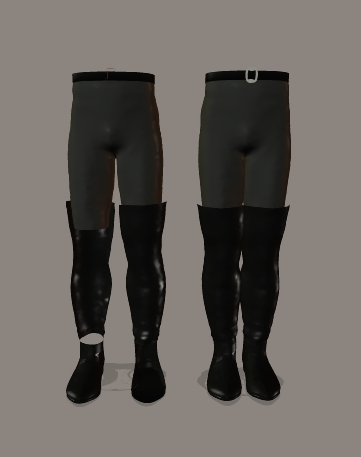
While I was looking into creating a tutorial for the grouping tool I noticed one of the options was to reverse the normals. This can be used to correct the problem some items have of being viewable from the wrong side (inside out) My favorite example of this is the poet's pants & boots I got from poserworld. This is a great dork item, but annoying to work with because parts are inside out. Picture shows before and after (is not rendered, but is anti-aliased) Note to Steve: if you want the .cr2 I'll e-mail it.