Renderosity Forums / Poser - OFFICIAL
Welcome to the Poser - OFFICIAL Forum
Forum Moderators: RedPhantom Forum Coordinators: Anim8dtoon
Poser - OFFICIAL F.A.Q (Last Updated: 2026 Mar 05 8:06 pm)

Subject: Displacement splits seam


Run the displacement map through a math node... see this thread-
http://www.renderosity.com/mod/forumpro/showthread.php?thread_id=2855000
... Of course the displacement/seam mismatch might be throwing an unforeseen variable into the mix? But the displacement should be equal across the seams without splitting I would think if you utilize the math node.

thanks hborre will try that out, poser has just crashed so might call it a night and try again tomorrow
Tools:- Win10, Dell XPS8900, ZBrush, Marvelous Designer 11, Hex 2, PSP8. PSP 2019 Ultimate, DAZ Studio, Affinity Photo, Affinity Designer, Filterforge 11, flowscape, Classic UVMapper, and several headache tablets.
If you are working with a straight displacement map as a separate image then you must reset the gamma for that image with linear workflow. The data from that type of map is only providing height information. Allowing it to assume a gamma = 2.2 with render gamma active will double the gamma value exaggerating the displacement in which case the mesh may swell and possible seams may become prominent. But it is determined by how high is the displacement value.
The thread you posted, which I re-read, is a special consideration; you are generating a displacement map from an existing color image, an entirely different situation. Perhaps this is a quick and dirty way to strip away color information for the sake of generating displacement, but it is incorrect when your height information is contradictory to the results you are expecting.
I don't utilize stripped out color maps by any means for any serious displacement or bump. I'm skilled enough artistically to paint my own maps and hell, even make art without Poser. Maybe occasionally I'll utilize an HSV on a diffuse map just to quickly fudge a bump, but in this instance I'm afraid you are mistaken and are jumping to conclusions based on your own assumptions. the attached image is the simple displacement map utilized during that thread query, I'm not seeing any
"quick and dirty way to strip away color information for the sake of generating displacement".


Lully, are you modeling this item? If so, then try extruding the seam edge (both bodice and collar) and pulling the new polys inward, just like a real hemmed seam would be. Then give that new 90' edge on each piece (bodice and collar) a tiny bevel.
Displacement certainly will leave gaps at seams. So, you can either fade the displacement away to zero as it nears a seam, by using a displacement mask, or hem the seam. If you are doing the modeling, I would much prefer making a hemmed seam.
Poser 12, Poser 13, Poser 14, in feet.
OSes: Win7Prox64, Win7Ultx64, Win11
Silo Pro 2.5.6 64bit, Silo 2025.1, Vue Infinite 2014.7, Genetica 4.0 Studio, UV Mapper Pro, UV Layout Pro, PhotoImpact X3, GIF Animator 5
I've exaggerated the thickness of the hem "trench" so that the different edges can be distinguished, but in practice you want that gap to be teeny tiny.
Poser 12, Poser 13, Poser 14, in feet.
OSes: Win7Prox64, Win7Ultx64, Win11
Silo Pro 2.5.6 64bit, Silo 2025.1, Vue Infinite 2014.7, Genetica 4.0 Studio, UV Mapper Pro, UV Layout Pro, PhotoImpact X3, GIF Animator 5
Hi All, thanks for responding
I just got in from work so only catching up from yesterday.
I tried the greyscale and math node = did not work :(
the gamma correction on the materials = did not work :(
The idea of a seam 'trench' I thought of similar but passed by as not sure it would work with dynamic wear (would it not just open up and straighten out?) I also made a seperate material zone around the neck 1 row above and below the seam but all it did was split in 2 areas around that so making it worse.
I will try out the trench and see what happens
Tools:- Win10, Dell XPS8900, ZBrush, Marvelous Designer 11, Hex 2, PSP8. PSP 2019 Ultimate, DAZ Studio, Affinity Photo, Affinity Designer, Filterforge 11, flowscape, Classic UVMapper, and several headache tablets.
Oh, dynamic - assign the trench polys to a group in your modeler (or mapper), and when you clothify it in Poser, assign the trench group to constrained. Those polys will follow the bends of the doll, but keep their shape. All the rest of the mesh can be left in the default dynamic group.
A similar idea would be piping along the seam. The piping would likewise need to be assigned to the constrained group.
Poser 12, Poser 13, Poser 14, in feet.
OSes: Win7Prox64, Win7Ultx64, Win11
Silo Pro 2.5.6 64bit, Silo 2025.1, Vue Infinite 2014.7, Genetica 4.0 Studio, UV Mapper Pro, UV Layout Pro, PhotoImpact X3, GIF Animator 5
Oh I thought constrained would make it pucker, will try that, the trench thing didnt work the first opened it up, then when i did it again i point welded all the way around creating a "french seam" sorta thing neither worked but the french seam reduced it to what looked like a snag, lol, i think i will try with the piping, (i like a bit of piping i duz) and will constrain that
Tools:- Win10, Dell XPS8900, ZBrush, Marvelous Designer 11, Hex 2, PSP8. PSP 2019 Ultimate, DAZ Studio, Affinity Photo, Affinity Designer, Filterforge 11, flowscape, Classic UVMapper, and several headache tablets.
thanks all
Tools:- Win10, Dell XPS8900, ZBrush, Marvelous Designer 11, Hex 2, PSP8. PSP 2019 Ultimate, DAZ Studio, Affinity Photo, Affinity Designer, Filterforge 11, flowscape, Classic UVMapper, and several headache tablets.
Just a quick two-coppers...
Is the neck set up as a different material zone than the chest? (It appears so.) If so, does it have different settings than the chest? If you're running any effects in the material room that work on U/V calcs, they'll be done a little differently across material zones. If you have those plugged into displacement maps.. Well, there ya go.
Got a pic of your Mat Room setup for the materials in question?
Don't discount displacement on the figure, either, as causing poke-through. Though, the displacement value shouldn't be set that high, it's worth checking. (The cloth shouldn't be that close to the model, anyway.)

the cape has a dynamic group for the neck, main and seam, the seam is constrained and the neck is stiffer than the rest so it stays standing up
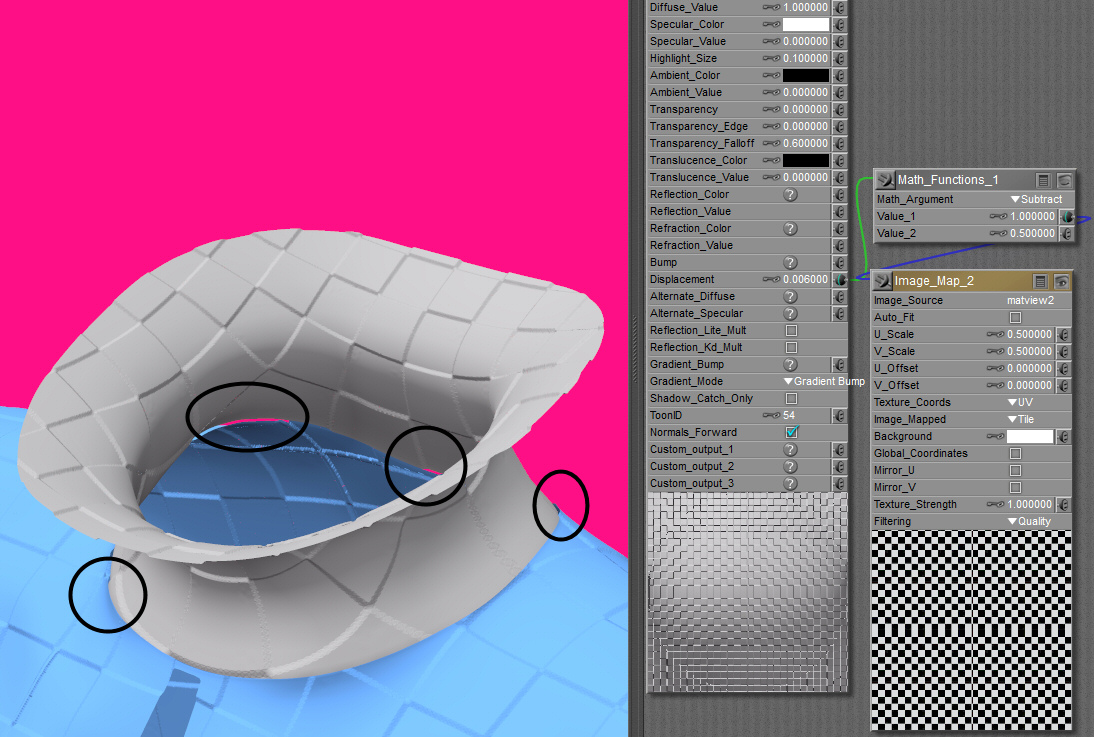
the material i cant do a screendump on as its one of my mats for apack, however ive done a preview of a simple checker to show it still happens, this isnt draped either so has no effects from a dynamic cloth drape. first one shows black and white with no math, the second with math with greyscale and black, they both have the same issues,
I did do test runs with just a plain white mannequin with no bumps or displacements and it still happened so not pokeys
best solution was the seam which is enclosed
Tools:- Win10, Dell XPS8900, ZBrush, Marvelous Designer 11, Hex 2, PSP8. PSP 2019 Ultimate, DAZ Studio, Affinity Photo, Affinity Designer, Filterforge 11, flowscape, Classic UVMapper, and several headache tablets.
Ah, gotcha.
A "trench" is often a nice finishing touch, where they'd be expected to be in real cloth. But, if you don't want to do that, you "might" get away with just adding a couple of extra edges along that seam, but done in such a way that the difference between their verts and their neighbors is not great enough for smooth-shading to break and reveal them.
ie:

So, with Firefly and its inorganic speciality renderer, it may not show that "seam" easily, if that's the kind of effect you want. You might also be able to turn up smooth shading on the item without losing other details. But, the extra polys there might give the dynamic engine more to work with, hiding the problem.
I don't know, it's just guesswork. /shrug
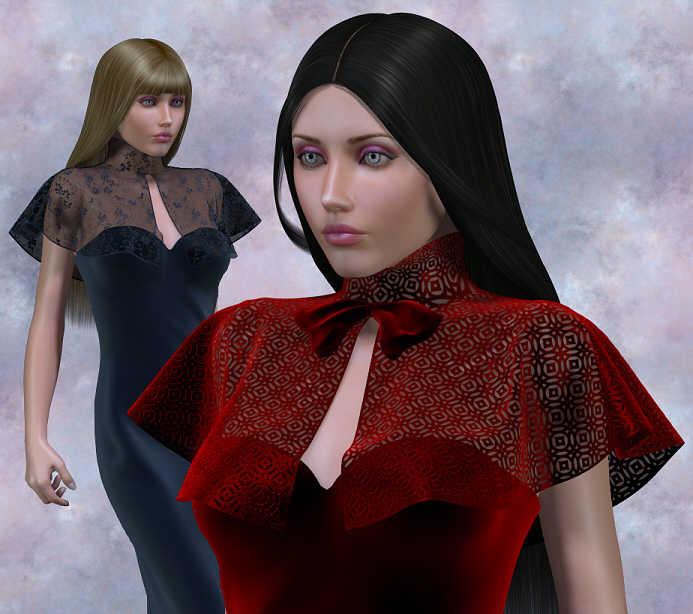
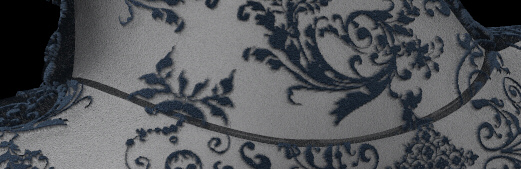
Anyway preview of what i ended up with is attached
Tools:- Win10, Dell XPS8900, ZBrush, Marvelous Designer 11, Hex 2, PSP8. PSP 2019 Ultimate, DAZ Studio, Affinity Photo, Affinity Designer, Filterforge 11, flowscape, Classic UVMapper, and several headache tablets.
Quote - Lully...that us super gorgeous!!! :)
Laurie
Cheers, :)
I've just sent you site mail by the way ;)
Tools:- Win10, Dell XPS8900, ZBrush, Marvelous Designer 11, Hex 2, PSP8. PSP 2019 Ultimate, DAZ Studio, Affinity Photo, Affinity Designer, Filterforge 11, flowscape, Classic UVMapper, and several headache tablets.
Privacy Notice
This site uses cookies to deliver the best experience. Our own cookies make user accounts and other features possible. Third-party cookies are used to display relevant ads and to analyze how Renderosity is used. By using our site, you acknowledge that you have read and understood our Terms of Service, including our Cookie Policy and our Privacy Policy.
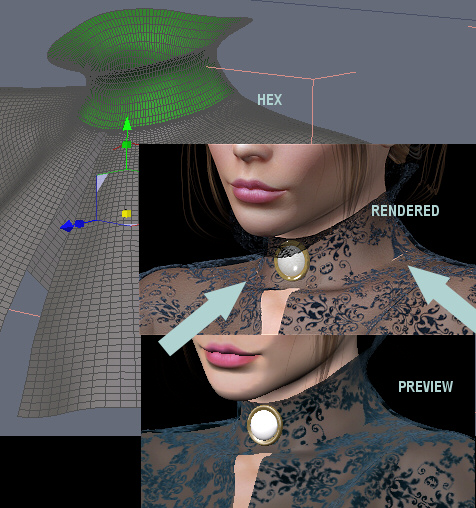
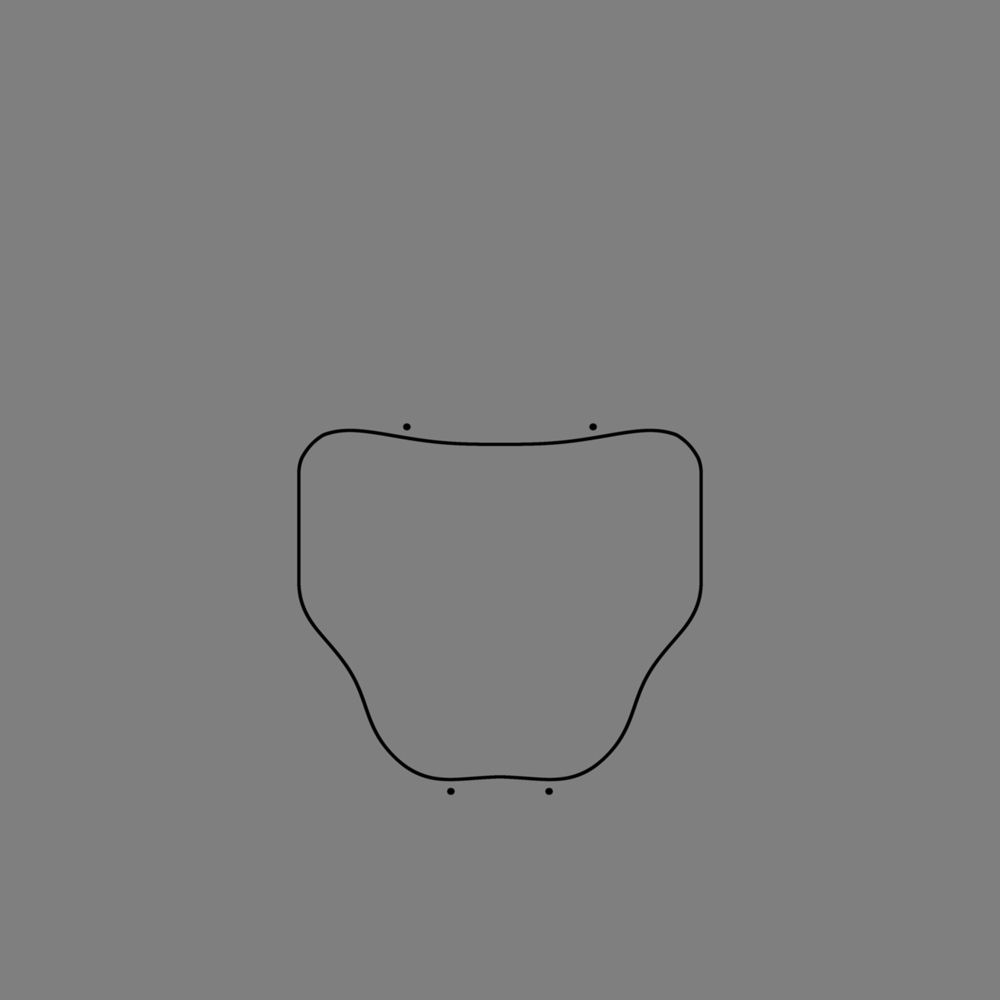
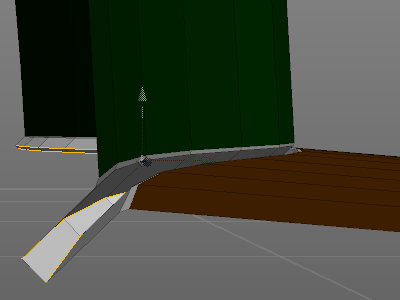
Is there a solution to the splits in the seams, I think i understand why it's done it as it's along one of the seams and the pattern used for the displacement does not match.I can't uv map the item without a seam so whatever I do it will notice :/
I've added a preview of hex, pre render and post render views
Tools:- Win10, Dell XPS8900, ZBrush, Marvelous Designer 11, Hex 2, PSP8. PSP 2019 Ultimate, DAZ Studio, Affinity Photo, Affinity Designer, Filterforge 11, flowscape, Classic UVMapper, and several headache tablets.