Renderosity Forums / Poser - OFFICIAL
Welcome to the Poser - OFFICIAL Forum
Forum Coordinators: RedPhantom
Poser - OFFICIAL F.A.Q (Last Updated: 2025 Jan 21 1:30 pm)
Subject: LightPlay:3d

Pinky - you left the lens cap of your mind on again.
Attached Link: http://www.sparkyworld.co.uk/3d10own.htm

Pinky - you left the lens cap of your mind on again.
Extrude some tubing in a modeler (Silo is my first choice).
The main extrusion would be the visible "neon".
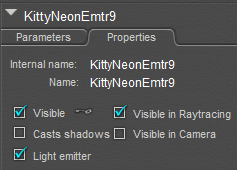
Nested just slightly inside would be an IDL emitter extrusion. Uncheck visible in camera, and text-edit the prop file to set visible in reflection to zero. This mesh will have intense ambient (7? 70?)
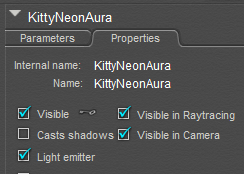
Make a third extrusion along the same path, but with a diameter about 2.5 times that of the neon. This third extrusion will be the glow aura, and use the double edge blend method of texturing.
Poser 12, in feet.
OSes: Win7Prox64, Win7Ultx64
Silo Pro 2.5.6 64bit, Vue Infinite 2014.7, Genetica 4.0 Studio, UV Mapper Pro, UV Layout Pro, PhotoImpact X3, GIF Animator 5
My python page
My ShareCG freebies
For a photo, I'd try pipe insulation (white foam, not the black foam) with LED rope inside.
To maintain shape, you might use coat hanger wire inside, or lay the shape out on the floor and fill the void space between LED rope and foam tubing with resin, letting that set up thoroughly before handling the outline. Downside would be that you'd not be able to re-use the materials for another shape.
The LED glow through the foam would be attenuated enough that you'll probably need to use a tripod and long exposure to get that neon look.
Poser 12, in feet.
OSes: Win7Prox64, Win7Ultx64
Silo Pro 2.5.6 64bit, Vue Infinite 2014.7, Genetica 4.0 Studio, UV Mapper Pro, UV Layout Pro, PhotoImpact X3, GIF Animator 5

Pinky - you left the lens cap of your mind on again.

Pinky - you left the lens cap of your mind on again.
Most of our "customers" here at the firehouse are taken aback by how quickly a fire progresses. Speed is of the essence. Thus, early warning is critical.
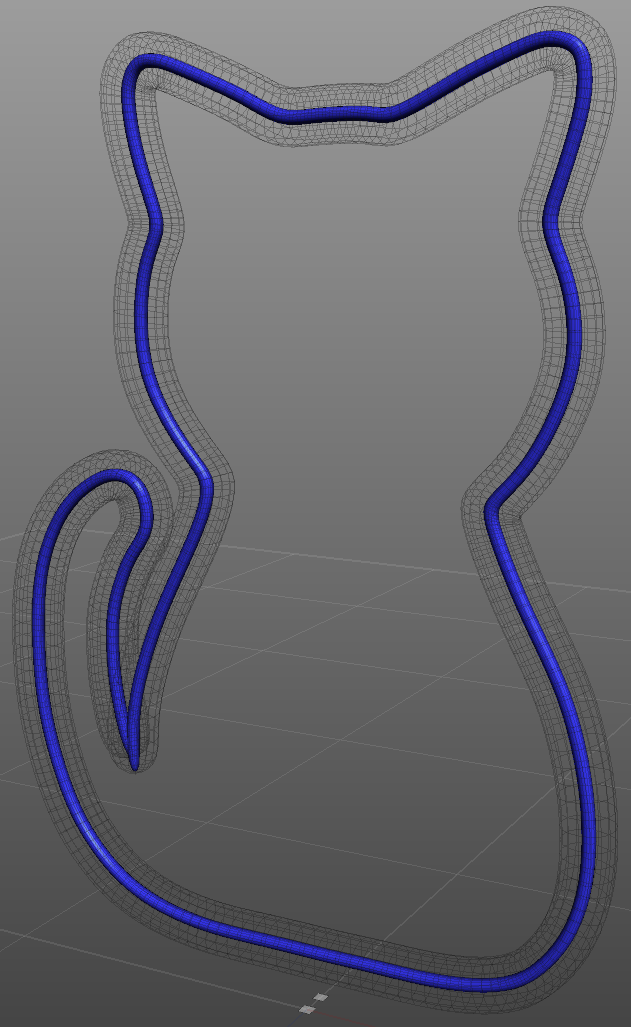
Ockham made an IDL neon heart logo; I'm working up a neon IDL MrSparky kitty...
 .
.
Kitty needs to be UV-unwrapped in order to allow for optional animated materials, so give me a little time. :)
Poser 12, in feet.
OSes: Win7Prox64, Win7Ultx64
Silo Pro 2.5.6 64bit, Vue Infinite 2014.7, Genetica 4.0 Studio, UV Mapper Pro, UV Layout Pro, PhotoImpact X3, GIF Animator 5
Quote - Luckily apart from a few smoke marks, a trashed timer and a stink of burnt plastic, no damage. Everyones future freebies and other stuff is safe. Though consider this the next time theres an annoying smoke alarm, that timer took just a few minutes to burn out and theres enough plastic there to kill a couple of people. Kinda put all the petty poser arguments into perspective.
Glad you got off so lightly. My sister recently lost her house and everything she owned, apparently to a surge protector. Take care of yourself.
Miss Nancy, I edited the emitter prop files to set visible in reflection to 0, but when I load the modified prop, it has visible in raytracing (and hence light emitter) unchecked. Both are necessary for an object to function as an emitter.
It appears that visible in reflection (in the text file) is just the internal name for visible in raytracing. Thus, this trick will not hide an IDL emitter in reflections.
If I'm wrong, somebody please give a brother a clue, here. Otherwise, I'm back to avoiding placing an emitter in front of a reflective surface (also goes for vampyres), and hope that SM will give us a not visible in camera which actually means it. Currently, unchecking visible in camera really means "ignored on first passage of ray, but visible on all subsequent ray passages".
Oh, the trials and tribulations of making kitteh neon. :rolleyes: The neon kitty logo is UV-unwrapped, pp2s stripped to remotely reference geometry, textured, and are undergoing render testing. I'm reduced to using surplus boxes on my secondary network because the "big girls" are already tied up with an animation.
Poser 12, in feet.
OSes: Win7Prox64, Win7Ultx64
Silo Pro 2.5.6 64bit, Vue Infinite 2014.7, Genetica 4.0 Studio, UV Mapper Pro, UV Layout Pro, PhotoImpact X3, GIF Animator 5
you desire light-emitting posersurface which, like poser directional lites, doesn't appear in reflection-only surface (zero specular)? reflection doesn't require IDL (GIVariables), but does require raytracing, whilst light-emitter requires both. they did fix refraction issue in SR4, but no news on any reflection fixes.

Pinky - you left the lens cap of your mind on again.

Pinky - you left the lens cap of your mind on again.

was thinking of HCl release during PVC combustion. cyano-acrylates (used with ABS) aren't cyanogenic - I double-checked.
Sure, I'll post screenies of the materials and test renders, plus P8 and P9+ version props, but I want to get the materials dialed in first, and each test render takes a while since they have to be final quality I'm using two lesser machines. Big girls will continue to be busy for another day and a half.
Miss Nancy; The prop consists of three concentric tubes, innermost is the visible neon, middle is the unseen IDL emitter, and outer is the fade-away aura. The neon and the aura should always be visible, including in reflection. The IDL emitter should never be seen; only the light which it casts should be seen.
For P8/PPro2010, I use a different emitter, which is smaller diameter tubing than the neon and thus nests hidden inside the neon. But even when the neon has casts shadows un-ticked, it considerably attenuates the light cast by the emitter, and the smaller emitter surface area is more prone to "IDL splotchiness", and the emitter still shows if viewed through a refractive window.
Poser 12, in feet.
OSes: Win7Prox64, Win7Ultx64
Silo Pro 2.5.6 64bit, Vue Infinite 2014.7, Genetica 4.0 Studio, UV Mapper Pro, UV Layout Pro, PhotoImpact X3, GIF Animator 5

Poser 12, in feet.
OSes: Win7Prox64, Win7Ultx64
Silo Pro 2.5.6 64bit, Vue Infinite 2014.7, Genetica 4.0 Studio, UV Mapper Pro, UV Layout Pro, PhotoImpact X3, GIF Animator 5

Poser 12, in feet.
OSes: Win7Prox64, Win7Ultx64
Silo Pro 2.5.6 64bit, Vue Infinite 2014.7, Genetica 4.0 Studio, UV Mapper Pro, UV Layout Pro, PhotoImpact X3, GIF Animator 5
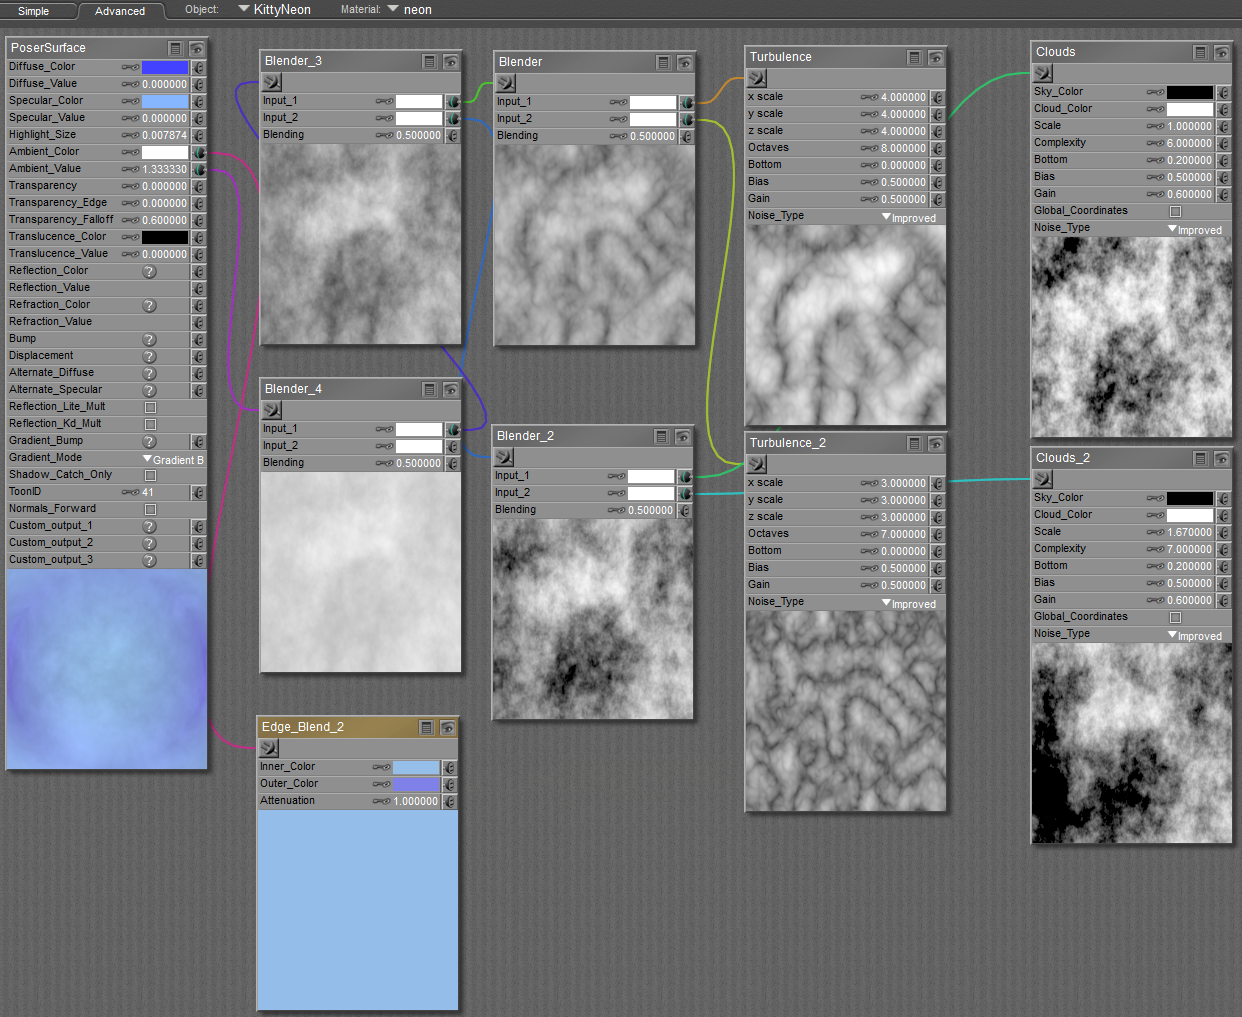
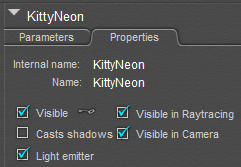
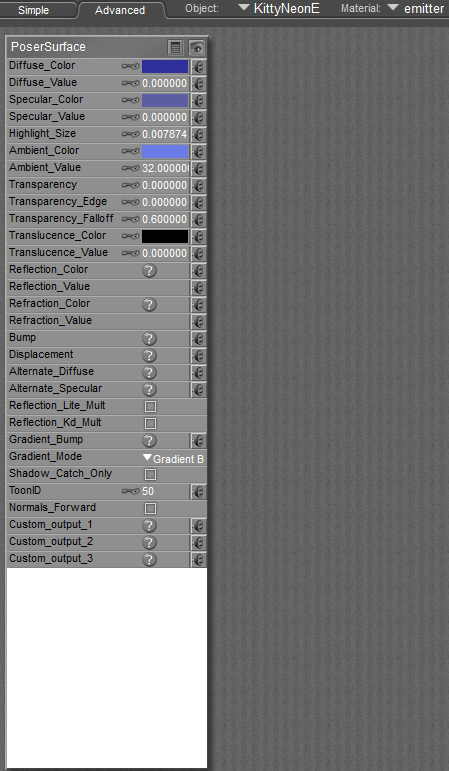
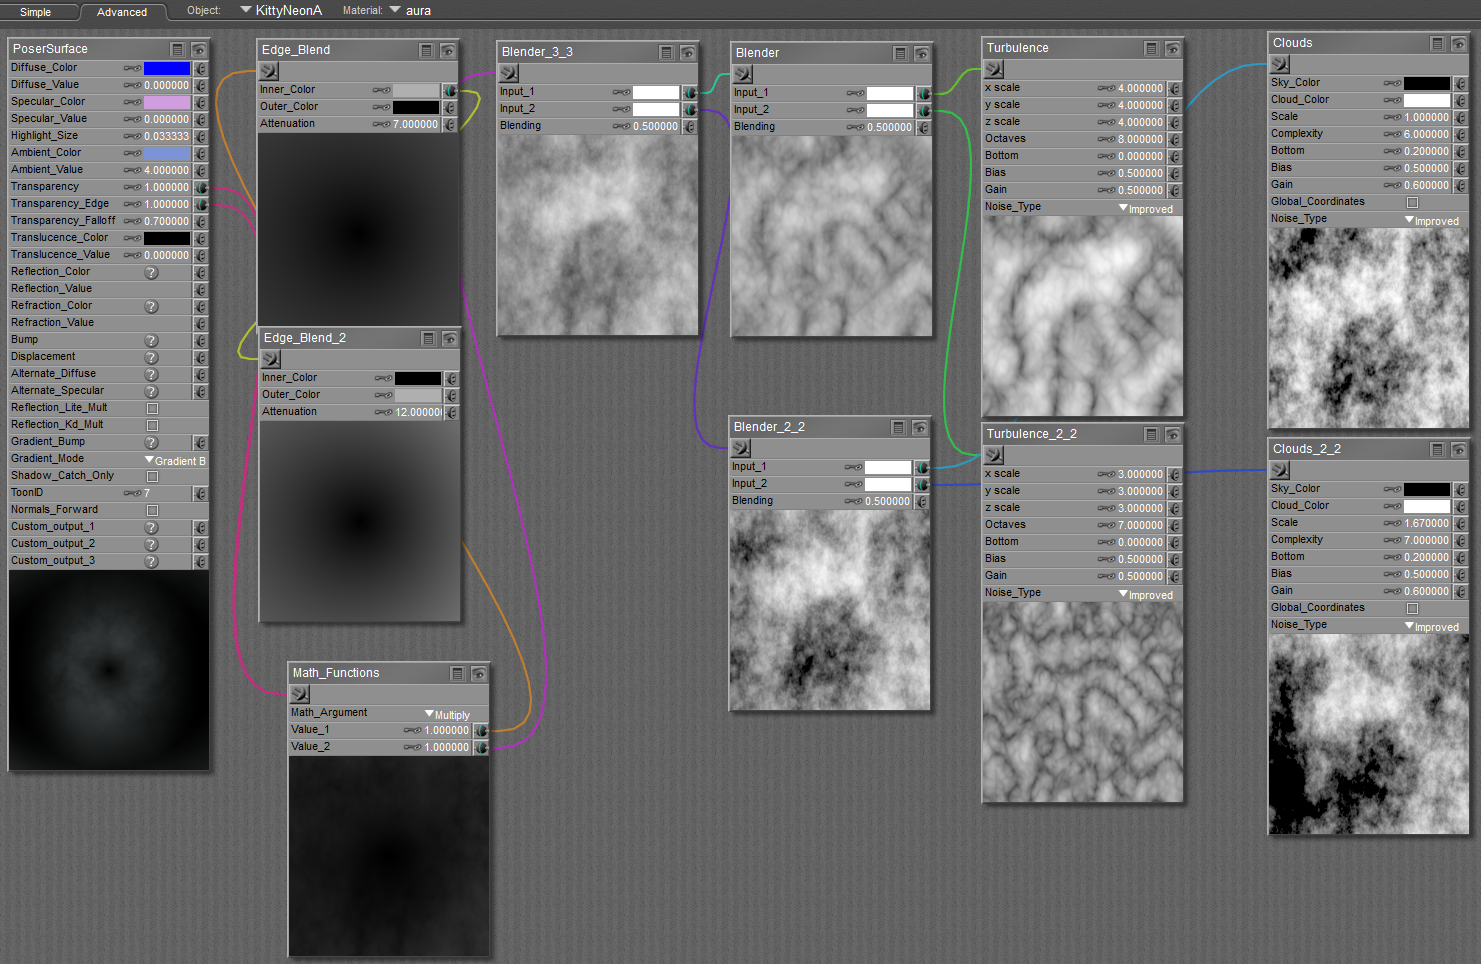
Materials and properties...
Neither the neon nor the aura material need to be this complex; they could be a solid color, but I wanted to give them some variation. Nothing more than that.
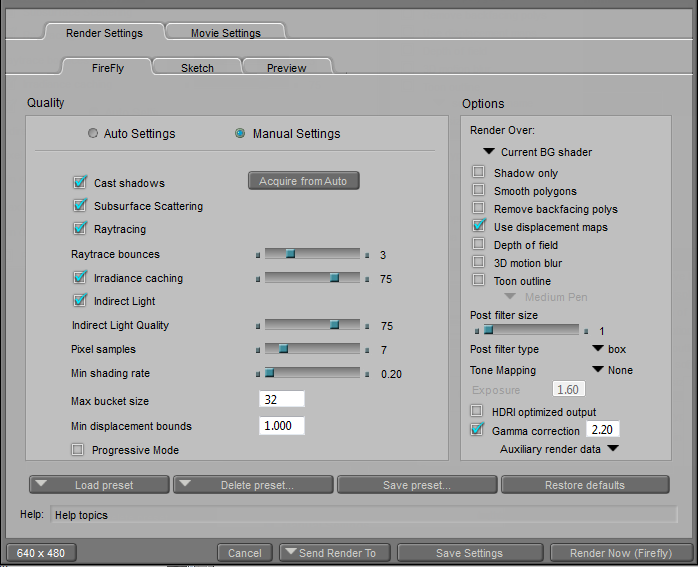
My render settings for the tests (yours can be quite different):
It remains to pack the prop. Oh, and I should save a P8/PPro2010 version as a separate prop file. The neon tubing and the glow aura should work for P7/PoserPro back to P5, but the prop won't cast light, so delete the emitter. You can use the gather node on the floor, walls, and ceiling, if you like. The gather node is used on any/all materials which will be receiving light. Or, sprinkle some strategically placed point lights if using P5-P7/PoserPro.
Argh. I set the clickable linked images to open in a new window, but the forum software keeps resetting them to replace the current window.
Poser 12, in feet.
OSes: Win7Prox64, Win7Ultx64
Silo Pro 2.5.6 64bit, Vue Infinite 2014.7, Genetica 4.0 Studio, UV Mapper Pro, UV Layout Pro, PhotoImpact X3, GIF Animator 5
o.k., will have a go at it. reflection should be realistic, e.g. not showing full emitter, which in poser burns out to white at ambient 2 - 4, depending on colour). there may yet be some way, if I can find photo of neon tube being reflected. I suspect there is gonna be burnt-out centre line, due to camera response, but that it fades to colour away from centre (edge-blend). is one example why they added tone-mapping.
have to report: can't duplicate mirror refl. issue using ock's heart prop and shaders. emitter colour don't burn out even at ambient 200, whether red (ock shader) or blue. was surprised; expected burn-out.
however, not optim. in re: aura sim. will await word from them on when they enable IDL/atmo. interaction.
My guess is that Ockham used an internal (P8 type) emitter. Try viewing the heart obliquely through a refractive pane of glass. What is the white band at the top of the mirror?
Ockham, how did you do your emitter? Nested inside the visible neon? How did you set the pp2 properties checkboxes for the neon and for the emitter? Or did you manage to flip some internal toggle to prevent the camera from viewing the emitter?
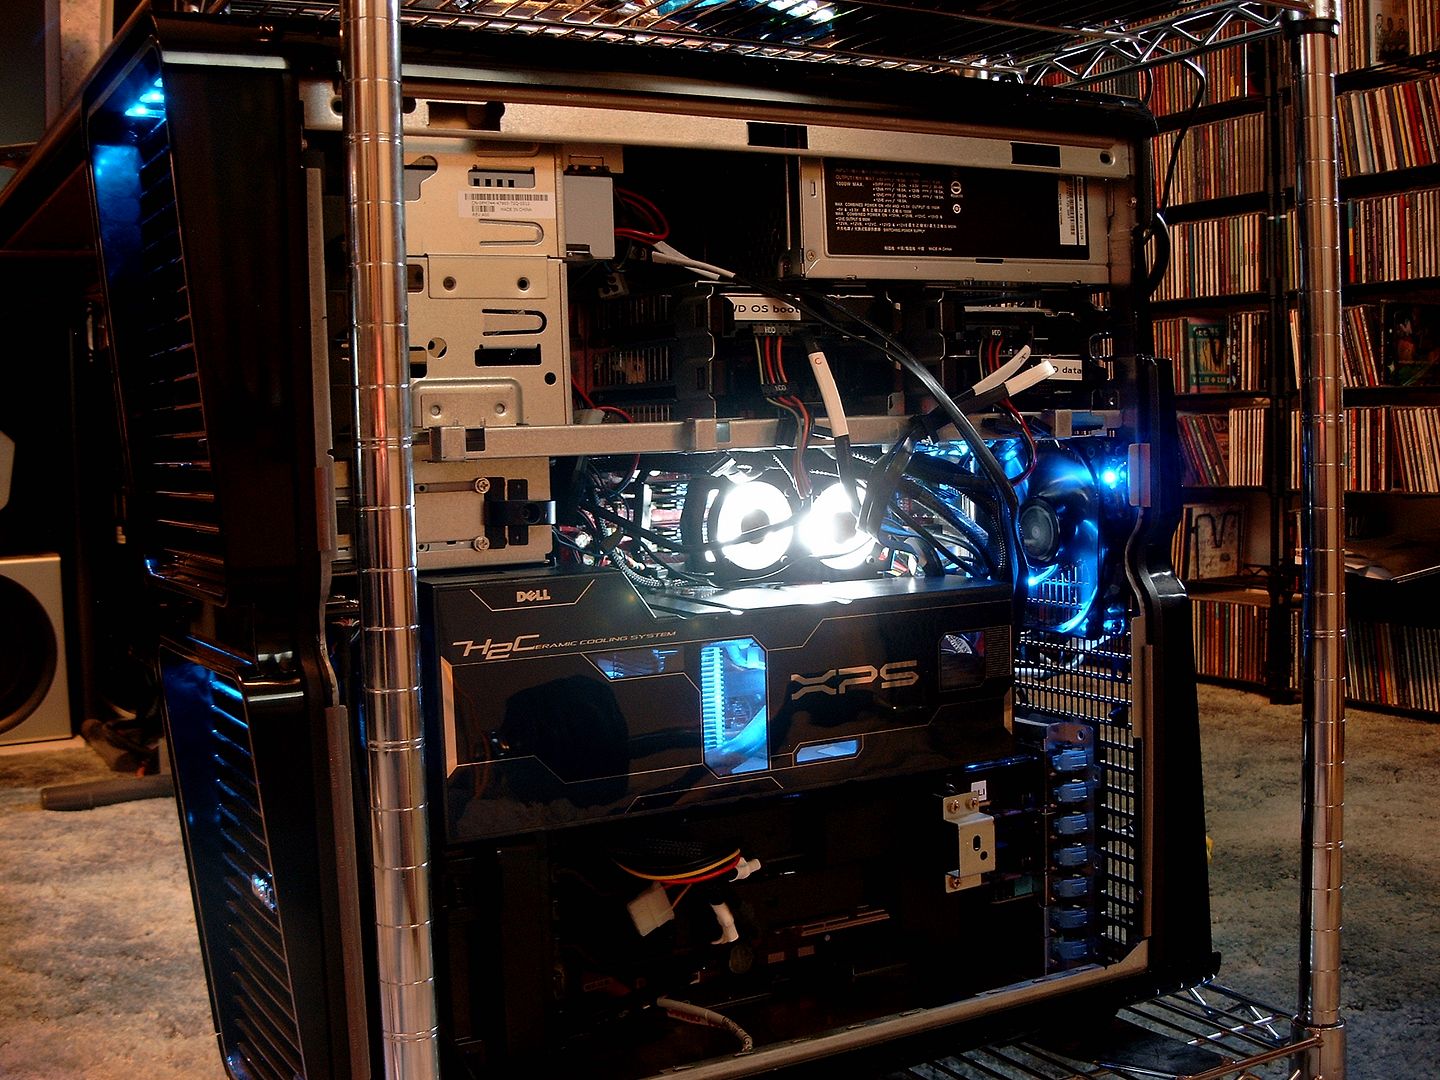
By the way, the kitty neon has both an internally concealed (P8 type) emitter and an overlaid (P9+ type) emitter, so y'all can choose which to use. I haven't gotten the thing packaged yet; I've been fixing hardware. In this old Dozer chassis, the processor is liquid cooled, but I fried the RAM. So, replaced the RAM -new RAM has anodized heat spreaders- and added a rear case fan (blue) and dual fans blowing over the memory (white). True to her name, Phoenix has arisen from her burnout.
PS If you want to see detail, open the image in a new window, then look for the little magnifying glass icon down in the lower right corner and click it. When the new view opens, click the magnifying glass icon a second time for full size. The RAM fan set is GSkill's Turbulence II, about $15 US.
Poser 12, in feet.
OSes: Win7Prox64, Win7Ultx64
Silo Pro 2.5.6 64bit, Vue Infinite 2014.7, Genetica 4.0 Studio, UV Mapper Pro, UV Layout Pro, PhotoImpact X3, GIF Animator 5
whilst I don't understand yer ref. to P8 emitter, I can say that my previous img uses red viper's e.d. warehouse. two lite sources: fluorescent fixture in ceiling and ock's heart prop. former is reflected in poser rounded cube, which is morphing prop secondary in importance only to amazing poser morphing bowl IMVHO.
by jove, that cooling system is impressive! in OS X we use smc fan control, such that cpu rarely exceeds 135 F.

Pinky - you left the lens cap of your mind on again.
Nancy - thanks for the description of cages script. In answer to your Q's what I'm thinking is neon style lighting would be the best way as visually it looks better. But any object that could act as a light would be fine. As for your thoughts about emitter "burn out", not sure about 3D/poser, but in photographic terms theres various factors... Obviously the exposure time and aperture because it's a camera. But also things like the intensity of the object emitting light. How other lights in the scene might impact the emitting light. Type of lighting as well. Angle can sometimes also play a part as well. Take for example the "eye glass" in the image below. Thats actually a sandwich of 3 bits of coloured binder plastic along with the top of a pringles can. It's made like that because just using coloured plastic alone caused burn out, so I used the pringles top as thats semi-opaque. To further reduce the burn I also used a small door-bell light as that had a cover over some LED which gave a more wider diffuse light. Even then it took me quite a few shots to get the time V exposure balance just right. Think this one might have some light painting exposure comp on top of full manual shutter/aperture/ISO as well.
Pinky - you left the lens cap of your mind on again.
seachnasaigh - again thanks for all of this and please no rush especially given you've got machine woes. Really just a couple of quick Q's and some thoughts... When you say .."each test render takes a while"..how long would you say each one takes? In your description of how it works, would be I correct - or not :)- in saying if there was only 1 "neon" tube, that could be used to light a scene? Obviously they'd be no glow, but it would it still need a IDL emitter? Whats the difference twxit P8 and P9 emitters? In your second image with the mirror I see you - rightly - caution about placing a mirror behind it. Not sure here but I wonder if a possible the solution might be to place a flattened version of the emitter behind the IDL emitter. Kinda like how I taped black card behind the eyeglass light and the mouth to stop light from spilling out from behind the mask and mouth. Or would that cause the same effect as in real life. Noticed on the real one at times I'd get some lens flare. Yea I know cliched, but did look rather cool :) Annoyingly as my SLR has an annoying sensor dust-spot, at certain angles I was getting some odd spots so that didn't work, but could lens flares be possible in poser? BTW sorry to read you've have to rebuild part of your mega-machine. Looks like an amazingly powerful piece of kit, the cooling system alone says don't mess with me!
Pinky - you left the lens cap of your mind on again.

Pinky - you left the lens cap of your mind on again.
He looks like a Borg. ![]()
Ah yes, machine woes - having just gotten Phoenix back online, now my number two workstation Galadriel has a destroyed RAID. Galadriel is a 2008 model, but well worth fixing. She has 24GB of 1600MHz RAM and a liquid-cooled HyperThreaded hex-core processor factory clocked at 3.46GHz, which automatically ramps up to 3.72 GHz when only some of the cores are running (speeds up when the render gets down to the last few buckets). At night, she glows violet. :)
Each test was taking 45min-1hr, but that is mostly attributable to the entirety of the scene (not the neon prop), and because the scene is completely IDL, with no Poser lights. In any case, you can use lesser render settings.
If you used a single tubing mesh, you run into that same old problem: If the ambient is high enough to cast a significant amount of light, the color is burned out (unless it's highly saturated), and the shape of the tubing is lost - it looks like a flat silhouette.
Hence, one tubing mesh for the "neon", which is intended to show in the render. This object will have a gentle ambient, so as to retain its color and shape/depth. A second tubing mesh will be the high-ambient emitter. In P8, it needs to be nested inside of the visible neon mesh like a matryoshka doll. This is a severe limitation on the amount of emitter surface area for some models, and you are limited in using transparency, refraction, etc. for the neon. Plus, in order to let IDL light through in P8, the neon must be not visible in raytracing. For P9+ I prefer to overlay the emitter outside of the neon mesh, with the emitter's properties set to be not visible in camera, but visible in raytracing and checked as a light emitter. The glow aura is a third tubing mesh, of considerably larger diameter.
"I wonder if a possible the solution might be to place a flattened version of the emitter behind the IDL emitter." That would conceal the emitter, but it would also block light from the emitter in that direction, and placement would depend on the camera perspective. So it would work for me, and for you, but it would be beyond most casual Poser users. Eventually, I would like to have a solution which allows for casual Poser users.
I hate postworking, but a simple workaround for P8 on up is to render once with the neon set for visible in raytracing, then render again with the neon set to not visible in raytracing, and overlay the two in your photo manipulation program, and erase the area showing the emitter in reflection.
Poser 12, in feet.
OSes: Win7Prox64, Win7Ultx64
Silo Pro 2.5.6 64bit, Vue Infinite 2014.7, Genetica 4.0 Studio, UV Mapper Pro, UV Layout Pro, PhotoImpact X3, GIF Animator 5
If you expand your Poser library's description area (temporarily), selecting the prop in the library will give you some pointers. 
Poser 12, in feet.
OSes: Win7Prox64, Win7Ultx64
Silo Pro 2.5.6 64bit, Vue Infinite 2014.7, Genetica 4.0 Studio, UV Mapper Pro, UV Layout Pro, PhotoImpact X3, GIF Animator 5
Privacy Notice
This site uses cookies to deliver the best experience. Our own cookies make user accounts and other features possible. Third-party cookies are used to display relevant ads and to analyze how Renderosity is used. By using our site, you acknowledge that you have read and understood our Terms of Service, including our Cookie Policy and our Privacy Policy.


 .
.
 .
.
 .
.



Attached Link: http://www.renderosity.com/mod/forumpro/showthread.php?thread_id=2882253

As I’ve said in the photo forum, had an idea for a cool photo, but it didn’t quite work out, but as said there it got me thinking and lead to two ideas... ***What if this idea was transposed from the real world to a virtual environment using similar construction and photographic style techniques? What else could be used to make shapes so artists and photographers can play with light? Mostly without spending too much money, in fact most of the stuff used here came from pound-stores :)*** To make it easier to follow, I’ve spilt the two ideas into 2 separate threads. The 3d in here and the photo stuff in the photo forum. Link to that is abovePinky - you left the lens cap of your mind on again.