Renderosity Forums / Photoshop
Welcome to the Photoshop Forum
Forum Moderators: Wolfenshire, Deenamic Forum Coordinators: Anim8dtoon
Photoshop F.A.Q (Last Updated: 2024 Nov 04 10:41 pm)
Our mission is to provide an open community and unique environment where anyone interested in learning more about Adobe Photoshop can share their experience and knowledge, post their work for review and critique by their peers, and learn new techniques while developing the skills that allow each individual to realize their own unique artistic vision. We do not limit this forum to any style of work, and we strongly encourage people of all levels and interests to participate.
Sharpen your Photoshop skill with this monthly challenge...
Checkout the Renderosity MarketPlace - Your source for digital art content!

Subject: effect question

Yes, definetly it looks much closer to what i had in mind! Though I would like to have the beams bursting out in all directions, I think something to be done with the perspective effect. The above link looks very promising. Could you just, list the effects you have used to create this? Thank you for taking the time helping me!


Sorry, I must not have been clear. My Algebra teacher always complained that I left out steps when doing proofs at the board. No quick mask mode. Duplicate your text, rasterize it, "rough up" the edges a little bit using the airbrush in diffuse mode, color black. Do the same thing with white in areas where you want extra light. Then hit it with Radial Blur a couple times. Be sure to move the center of the blur to the center of your text. Now erase the parts of the blur that are obscuring the parts of your text that you want to see. You can do that with the eraser, but I prefer to add a "Layer Mask" and use a soft airbrush, color black to do it. You'll probably want to add a "Levels Adjustment Layer" on top of everything and slide the white arrow on the right towards the center in order to brighten up the image when you're done. I'll try and post a step by step later today. Part of the problem is that I rarely do anything the same way twice. Right now I have to go "pretend to work". Keep trying. I just upgraded to PS 7 and am only now getting around to trying some features that were added in 5.5 - Ken -
Thank you Ken! I am very close now... I've been experimetnig with applying the effect for each letter, separately. It takes a lot more time, but with the actions... but still takes a lot more time. I am doing the opposite now. I am working, but pretending not to work (I am on holiday for 3 months in Marseille!) Cheers! Balin

Privacy Notice
This site uses cookies to deliver the best experience. Our own cookies make user accounts and other features possible. Third-party cookies are used to display relevant ads and to analyze how Renderosity is used. By using our site, you acknowledge that you have read and understood our Terms of Service, including our Cookie Policy and our Privacy Policy.
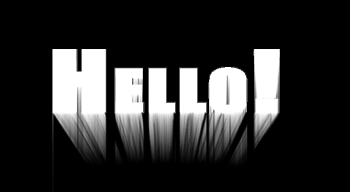
Hello!Can anyone help me how to achieve the following effect?
The effect is something similar to when the sun passes through the clouds and you can see the beams.
In my case, we have a black background, a hole on it, e.g. the word "hello", and beneath it there is a very strong burst of light, so you have beams coming out of the hole (or the word).
On the attached image, i've achieved the opposite. I was playing with the rotation, wind, then the perspective filters/transfomration.
The clear, perhaps glowing white letters should be behind, or underneath the beams, and not on top.
I've recently migrated from PaintShop to PS, and I really want to do it in PS, to justify my investment. I know it might be completed, any ideas, suggestions are appreciated.
Thank you
Fuli