Renderosity Forums / Photoshop
Welcome to the Photoshop Forum
Forum Moderators: Wolfenshire Forum Coordinators: Anim8dtoon
Photoshop F.A.Q (Last Updated: 2025 Jan 14 1:57 am)
Our mission is to provide an open community and unique environment where anyone interested in learning more about Adobe Photoshop can share their experience and knowledge, post their work for review and critique by their peers, and learn new techniques while developing the skills that allow each individual to realize their own unique artistic vision. We do not limit this forum to any style of work, and we strongly encourage people of all levels and interests to participate.
Sharpen your Photoshop skill with this monthly challenge...
Checkout the Renderosity MarketPlace - Your source for digital art content!

Subject: Brushed Metal in Circles?


Measure
your mind's height
by the shade it casts.
Robert Browning (Paracelsus)
http://franontheedge.blogspot.com/
Tihomir, Tried your method, tried it lots of times in various combinations but I couldn't get it to work at all.
Measure
your mind's height
by the shade it casts.
Robert Browning (Paracelsus)
http://franontheedge.blogspot.com/
You will probably need to mask it with a circular mask at some point. It will certainly help if you use a canvas larger than the size you want to end up with so that you can mask off the edges. If you find definition lacking try Auto Levels or just manually tweaking the contrast through Image->Adjust->Brightness/Contrast or Curves. Also, highlights can be airbrushed on with a white and Color Dodge mode and shadows with black and multiply. Also, a little manual work might be required on the very center becuase of course Radial Blur has little effect on the center of the blur. I think Alien Skin have filter that emulates this type of brushed metal, but it's more fun to try to achieve it with the tools supplied :)

Open your mind and share the knowledge!
lundqvist, Aha! So your version in message 2 above isn't a shot showing the effect on a model, but the "shine" is artificially applied in PhotoShop! I see. In that case it won't do for my purposes as I need a uniform result so that the lighting in Bryce adds the shine so that the model with this texture fits in with the rest of the scene. Tihomir, Sorry, but I don't understand what you said. a) that doesn't look like my texture, it looks patchier. b) What does "duplicate the background and set it to screen" mean? Particularly the word "screen" is baffling me. c) How "duplicate again"? d) What are "difference clouds" and where are they? e) what "mode" where? f) what is a "H/S adjustment layer" and how do you add it to anything? Where are the "settings" you mention? etc etc "contrast" is about the only thing I know where to find (appart from using ctrl L for levels, I can do that.) Sorry about this Tihomir. lundqvist, "I think Alien Skin have filter that emulates this type of brushed metal, but it's more fun to try to achieve it with the tools supplied :)" It's also a lot more likely to help me learn how to actually use this program. But thanks for the suggestion. Fran
Measure
your mind's height
by the shade it casts.
Robert Browning (Paracelsus)
http://franontheedge.blogspot.com/


**************************************************************************************
Life may not be the party we hoped for but while we're here we should dance.
"In that case it won't do for my purposes as I need a uniform result" Hmm, in that case, just radial blur the black/white noize but don't apply any faux-shading with, it will then be flat-shaded. Then Bryce's material properties can be used to effect the specularity, reflection, etc. You may also be use it as a bump map for the same texture (but the strength would need to be very low).
Ravynsworld, Thanks very much indeed, very easy to understand and not in the least confusing. I'm saving this page for later use. Brill! lundqvist, I'm fairly sure that's just what I did, so that's okay (not sure what 'faux shading' is anyway) But yes, on the Bryce mat properties, that's what I intend. As for bump - I was thinking of about 1.6.... okay? Thanks to all; lundqvist, tantarus & Ravynsworld for all your efforts to help me with this, much appreciated. Fran
Measure
your mind's height
by the shade it casts.
Robert Browning (Paracelsus)
http://franontheedge.blogspot.com/

Measure
your mind's height
by the shade it casts.
Robert Browning (Paracelsus)
http://franontheedge.blogspot.com/

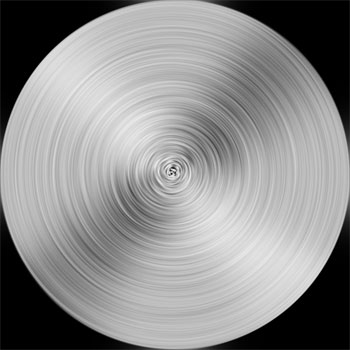
Is this the way to go? I've tried the highest radial blur (on it's own no good as pic in message 13 demonstrates) but then I applied the radial blur again, on a lower setting (17) just to see - It reduced the banding considerably, so I tried again with the same low setting, and once again, and now I've got this...
Do you think this will be good enough, or should I keep on with more radial blurs? (at 17? or higher?)
Message edited on: 12/01/2005 07:38
Measure
your mind's height
by the shade it casts.
Robert Browning (Paracelsus)
http://franontheedge.blogspot.com/
Yes I think that will work, but might need a bit of contrast boost. My approach, FWIW, would be to begin with a canvas filled with black/white noize. Then apply radial blur with a low spin setting, maybe 15. Then, to keep hitting CTRL-F until the circular bands seem smoothed out enough - Not being concerned about contrast at this point, just to get a nice set of concentric bands. Applying the same filter repeatedly at a low setting lets you decide when you've got what you want interactively. Once I'd got a base that I was happy with, I would start to worry about contrast and start using levels, curves, or brightness/contrast to get the variance I'd like. The contrast between light and dark in the image will have a bearing both on the texture and the bump map of course and you might use different maps for each, derived from the same source image, but with differing contrast. Hope you get the effect you're seeking :)
Yes, that what I did, more or less. Hadn't thought of using levels though. And thanks for the tip on using 'same image/ different contrast' for the bump. I'll try that.
Measure
your mind's height
by the shade it casts.
Robert Browning (Paracelsus)
http://franontheedge.blogspot.com/

I tend to take money out rather than put it in, so I dont see many vault doors... unless George Clooney, dressed in black is clicking uselessly and repeatedly on a small, grey, battery-driven remote switch... And even then I tend to be concentrating on George, rather than the texture of the vault door... I'll try to remember next time.
Measure
your mind's height
by the shade it casts.
Robert Browning (Paracelsus)
http://franontheedge.blogspot.com/
Privacy Notice
This site uses cookies to deliver the best experience. Our own cookies make user accounts and other features possible. Third-party cookies are used to display relevant ads and to analyze how Renderosity is used. By using our site, you acknowledge that you have read and understood our Terms of Service, including our Cookie Policy and our Privacy Policy.
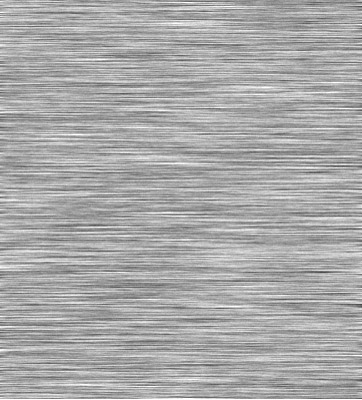
I did a nice easy "Brushed Metal" tutorial a while back. Fill with grey, add noise, motion blur, adjust brightness/contrast, crop, done. See image above^^^ But now in actually using the image texture I find I need to know how to get that same brushed metal texture to look brushed in circles - as if a mechanical thing has inscribed lines on a flat circle of metal with... say a brillo pad - by holding the pad in the centre of the spinning circle and slowly drawing the pad outwards to the edge thus creating circular brushed marks. How can I do this? Also is it possible to bend the brushed metal texture to get the lines to go in a curved sweep rather than either straight or circular?Measure your mind's height
by the shade it casts.
Robert Browning (Paracelsus)
Fran's Freestuff
http://franontheedge.blogspot.com/
http://www.FranOnTheEdge.com