Renderosity Forums / Poser - OFFICIAL
Welcome to the Poser - OFFICIAL Forum
Forum Coordinators: RedPhantom
Poser - OFFICIAL F.A.Q (Last Updated: 2025 Feb 03 12:46 am)

Subject: Magnet question


Interesting. I don't think there's any way to 'lock' vertices...
A couple of vaguely related things that may or may not lead to an answer:
Sometimes Poser doesn't quite know how to find an attached prop
like a hair prop. It can be hard to reach such things in Python, and
sometimes they don't appear on the selection menus.
Also, are you sure the zone is really where you want it?
Have you looked at it from two different angles to check that
it's not really out in front of the hair?
My python page
My ShareCG freebies
Thanks for the reply, Ockham.
This is a hair figure I'm dealing with specifically, not a prop. Yes I made sure the zone was where I needed it to be. I use magnets all the time for clothing and adjusting body parts.
The hair figure is the FK Twins pigtails from 3DCommune. I've tried sizing it with the various scale dials, but it doesn't react well since it's conformed. I have used magnets on other hair figures without a problem, but this one and some props just seem to ignore the deformers.
Yeah, I didn't really think that would be the problem.... just wanted
to get the obvious stuff out of the way first.
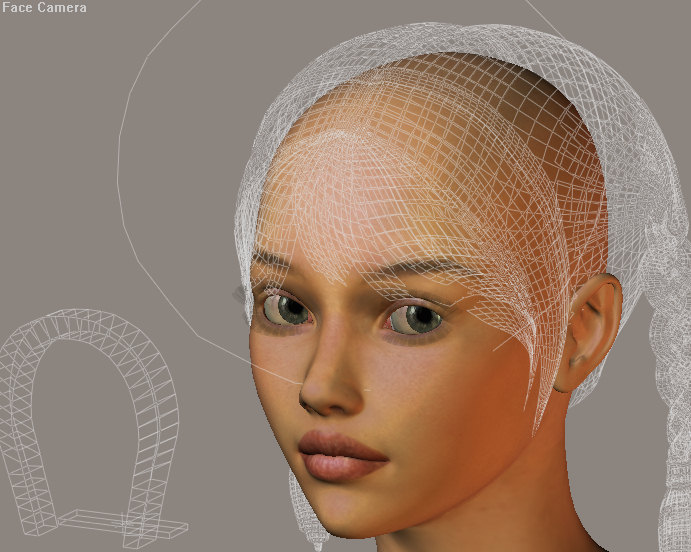
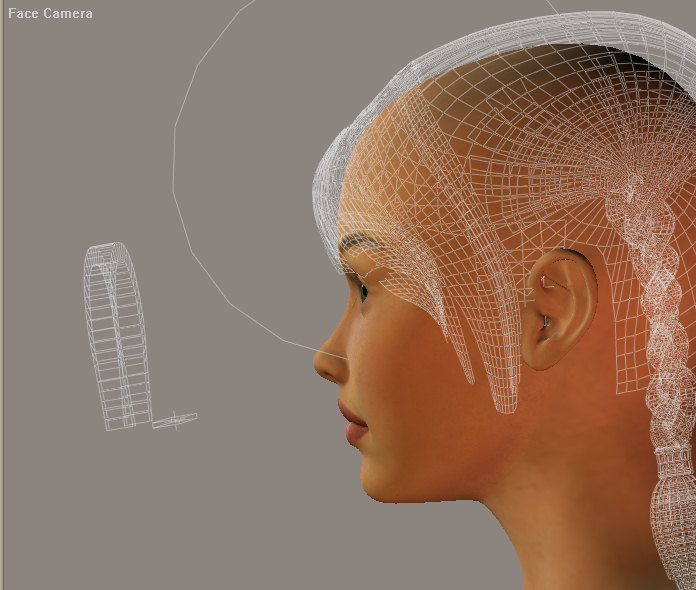
Could you post a picture in wireframe mode to show the vertices and facets?
Maybe that will give someone a clue.
My python page
My ShareCG freebies

In that case, i think the deformer will have problems acting on
one of them.
My python page
My ShareCG freebies


I didn't check the Bend option, will do that in a minute.
I didn't lock the hair. I never use Lock, since I can't see that it ever does anything, at least it never does what I expect it to, lol.
I selected the Head portion of the hair which is where all the morphs are located. I did try adding the Body to the deformer, but it didn't make a difference.
Unfortunately checking the Bend option for the head object didn't make a difference (it was originally unchecked.)
Here are the available parts of the firgure: Head, Body, Control (an attached control prop), lTopBraid, rTopBraid, lBraid1, rBraid1, rTail, lTail. Here is what I tried that did not had any effect:
Select Head and create magnet
Add Body to deformer
Select Body and create magnet
Add Head to deformer
I do appreciate the suggestions though.
there's an awful lot of things that can go wrong or weird with conforming hair. without knowing the cr2 and obj one would have to write a novel to exclude all possibilities. so i suggest you talk to the guy who made this hair (and if he cannot help you...start some voodoo-thing). the other suggestion...since you know how to use magnets, why don't you use this hair as a prop? i don't see a reason why it has to be conforming, it has all groups ready to move the braids seperately...

Are you completely certain the magnet isn't having any effect at all? From your screens it looks to me like you want to pull the bottoms of the bangs away from the face, to fix that clipping problem - the ends of the bangs are near the bottom of the mag zone though, and the falloff settings and the amount of movement you have put on the magnet may not be enough to actually move the ends too much. The high part of the forehead actually does look pulled out to me. What happens if you move the magnet to something like Z: 10 or 20?
Just to cover the basics, why don't you scale the zone to something rather large, large enough to cover both figures. And add every actor of the hair figure as well for the mag to deform. Better yet, is it possible if you can do this without conforming the hair, and only the hair figure in the scene. And make sure the group box in the magzone property tab is unchecked. It also doesn't hurt to have these checks done in a freshly started Poser in a freshly turned on computer, if you know what I mean :)
Alternately, You can also import the hair object and mess with it instead of the figure. Export out the morphed hair and use it as a morph target.
If all else fails, as a last resort, import the hair object and use the setup room to create a new hair figure using the donor bone from other similarly styled hair figure. Or if you are comfortable with doing it by editing cr2, whichever method you prefer, create a new figure and see if that solves this mystery magnet problem.
Thanks for the replies folks.
PJZ and Chinnei: I have tried making the zone huge and moving the magnet all over the place, not a molecule of movement from the hair figure.
Amacord: How do I make the figure a prop? Won't it lose the bone information for the braids?
Chinnei: I've never really used the Setup room, probably farther than I want to go right now.
FYI, I started up a fresh session, loaded the hair figure only, and the magnet still won't affect it, trying all the things I've tried so far.
I'm trying Chinnei's suggestin of importing the obj, applying the magnet, and then exporting as a morph target to see if that works.
Well, trying the load morph target on the Head object I get the error that the target has the wrong number of vertices. If I choose the body and then load morph target Poser crashes and burns.
So I exported only the head part of the figure, reimported that obj, applied the magnet (which works fine on the obj), then exported that as a morph target.
Then cleared Poser, loaded the hair figure and loaded the head morph target. It load fine, but the dial doesn't do anything...
I haven't really successfully done external morph targets before, so I'm probably missing a step. Did I need to do something to save the magnet information?
basically import the .obj, parent it to actor head and save it to libraries/hair. of course there's no bones then, this prop will be as stiff as a gun barrel. but that's where mags show their power...;) personally i never use conforming hair. it's this "wrapped-around-the-neck" thing..... if you want to keep existing morphs it's a bit more complicated. but just a bit: - load the hair in a new scene. - make sure that all dials (morphs, trans and scale - whatever) are zeroed. - export the figure as "*.obj". include all actors. in export options check only "weld identical vertices" and "include existing groups". - then set the first morph to "1.0" - export it with the same options as before, and use the morphs name. - same for all the other morphs. - when you have all morphs, import the first obj. (the zeroed hair) - with object properties/add morph targets you can assign the exported morph.obj's as morphs. (sorry, my english isn't good enough for sentences like this...) - load your v4, parent the prop to actor head, safe it to libraries/props. - amen. what sounds sooo complicated is in fact boring but simple. less than an hour's work, i'd say. with the creators permission (i don't have this hair) i could make it for you, but it's quite unlikely that he will agree. try your luck and ask him..... A.
Lol, thanks Amacord. Your English is better than most Americans who have been speaking it all their lives.
Actually I found that the Aiko 3 version of the hair scales and fits V4 better than the V3 version does.
I did email the creator of the hair asking why magnets wouldn't work, and if they planned on releasing V4 fits for it.
thanks for all the help though!
Okay, I'm gonna try to list it step by step so I hope you don't mind if some are just too basic. (I'm using Poser6 SR2 btw)
Import the original hair geometry as obj with everything unchecked.
Morph the obj with magnets, but do not move the object. If you are fitting this to V4, I would move the V4 figure instead. Don't parent the object either.
Once you morphed the obj, and I'm assuming the morph is only done to the head portion of the hair, click on group editor and select the group head. Make sure the group is highlighted and it is the correct group that you made changes to. Click Create Prop and name it as V4Fit, or whatever. Inspect your new object with the morphed object to make sure the changes have indeed carried over. Export out this new obj with only the last option checked, "As Morph Target", and save it as V4Fit or whatever.
Load the hair figure into the scene. Select the head portion of the figure. Under Properties tab, click Load Morph Target, and load V4Fit as morph target.
Above step was only for the head group. If you've made any changes to the tails or other parts, follow the same procedure as above for each group. For example, if you made changes to lTopBraid portion of the hair obj, then you would select the corresponding group under group editor, and create a prop using that group.
Since this involves only head group, the process is pretty quick. But other objects with multiple groups it becomes really time consuming, if you've made changes to more than one group. I could swore someone made a python script for this but can't think of the link at this moment. Maybe someone can chime in on this.
Anyway, I hope this works out for you, and let me know if there's a problem.
ROFL, this is too funny!! I didn't even know my posts had to be decoded. :)
I use high contrast desktop setting so I could not tell it came out like that. I disabled it and now it shows all black. Although, kinda strange that my previous post was not affected by it. Hmmm, some strange things going on today.
Thanks for telling me this btw.
Well, the steps all made sense and were easy enough, but loading the morph target and trying to adjust the dial results in zero change at all to the figure. Actually I can change the dial up to an ungodly number, but when I click on the dial number, it shows zero, even though it shows the value I set it for when not in edit mode on the parameter.

That's the case of when the actor is locked. Although I know you checked already, but can you verify this again? Make sure to select on the head of the figure, and check the object menu and see "Lock Actor" is not checkmarked.
If not, then it's probably within the CR2, but sorry that I don't know exactly which line to look for.
Well sure enough, the Lock Actor check was on for the head object. I KNOW I checked before when you or someone else mentioned it. And sure enough the MT works perfectly.
Just to be sure, though. I loaded a new instance of the hair and unchecked the Lock Actor on the Head, and tried a magnet again, still wouldn't move. I just needed to make sure we didn't go through all this due to my own stupidity.
Thanks for all the help from everyone!
I found this just now, so I had to see what was up. It's a simple matter of:
(1) The HEAD actor is locked by default.
(2) The HEAD actor has BEND turned off by default.
So all you have to do is:
(1) Select the HEAD. From the menu, choose Object: Lock Actor. You will see that the checkmark goes away.
(2) On the Parameter Dials panel, click the Properties tab. Click the box next to BEND to turn it on for this actor.
Now you can add magnets to it and see their effects as expected.
No import/export required. :)
Quote - No import/export required. :)
And what's wrong with import/export?
I do all my morph, whether using magnets or using external modelling program, with the original geometry. When you morph the figure, you are still working with the original geometry, except that now it's dependent on the CR2. I find it much more accurate and trouble free to morph the object directly. Also, you only need to add a magnet once per object, instead of adding different actors one by one. it might take couple more steps to export a morph, but I do use a program from Dimension3D, which makes it even more quicker than working with the figure.
If you're using an external program for morphs, then yes, importing is absolutely necessary. If you're only using Poser magnets, then no.
ir:
Are you starting with a freshly loaded hair figure, and then doing the above, and then adding the magnet? Also, the actor to add the magnet to is the Head. Just making sure, since it works as expected once those options are set to how they should be (using the exact same FK-Twin hair model you are).
Quote - If you're using an external program for morphs, then yes, importing is absolutely necessary. If you're only using Poser magnets, then no.
Hmmm, for some reason my post keep shows up in black box.
Anyways, no one's saying it's absolutely necessary to morph using only the original geometry. If you find it easier morphing the figure, then by all means, use the figure. I just find it more accurate and trouble free to morph the geometry instead, even with the magnets. The whole argument is silly anyways, when you morph the figure, you are essentially morphing the geometry of the figure. I just prefer to not deal with other stuff that's not related with the actual geometry that's all :)
Oh btw for others, if anyone cares, I found that link for the script that pretty much automatize the entire process. It's made by svdl and it works fine for me, with FBM and all. (I think it only works in P6 though)
http://svdlinden.xs4all.nl/poserstuff/downloads/morphfromobjp6.zip
I realise this is stating the blooming obvious, but the two screen shots show the magnet bar and magnet both almost touching and outside the effect zone. This won't create a particularly marked effect. You need to leave the magnet bar inside the sphere of influence, ideally, and just move the horseshoe part of the magnet to create an effect.
Well, I have to admit defeat here.
After a fresh reboot, and performing the appropriate steps (unlocking, bending), the magnet now works fine. I don't know, maybe something was lingering in cached memory that Poser was still picking up on. Very odd. However the magnet base was nowhere near the zone ;)
I wasn't talking about the magnet and base, I was talking about the base and zone, as you mentioned. The screenshot was just a point in time, I had moved the magnet, independent of the base, all over the place, the screenshot just showed where it happened to be. Bur even that small movement, once all ws said and done, did show a marked effect. The relation of the magnet and base to the zone are irrelevant, it's the relation of the magnet to the base that produces the effect.
Privacy Notice
This site uses cookies to deliver the best experience. Our own cookies make user accounts and other features possible. Third-party cookies are used to display relevant ads and to analyze how Renderosity is used. By using our site, you acknowledge that you have read and understood our Terms of Service, including our Cookie Policy and our Privacy Policy.
Using Poser 7, but I've noticed this in 4 and 5 too.
When applying a magnet to some figures and props, the magnet (and waves too) seemingly have no effect within the zone. Meaning I would expect the object to be deformed but it doesn't change.
I could see why this might happen on some items which are extremely low poly, but recently I tried it on a hair figure (not a hair prop) to get it to fit V4 better. Nothing happend when the magnet was manipulated. I even tried adding other elements of the hair figure to the deform list, but still nothing. I know it's not because it's a conformed figure, so what might be the reason?