Renderosity Forums / Poser - OFFICIAL
Welcome to the Poser - OFFICIAL Forum
Forum Coordinators: RedPhantom
Poser - OFFICIAL F.A.Q (Last Updated: 2025 Jan 03 1:41 pm)
Subject: Some questions on how to parent a light to a poser prop...
- Yes.
- Yes.
- Yes, you can paste the lt2 data here. It is not really significant where you a paste it, so long as it respects the brackets.
- Yes.
What I usually do myself when adding a light to a prop, is to parent the light to the prop, then save a pz3 (scene). I then construct a pp2 template like so:
{
version
{
number 3
}
[added code goes under this line]
}
I then Copy & Paste the relevant parts of the code from the pz3 to my pp2 template. There are three parts of the pz3 that need to be copped. Of course, only copying the relevant parts. The declaration section near the start of the file. The definition section which contains the channels and other stuff, and the 'doc' section.
There are actually some if's and's and but's that need to be added , but I'm in not any condition to do that at the moment. A good tip is to edit the names of the light and shadow cam to give them unique internal names, so that ne names do not conflict with names that may already exist in a scent that you will load the pp2 into.
The attached file is a Poser box prop with a light parented to it. You will need to loose the ".TXT" part of the file extension. Because Poser increments the names of successive instances of props, this will only work for the first instance of the box loaded into the scene. To have it work for multiple instances of the prop, you would have to implement it as a cr2.

Privacy Notice
This site uses cookies to deliver the best experience. Our own cookies make user accounts and other features possible. Third-party cookies are used to display relevant ads and to analyze how Renderosity is used. By using our site, you acknowledge that you have read and understood our Terms of Service, including our Cookie Policy and our Privacy Policy.


Hello. This is my first time asking a question here, some of you who visit DAZ3D's forums might know me as lordvicore (Ooooooh... that guy,eh...) over there. I tend to write a lot and ask long questions, but I'm really trying to be as concise as possible. So on to the questions...What I want to do: Make a Prop(which I have already created)have a light(or lights) parented to it so that it can be used as a smart prop, which will only require the user to click it's icon to load it.
This is for a BIG architectural freebie model I made and I want it to contain some lighting.
The problem:
I'm trying to follow a tutorial by Webtigress (or N8Dreams) "How to light Poser props"
http://www.sharecg.com/v/25791/PDF-Tutorial/How-to-Light-Poser-Props?interstitial_displayed=Yes
What I want to do is (as the tutorial says I can) is to Parent a light to a poser prop by altering the .pp2 to include the .lt2 data. Only problem is that despite several attempts, it won't work. I've tried several variations of the methods described but they don't work either. I searched the web for other tutorials but that yielded a lot of nothing.
I'm guessing that I'm missing something, or placing something in the wrong spot...
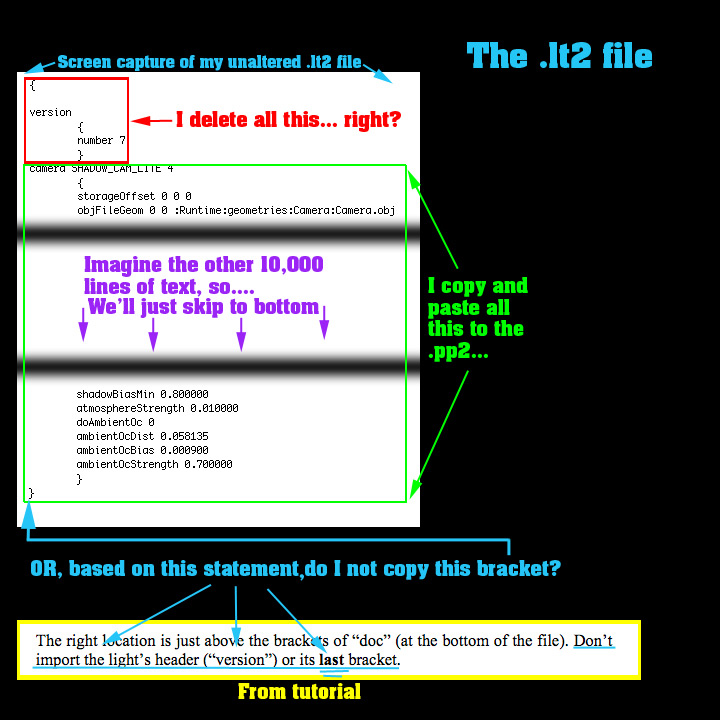
Rather than describe the tutorial, I figured I'd try and illustrate what I'm talking about using some screen captures...
The first is of My unaltered LT2 file, the second image shows the PP2... I'm guessing that proper(exact) placement of the copied data is real important and I'm really not clear if I'm on target... Just to be clear, I think the tutorial is great, I just think I may not be interpreting it correctly.
(so thanks Webtigress... or N8Dreams for the tutorial it is very helpful).
Anyway thank you in advance for any suggestions or advice you may have.
-Edit I don't see a way to post more than one picture per post...
This set up is different from other forums I visit... I'll post The PP2 image right after this(a new post)....