Renderosity Forums / Poser - OFFICIAL
Welcome to the Poser - OFFICIAL Forum
Forum Coordinators: RedPhantom
Poser - OFFICIAL F.A.Q (Last Updated: 2025 Jan 20 11:41 am)
Subject: Material room question (combining textures)
a simple way is to use two image files and a mask. You may be able to omit the mask.
add a blender node. connect the two image maps to inputs 1 and 2 . set the blend value (last input) to 0.5 and connect the blender node to diffuse.
The blend value can be adjusted as needed.
For better blend control make a black and white mask and plug it into the blend value input. The mask sets one or the other image to display. Blur the edge of the mask a little and you get a transition between the two textures.
You might also get an interesting depth effect by blending using a Custom_Scatter node. Not sure how well that would end up working for skin and tattoos, but I've had some success at creating layered depth for other surfaces using that node. Putting the tattoo in the base layer might allow one to skip any blurring step, dunno.... :unsure:
===========================sigline======================================================
Cage can be an opinionated jerk who posts without thinking. He apologizes for this. He's honestly not trying to be a turkeyhead.
Cage had some freebies, compatible with Poser 11 and below. His Python scripts were saved at archive.org, along with the rest of the Morphography site, where they were hosted.
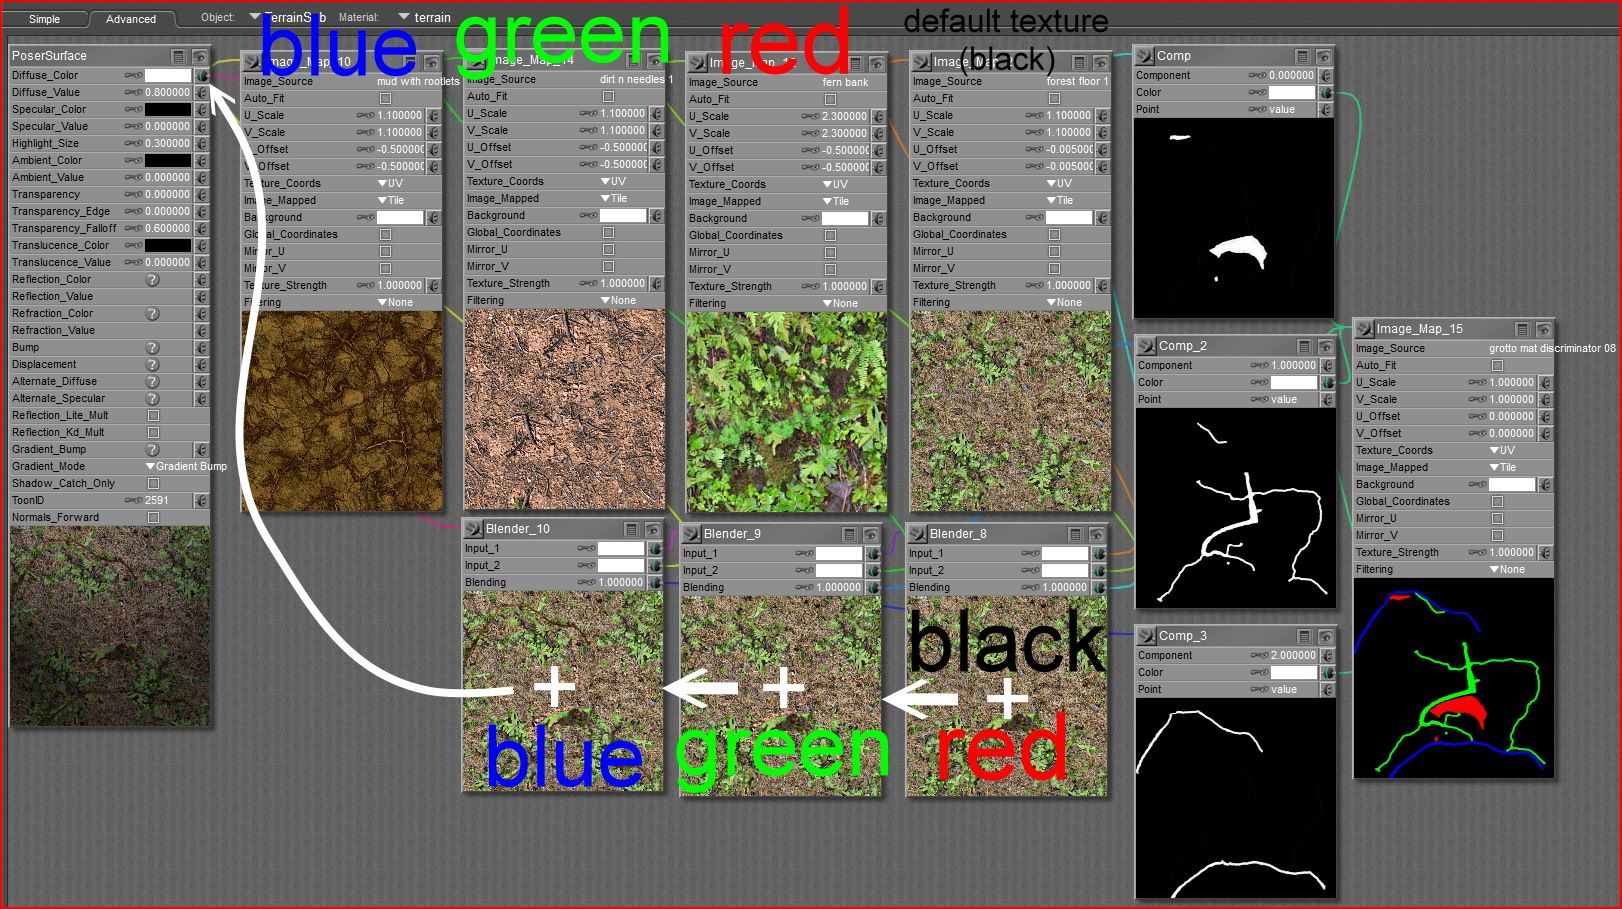
If you have two textures in addition to the base skin, I would suggest a red/green/blue mask on a black background. The black background of the discriminator image would represent skin. Red can be scar, green for hair, and blue unused. Component nodes for each color would drive the value of that color's texture.* * A chain of blender nodes creates the composite texture.
Poser 12, in feet.
OSes: Win7Prox64, Win7Ultx64
Silo Pro 2.5.6 64bit, Vue Infinite 2014.7, Genetica 4.0 Studio, UV Mapper Pro, UV Layout Pro, PhotoImpact X3, GIF Animator 5

The mask, the displacement map, and the "Blinn" map, are automatically created from the second "corset" texture".
Figure texture is upper right
Second texture is lower right
The Blender puts one on top of the other, controlled by the in Math_Functions_3 automatically created mask.
Privacy Notice
This site uses cookies to deliver the best experience. Our own cookies make user accounts and other features possible. Third-party cookies are used to display relevant ads and to analyze how Renderosity is used. By using our site, you acknowledge that you have read and understood our Terms of Service, including our Cookie Policy and our Privacy Policy.


I have lost a little of my material room knowledge but I need to try to combine three parts of a texture into one diffuse. I have the base skin texture and I want to add a scar layer in a certain color (call it red) and then I want to add a hair layer in a certain color (call it black). If I could get a touch of assistance with the blender nodes I would appreciate it. I have an older file someplace that I do something similar (beard and superhero outfit on top of diffuse) but I can't find it on my other machine.
Thanks, in advance.