Renderosity Forums / 3D Modeling
Welcome to the 3D Modeling Forum
Forum Moderators: Lobo3433
3D Modeling F.A.Q (Last Updated: 2024 Sep 08 8:54 pm)
Freeware 3D Modeling Software Links:
Blender | Trimble Sketchup | Wings 3D | Anim8or | Metasequoia | Clara IO (Browser-based 3d modeler)
Check out the MarketPlace Wishing Well, as a content creator's resource for your next project.
"What 3D Program Should I buy?" Not one person here can really tell you what's best for you, as everyone has their own taste in workflow. Try the demo or learning edition of the program you're interested in, this is the only way to find out which programs you like.
Checkout the Renderosity MarketPlace - Your source for digital art content!

Subject: So, what are YOU working on?


Mini test video is here on YouTube : http://youtu.be/SV532sRfMyA
To see a real life demo by some folk I do not know, see this video on YouTube ( just ignore the first several seconds of the guy prepping for the demo !) : http://youtu.be/Fo6qxye-Vbc
Eternal Hobbyist

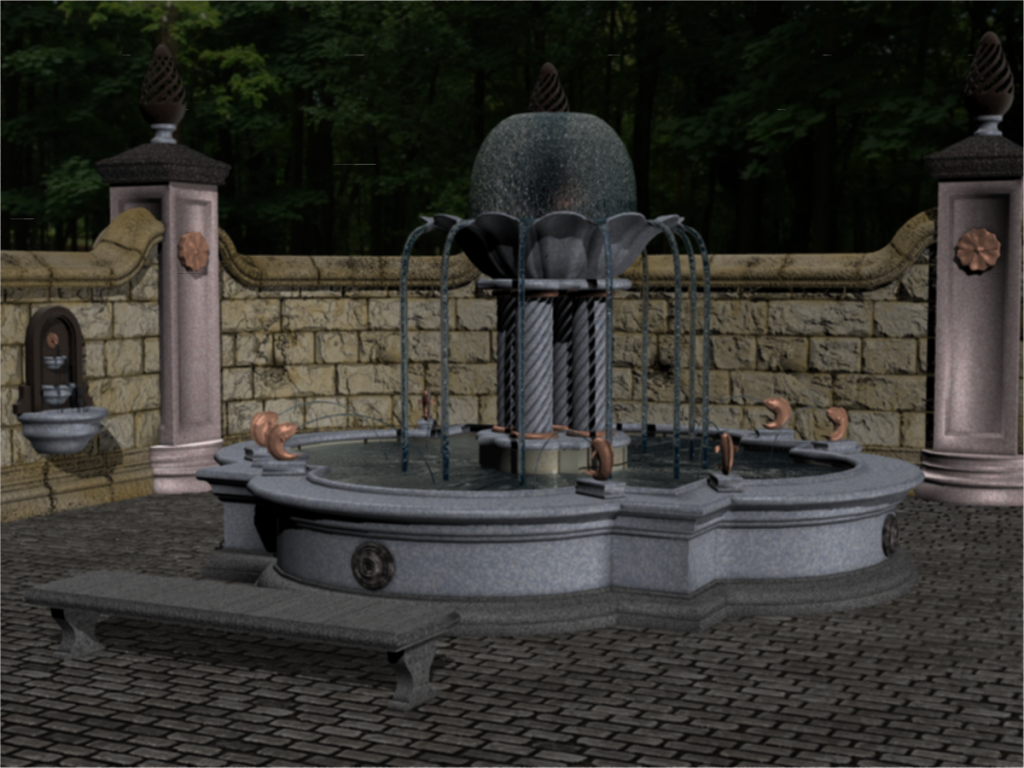
I've been working on a garden / courtyard kit for creating some scene settings. I've almost got all the prop models built, few more small decorative items to make and also a cypress tree to figure out how to make (plants are something I've not done much of so that's going to be a new challenge). The fountain is built in sections to allow it to be taken apart and re-arranged for variation and the water spouts on the fish have a morph to control how far the water stream shoots out. There are a couple of props not pictured here (a wall niche that inserts into the wall, a pedestal base, some decorative garden urns and vases). The bench is still being tweaked, but will also come in a curved version and there will stone back that can be attached to it to change its appearance futher. The decorative bits on the columns are individual props that can be added where ever you like (I'm making a set of 4 different decorative medallions). Also the finials on top of the columns are separate and there are currently two different types, I may add a third. The tops of the columns also morph shape from pyramid to completely flat.
I have virtually all the texturing and bump maps to do still. The limestone block walls are the only thing with a finished texture and displacement map. All the detal in the fountain is modeled in the mesh, no bump map on it at all.
I'm also still pondering what to call this kit. I'll worry about that when its finished. I hesitate to say how long because everytime I do something comes up or goes wrong and it all gets delayed so I'm just not gonna jinx it. LOL
The modeling has been done entirely in Blender 2.67b. Textures and bump maps were done in a combination of Blender, Filter Forge and GIMP. The background is a stock photo from CGTextures on a simple semi-circle surround prop I also made in Blender. Most of the prop meshes are around 1500 verts each, except for the fountain which with all its parts totals around 40k verts (I splurged on it since its the center piece).
So definitely still a work in progress.


Monterey/Mint21.x/Win10 - Blender3.x - PP11.3(cm) - Musescore3.6.2
Wir sind gewohnt, daß die Menschen verhöhnen was sie nicht verstehen
[it is clear that humans have contempt for that which they do not understand]
infinity10, those look really cool, especially in that quick animation.
BardicHeart, great work there! Lots of cool details put into that, like those spitting fish, and those twisted ornaments on the columns. That's looking great so far.
RobynsVeil, that looks very good so far. Love that refridgerator. The only thing is that the table appears a little too tall. Otherwise, very interesting, and I'd like to see how this comes along. I was working on my own kitchen layout recently. I might upload that to this threa at some point.
Great work so far everyone, keep the thread going.
______________________________________
My Store
My Free Models
My Video Tutorials
My CG Animations
Instagram: @luxxeon3d
Facebook: https://www.facebook.com/luxxeon
LuxXeon - Thanks, its been a fun project though at times frustrating. I've rebuilt the meshes of some parts so many times I know the verts by heart at this point. LOL But that's just the perfectionist in me. The fish spouts were one of those frustrating challenges. I started out in Blender using is fluid dynamics simulation trying to create a spout of water that way. While I got some pretty cool results, they were also so high poly there was not way to use them (300k verts, looked awesome but... ugh). So eventually I went back to a small cylinder, array modifier, curved on a path, then added some distortion to add some variation. Worked pretty well and also made creating the morph target easy. The columns were a fun touch, just "screwing" around in Blender with the screw modifier (pun intended, been waiting all day to use that!). LOL
Looking at the mesh for your chair I was noticing how you mapped the quads around the circular cut out. That's something I need to get better at doing. Its a very clean mesh and I can appreciate the skill that went into making it.
Robyn - Building a room is something I want to do in the near future. I'd like to do something Victorian or Georgian or Queen Anne. Did you build from a floor plan or measured drawing? I'm thinking about using a home architect program to create the floor plan I want, then import that as a plane into Blender, match the scale and use that to work from.
Quote - @LuxXeon, thanks. Getting the animation done took some tweaking, and I'll need more time to get a good choreography going.
I looked at the real life video, and it's really amazing stuff. Never saw that kind of dance before; it's both beautiful and unique. I think reproducing this in keyframed animation will be no easy task. Good luck, and keep us posted with the progress.
______________________________________
My Store
My Free Models
My Video Tutorials
My CG Animations
Instagram: @luxxeon3d
Facebook: https://www.facebook.com/luxxeon


Schurby
Quote - RobynsVeil, that looks very good so far. Love that refridgerator. The only thing is that the table appears a little too tall. Otherwise, very interesting, and I'd like to see how this comes along. I was working on my own kitchen layout recently. I might upload that to this threa at some point. Great work so far everyone, keep the thread going.
Thanks, LuxXeon.
I'll have to admit: the fridge is a BlendSwap model - one I did a bit of tweaking to, including changing the shader - by Sendercorp. The table (and everything else you see) I modelled myself, but I agree - it needs to be resized a wee bit, yet. I'm modelling the chairs atm, but since the emphasis is getting it so my daughter can get an idea when the room looks like, so I'll be concentrating on cabinetry and stuff like that.
So, this isn't so much an artistic effort rather than a quick archvis project... what's nice is that I can use real-world measurements, which I did use on the benches and will do for the table, since Blender uses 1 metre as default unit of measurement, same as we do here in Oz.
Monterey/Mint21.x/Win10 - Blender3.x - PP11.3(cm) - Musescore3.6.2
Wir sind gewohnt, daß die Menschen verhöhnen was sie nicht verstehen
[it is clear that humans have contempt for that which they do not understand]

Ok, I'll play. I modelled this today in Cinema4D. Can't show the finished render, because it's part of an arch shot for a client, but I can show the wires without issue. My colleague did the exterior structure, and facade. I did the interior models. We have a brilliant texture artist that really made this shot look incredibly real in the final render, with some insane Vray mats. Our lighting guy is credited for this light setup, which is completely lit from the outside (it's an enclosed room). But this is a modelling forum, so that's my work below.
C4D / Vray render.

Quote - Was bored about a month ago and looked out my window wondering what I could start to model. Seen the ole' Dodge in the driveway and took a few pictures of it and played around off an on with it for a week in Cinema 4D. So after I played withit in 3 other programs an finally into Poser to finish the Dodge I decided to go back to Cinema and build my dream truck a monster. Am working on the finishing touches, still have a couple weeks of texturing between my golf, boating on the Mississipi, and riding the ole Harley cause the weather been great for the last week and will be for next week. But it'll get hot again so I'll have to wait to finish it then. Named it "Guts n Glory",
Those are impressive models.


Quote - Detailing my Aerotrain some.
That looks interesting so far, Shawn. Are the door panels modeled into the geometry as well, or are they just mapping details? Also, is that black square in the front/middle, between the two "intake scoops", a deleted polygon? Just wondering if that's an intentional detail, or if it's a reversed normal, or render artifact?
Sinnersaint, that's a good looking room. I like that chair. Did you model the tree/plant as well?
______________________________________
My Store
My Free Models
My Video Tutorials
My CG Animations
Instagram: @luxxeon3d
Facebook: https://www.facebook.com/luxxeon
Quote - > Quote - Detailing my Aerotrain some.
That looks interesting so far, Shawn. Are the door panels modeled into the geometry as well, or are they just mapping details? Also, is that black square in the front/middle, between the two "intake scoops", a deleted polygon? Just wondering if that's an intentional detail, or if it's a reversed normal, or render artifact?
Doors are modeled into the shell. The hole in front is for a video camera to see out, so the pilot has a forward view on his monitor.
www.youtube.com/user/ShawnDriscollCG


What is Lunar Cell?
Here's another object I've been working on a bit today. It's a 3D-printable "Faberge Egg". The details are all modeled in, and in some cases, so tiny you really need to zoom in to see them. Very painstaking, but simple polygon modeling here. About two hours of work, but only 25% completed. Once done, I'll do an STL check, and then send this off to become my first actual 3D printed object (fingers crossed). It only appears to have thickness at this point. I'll add a shell modifier to thicken it up when the polygon details are done. We will see how much of the details are actually going to make it into the print.

______________________________________
My Store
My Free Models
My Video Tutorials
My CG Animations
Instagram: @luxxeon3d
Facebook: https://www.facebook.com/luxxeon

LunarCell helps make planets. http://www.youtube.com/watch?v=XT2p39ypras
www.youtube.com/user/ShawnDriscollCG
Quote - LunarCell helps make planets. http://www.youtube.com/watch?v=XT2p39ypras
Yeah, I Googled it after I asked, and found it. Looks interesting, and useful for making the texture maps, etc.
Here's my latest. I did this model today, and about to finish up the maps for it. I'll upload it to freebies tonight. A tufted hydrolic footstool. Started out where I just wanted to model some wheels, so that I had them to use in future projects (these kind of wheels come in handy), but went the whole nine yards and made the entire chair. Took about an hour total modeling time. All quads, and unless I decide to add any more detail, which is unlikely, it currently sits at 14,500 polygons.

______________________________________
My Store
My Free Models
My Video Tutorials
My CG Animations
Instagram: @luxxeon3d
Facebook: https://www.facebook.com/luxxeon
Quote - Here's my latest. I did this model today, and about to finish up the maps for it. I'll upload it to freebies tonight. A tufted hydrolic footstool. Started out where I just wanted to model some wheels, so that I had them to use in future projects (these kind of wheels come in handy), but went the whole nine yards and made the entire chair. Took about an hour total modeling time. All quads, and unless I decide to add any more detail, which is unlikely, it currently sits at 14,500 polygons.
Well, this model is finished now. Here's the production render:

It's also now available in .obj download from freestuff here, as well as on Turbosquid and ShareCG.com. All parts are UV mapped independantly, but I only provided the texture maps for the seat part. The others are just as well with procedural metal and plastic shaders. Here's the links to download the model:
Freestuff on Renderosity (.obj is up, and .max version should be approved soon)
**Turbosquid.com **(obj and .max files as separate download)
**ShareCG.com **(both obj and .max files in one zip download)
**
**
______________________________________
My Store
My Free Models
My Video Tutorials
My CG Animations
Instagram: @luxxeon3d
Facebook: https://www.facebook.com/luxxeon
Not bad. What was used for the UVmapping? 3D-Coat straightened things out for me.
www.youtube.com/user/ShawnDriscollCG
Quote - Not bad. What was used for the UVmapping? 3D-Coat straightened things out for me.
Thanks, Shawn. In this case, the model was UVmapped in 3dsmax. The seat was a little tricky, as UV mapping isn't my forte, so I employed a plugin called Unwrella, which creates very good "automatic" UV maps in Max. All other parts were simply done with the standard UVUnwrap tools.
I hear 3D-Coat is an excellent tool. Personally, there are cases where I will export a model for unwrapping to Sculptris, which does an excellent job of automatically unwrapping a model, then paint texture maps in there, and export back to Max. I try to avoid this if possible though, because the UV coordinates Sculptris provides isn't very friendly to someone trying to create their own textures by hand. Unless you also paint your maps directly in Sculptris after the unwrap, the UV "packing" and seam layout it provides would be very complex and confusing to a texture artist trying to paint on them in Photoshop or the like. Not a big deal, unless you plan to distribute the models to others, and want to keep things as user friendly as possible.
Did you have problems with the maps on this model?
______________________________________
My Store
My Free Models
My Video Tutorials
My CG Animations
Instagram: @luxxeon3d
Facebook: https://www.facebook.com/luxxeon
That's the trick with UVs sometimes, using an already existing texture pattern that the UVs lay over, or painting the textures manually over the UVs. Then there is the texture baking that locks in the UVs from changing. But you can still re-UV and bake again using the new UV layout.
I will take a look at Sculptris again. I never tried the UVmapping it has. 3D-Coat spoiled me with its one-click auto-UVing.
3D-Coat found some overlapping and some stretching of the UVs for the seat.
www.youtube.com/user/ShawnDriscollCG
Quote - That's the trick with UVs sometimes, using an already existing texture pattern that the UVs lay over, or painting the textures manually over the UVs. Then there is the texture baking that locks in the UVs from changing. But you can still re-UV and bake again using the new UV layout.
I will take a look at Sculptris again. I never tried the UVmapping it has. 3D-Coat spoiled me with its one-click auto-UVing.
3D-Coat found some overlapping and some stretching of the UVs for the seat.
That's funny about UV overlapping for the seat, because I ran the CheckMate Lite tool on it, which is the standard that Turbosquid uses, and it found no overlapping UV's.
______________________________________
My Store
My Free Models
My Video Tutorials
My CG Animations
Instagram: @luxxeon3d
Facebook: https://www.facebook.com/luxxeon
Shawn, here's the UV coordinates. I don't see any overlapping seams or verts here, do you? Not saying there's not any stetching, because I'm sure there is. I set a margin of error for stetching to 0.1.

______________________________________
My Store
My Free Models
My Video Tutorials
My CG Animations
Instagram: @luxxeon3d
Facebook: https://www.facebook.com/luxxeon
Quote - I don't see any either in that image.
I ran yet another check with Max's own UVunwrap tools, and still no overlapping UV's. Hmmm. I trust Checkmate Lite for evaluating the mesh and UV's, so I don't know why 3D coat turned up that issue, and that concerns me. Although I have released some free models where I knew the UV's were overlapping, I certainly don't want to release any that I think are not, but actually are.
I may have to download the trial of 3D coat and see what's going on. I'm wondering if perhaps the fact that I separated the UV zones on the seat into 3 different groups, for the 3 different color textures, has anything to do with 3D Coat reporting overlap? I think maybe the reason is that when I export the model to .obj, those 3 distinct material groups get merged into one. So that indeed would cause overlap. However, the overlap is not present in the .max version of the model. If that's the case, then I'll have to figure out another way to export unique maps for the same UV coordinates. I might have to split those parts into separate objects, which kinda sucks.
______________________________________
My Store
My Free Models
My Video Tutorials
My CG Animations
Instagram: @luxxeon3d
Facebook: https://www.facebook.com/luxxeon

www.youtube.com/user/ShawnDriscollCG
Quote - It looks like just a rendering issue in 3D-Coat. Either a normal map or material name has a different spec assigned to it. But it's minor. But give its UV mapping a try. It clears up the preview render of the seat when the UVs are more unified like this.
Interesting. I'll have to give 3DCoat a try for it's UV mapping. Thanks.
______________________________________
My Store
My Free Models
My Video Tutorials
My CG Animations
Instagram: @luxxeon3d
Facebook: https://www.facebook.com/luxxeon

Quote - Now rendering an animation. Here's a frame from it.
Looks good, Shawn. Will you render out with motion blur, or add it in post?
______________________________________
My Store
My Free Models
My Video Tutorials
My CG Animations
Instagram: @luxxeon3d
Facebook: https://www.facebook.com/luxxeon
Quote - Animated clip http://www.youtube.com/watch?v=lsKv6dB2zZU
Great stuff, Shawn. I like the production quality, and even though I thought I would miss the motion blur, it wasn't a big deal. Typically, animations without some motion blur have a tell-tale "strobing" effect; I didn't get that impression with your sequence there for some reason. Also, when you showed the still image earlier, I thought you may have too many of those trees repeating in the background terrain. However, once again, the final result didn't give that impression. It looked very good.
______________________________________
My Store
My Free Models
My Video Tutorials
My CG Animations
Instagram: @luxxeon3d
Facebook: https://www.facebook.com/luxxeon
I thought I'd have too many trees, too. I had it on its lowest setting. But forgot that adding a blank object to the trees would have spread them even farther apart and fewer of them. Next time. Lots of errors can be found in the clip. Put the brain doesn't see them on the first go-around.
www.youtube.com/user/ShawnDriscollCG

Just off the west coast of Ireland, or some way off the east coast of America depending on how you look at it!
I took a boat trip out and around it a few years ago and was humbled to say the least. I live in London and you loose track of the elements, I've digressed
Anyway this was a quality build and cost £17000 around the turn of the last century.
My suspision is that each stone is more or less the same size so as the diameter increases at the bottom there are more? My thoughts turned to UVs and how?
I'd UV map it the same way I'd map a cylinder. Then use procedural shading to generate the blocks, grout, and grime on it and bake as textures maps.
www.youtube.com/user/ShawnDriscollCG

After that, you can paint the rust marks from the windows on the model itself and re-bake.
www.youtube.com/user/ShawnDriscollCG

airflamesred, the lighthouse model is looking really good so far. Impressive, and ambitious work there. I'll be interested to see how you decide to attack the terrain. Personally, I would stick with a mesh, even if it's a triangulated quick fix from terrain height data. It's predictable and precise, compared to displacement alternatives, and of course more widely compatible if you ever decided to distribute, or re-visit, the scene in the future.
Here's my latest offering; a modern "Saturn Chair". Should be available in Freestuff here soon, as it's waiting for approval. It should also be on Turbosquid and ShareCG.com very soon, as with all my freebies.

All quads, finished with 25,898 polys total, and 25,868 verts, which I don't think is too bad, considering the detail on the base and in the seams. I optimized the topology as much as I could before the desired profile changed. ShawnDriscoll, if you see this, I used 3D Coat for the auto-unwrapping on the seat portion for this one. Checkmate Lite said no overlapping, so if 3D Coat reports any, then it's 3D Coat's fault. haha. The base portion I unwrapped with Max.** ;)**
______________________________________
My Store
My Free Models
My Video Tutorials
My CG Animations
Instagram: @luxxeon3d
Facebook: https://www.facebook.com/luxxeon


Quote - Some stuff I'm doing in my spare time.
Very impressive. What are the specs here? What software, poly count? Can we see the wire? Im about to take an advanced course in organic modeling in the fall, so works like this have particular relevance to me now. Any info on your workflow could be helpful. The course I'm enrolled in will be creating the base mesh in 3dsmax, which I'm very familiar with, but then they say the beauty work will require Zbrush, which I'm NOT familiar with at all, and the thought of learning that application is giving me anxiety. I've been practicing over the summer in Sculptris, and while it's obviously a great application, it's still quite awkward to me.
______________________________________
My Store
My Free Models
My Video Tutorials
My CG Animations
Instagram: @luxxeon3d
Facebook: https://www.facebook.com/luxxeon
Thanks. It's ok. The more I look at it the less happy I am with the design. This was done, start to finish, inside ZBrush using Dynamesh. The current count is about 6 million polys across 8 subtools. That's only because I'm using Dynamesh for all parts at the moment. I can bring the poly count down using ZRemesher. What class and where are you taking it?
ZBrush's Dynamesh feature is very similar in some respects to the way Sculptris works. The interface of ZBrush can be intimidating but really, you don't spend as much time screwing with it as you may think. Most of your time is spent with your brush and your object (ZBrush calls objects subtools). You can watch some of the creation of this guy - which started from spheres - right here:
http://youtu.be/3KaJDh0qzfc
and here:
http://youtu.be/86uZqu3KOuo
And this one is another Dynamesh model. Here you can see the entire workspace and how quickly I was able to get from start to finish using ZBrush's Dynamesh feature (there's a timer running as I work). Dynamesh is great for speed sculpting.
http://youtu.be/PPyS5C-aMf0
Privacy Notice
This site uses cookies to deliver the best experience. Our own cookies make user accounts and other features possible. Third-party cookies are used to display relevant ads and to analyze how Renderosity is used. By using our site, you acknowledge that you have read and understood our Terms of Service, including our Cookie Policy and our Privacy Policy.
Ok, guys, time for most of you to DE-lurk. I thought it might be fun to start a thread like this. I've seen them in other forums, and they're pretty cool. Basically, you just post whatever it is your working on model-wise; be it a wireframe, clay render, or production render, to keep the thread growing.
All skill levels welcome; beginners to advanced, and doesn't matter what software you use. Don't be shy. It's a fun way to learn, and get inspired too.
I'll begin.
Spent the day playin around with concept chair designs. I call this one the Triskelion Chair, for obvious reasons (I hope). The idea came to me after stumbling on a video tutorial about spline modeling a Omega Chair, which is a pretty simple modern chair design. I got a little bored of the tutelage, and decided to take it in a much more experimental direction. Personally, I find the lines unusual but sleek, and it "could" actually work in fabrication; I'd seen some two-legged, angled chair designs that actually stood pretty solid, so this could work too. The twisted, flowing legs here are admittedly extreme, but it looks pretty interesting with textures and proper materials. I've got it all UV mapped, and just about ready to roll out as a freebie. Here's the wireframe:
I started it as a spline model with patch topology, but then converted it to polygons, and continued editing it with your average edge and poly modeling operations. It's all quads, except for two damned tris hidden down in the corner of the legs somewhere. Not a big deal, so I'll leave em.
Total modeling time: about 30 minutes, mostly because I couldn't decide what "ornament" I wanted for that hole in the back (I like making holes in objects for no reason, then deciding what to do with them later - hehe). The chair's profile reminded me of a Triskelion motif, so I went with that.
Who's next? ;)
______________________________________
My Store
My Free Models
My Video Tutorials
My CG Animations
Instagram: @luxxeon3d
Facebook: https://www.facebook.com/luxxeon