Sun, Jan 12, 5:49 PM CST

Renderosity Forums / Vue


Welcome to the Vue Forum

Forum Moderators: wheatpenny, TheBryster

Vue F.A.Q (Last Updated: 2024 Dec 30 8:14 pm)


Subject: How to create a texture map


genny ( ) posted Fri, 05 July 2002 at 9:42 AM · edited Sat, 03 August 2024 at 3:01 AM

file_15006.jpg

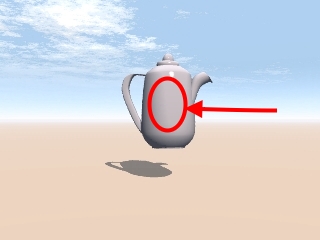
Hi all, I would like to put a picture on a coffee pot that is native to Vue4, but I don't know how to get the image to go where I want it too. Since it is not a obj. I can't take it to UV Mapper, so how do you do this, or can it be done? Genny


gebe ( ) posted Fri, 05 July 2002 at 10:04 AM

I don't think this is easy or even possible. But as I have created this object, I will search in my archive and give it to you as an OBJ if you want. Just send me your e-mail by IM. :-)Guitta


genny ( ) posted Fri, 05 July 2002 at 11:43 AM

Oh, thank you sooooooo Much, Guitta! (: Genny


solemnchaos ( ) posted Fri, 05 July 2002 at 1:10 PM

file_15007.jpg

The easy way is to get the obj file from guitta:} But for those interested, you can map a picture to a vue object. I'll try to give a quick tutorial here. This is my first tutorial, so feel free to ask questions and give critiques.

First, select just the coffeepot section of the coffeepot (see the pic...it's the cylindrical center part of the coffeepot object ).
Then double click the picture of the material at the top to enter the material editor (or right click and choose edit material).


gebe ( ) posted Fri, 05 July 2002 at 1:19 PM

Oh, I did not remember the coffeepot was splitted, I thought it was in only one part. Thanks, that's great:-) Guitta


solemnchaos ( ) posted Fri, 05 July 2002 at 1:28 PM

file_15008.jpg

In the material editor, change to 'mapped picture' in the coloring mode box. Load your picture. It works best if your picture has a large white background (if you use a small picture...like the 100x100 pic I used, Vue tries to repeat the picture over the surface of the object.)

In the effects box (upper right), choose 'world-cylindrical' mapping. Then in the mapping box (lower right), choose 'cylindrical'.

In the picture scale and offset boxes, I found it was just a matter of trial and error to position the picture. Make a change then watch your main camera preview (click on the preview to force it to update if needed). I suggest scaling it first, then using the offset to position it.

Write down the settings you chose for picture scale, picture offset, and mapping (you will need them for the transparency section).


genny ( ) posted Fri, 05 July 2002 at 1:37 PM

Thank you both for your replys...........I think I want to do it the easy way, (special thanks to Guitta) but this is always good to know too. (: I really can't get over how much I have learned from just visiting this site, thank you to everyone for sharing your knowledge. (: Genny


solemnchaos ( ) posted Fri, 05 July 2002 at 1:40 PM

file_15009.jpg

In the transparency section of the material editor, increase global transparency to 100%. Then in the effects box, select underlying material and variable transparency.

Right click the sphere picture in the underlying material window and choose edit material. Then choose the white porcelain material (it's in the basic section).

Now right click the sphere picture in the transparency production box and select 'edit function' (or just ctrl-left click).


solemnchaos ( ) posted Fri, 05 July 2002 at 1:50 PM

file_15010.jpg

Now from the function editor, select 'mapped values' in the kind of layer box. Then click the picture button and load your picture (if your picture isn't all black on a white background like mine, you'll need to make it that way in an image editor...sorry, I should have mentioned that earlier:})

Now remember where you wrote down the picture scale, picture offset, and mapping information? Change the values in the function editor to match what you wrote down.


solemnchaos ( ) posted Fri, 05 July 2002 at 1:56 PM

file_15011.jpg

Ok, that should work:} Feel free to ask questions or recommend better or more efficient solutions.

Hope that helps,
solemnchaos


sittingblue ( ) posted Fri, 05 July 2002 at 7:04 PM

That was a very informative tutorial. Many thanks! Charles :-)

Charles


genny ( ) posted Sat, 06 July 2002 at 5:01 AM

I did a screen capture of all your images above, and the very next chance I get, I hope to try your tut out. This is really great to know and will come in handy for me, many times over. Thank you. (: Genny


solemnchaos ( ) posted Sat, 06 July 2002 at 4:02 PM

Attached Link: http://www.solemnchaos.net/tutorials/vuecoffeepot.html

Glad I could help. I've actually clarified it and fixed some problems and added it to my website: http://www.solemnchaos.net/tutorials/vuecoffeepot.html


genny ( ) posted Sun, 07 July 2002 at 10:11 AM

Going to go Bookmark it RIGHT now.(: Thanks again. Genny


gebe ( ) posted Sun, 07 July 2002 at 10:34 AM

Can you upload the link in our tutorial databas, please:-) Guitta


Privacy Notice

This site uses cookies to deliver the best experience. Our own cookies make user accounts and other features possible. Third-party cookies are used to display relevant ads and to analyze how Renderosity is used. By using our site, you acknowledge that you have read and understood our Terms of Service, including our Cookie Policy and our Privacy Policy.