Tue, Jan 21, 6:43 PM CST

Renderosity Forums / Carrara


Welcome to the Carrara Forum

Forum Coordinators: Kalypso

Carrara F.A.Q (Last Updated: 2025 Jan 20 11:31 am)


Visit the Carrara Gallery here.

Carrara Free Stuff here.

 
Visit the Renderosity MarketPlace - Your source for digital art content!


Subject: Custom Leaf photo/UV map tutorial.


Patrick_210 ( ) posted Sun, 12 February 2006 at 6:23 PM · edited Tue, 21 January 2025 at 6:42 PM

file_325991.jpg

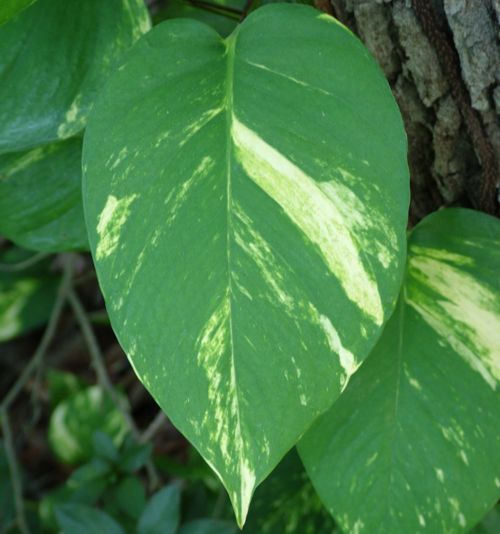
Start by taking a digital photo of a leaf. Rotate it so that the leaf is vertical and crop to a square format. Resize it to 500 pixels x 500 pixels and save as jpg in your photo program.


Patrick_210 ( ) posted Sun, 12 February 2006 at 6:24 PM

file_325992.jpg

Open Carrara and insert a vertex object. Set views to all four, and load the leaf image into the left/right grid under the global tab, check the enable box.


Patrick_210 ( ) posted Sun, 12 February 2006 at 6:25 PM · edited Sun, 12 February 2006 at 6:36 PM

file_325993.jpg

Select the polygon tool which is the bottom icon under the sphere icon list, far left in the top row of icons. In the right view section (the ss shows "left", change to "right") trace around the outside edge of the leaf. Add a couple of points to create a small stem at the top of the leaf. Press enter when you have finished.

Message edited on: 02/12/2006 18:36


Patrick_210 ( ) posted Sun, 12 February 2006 at 6:26 PM

file_325994.jpg

Select the Shader room icon and see the default texture there. In the Color channel, select Texture Map and load the same leaf image as before.


Patrick_210 ( ) posted Sun, 12 February 2006 at 6:27 PM

file_325995.jpg

Now return to the Vertex modeler and select the UV Map tab, and Box Face under Mapping. Then press the UV Editor button. You should see your UV map outlines here overlayed on the leaf image. The points should still be highlighted in red.


Patrick_210 ( ) posted Sun, 12 February 2006 at 6:27 PM

file_325996.jpg

Now, click towards the side of the leaf image to deselect the points. Then, one by one, grab and drag the points sideways to the edge of the leaf, until they have outlined the leaf. Then hit OK.


Patrick_210 ( ) posted Sun, 12 February 2006 at 6:28 PM

file_325997.jpg

Return to the assembly room. Under the Modifier tab, select Bend & Twist. Set the Bend Angle to 90 and set the Bend Axis Angle to 180. Make sure the Z axis is the one selected. Now your leaf should look like this. Save this file as a Carrara file, place it in the Eovia Program folder under Carrara 5 Pro/Data/Plants. This is for PC, I would appreciate it if a Mac person would chime in about where to place the plant data for them.


Patrick_210 ( ) posted Sun, 12 February 2006 at 6:29 PM

file_325998.jpg

Then click on the Shaders tab and drag the leaf shader into a shader folder in the browser.


Patrick_210 ( ) posted Sun, 12 February 2006 at 6:30 PM · edited Sun, 12 February 2006 at 6:40 PM

file_325999.jpg

Now you can close the file and open a new Carrara file. Insert a plant object. Change the settings to the ones shown in the screenshot. Then in the drop down for Leaf Type, select the leaf name that you saved in the plant data file. If you saved it correctly, it should be in the list.

Message edited on: 02/12/2006 18:40


Patrick_210 ( ) posted Sun, 12 February 2006 at 6:31 PM

file_326000.jpg

Now back in the shader room, drag the leaf shader from the browser to the shading domain for the leaf part of the plant. Another tip for shading: Take your leaf texture into your photo program and lighten it a little and increase the intensity a little and put that image into the transparency channel of the shader. You might want to darken the original image also. This will make for more realism when rendering with light through transparency. With some leaf images it is possible to create a bump map from the photo also, depending on the image. Play with the shininess and highlight also. This type of leaf is quick to load and render and is good for a wide range of small plants and trees. Even complex shapes can be used.


Patrick_210 ( ) posted Sun, 12 February 2006 at 6:34 PM

In step 3, it shows the image in the "left" view, you have to change that view to "right" or your UV map will be flipped.


steama ( ) posted Sun, 12 February 2006 at 7:03 PM

Thanks Patrick


ren_mem ( ) posted Sun, 12 February 2006 at 7:17 PM

Ditto!

No need to think outside the box....
    Just make it invisible.


Patrick_210 ( ) posted Sun, 12 February 2006 at 7:19 PM

No problem, I forgot to add that sometimes it is necessary to lengthen the stem in the vertex modeler after you have UV mapped the image. This obviously lets you make leaves for plants with longer stems.


bluetone ( ) posted Sun, 12 February 2006 at 11:33 PM

Outstanding Patrick! Thanx! :D


JasenJ1 ( ) posted Mon, 13 February 2006 at 6:22 AM

Interesting. I've used almost the same technique in a project I'm working on; except I used the spline modeler rather than the vertex modeler. My technique: Use Photoshop's selection tools (magic wand, etc.) to outline your object. Convert the selection to a path. Clean up the path in Photoshop as desired. Export path as an Illustrator file. In Carrara, import the Illustrator path into the spline modeler. Use flat mapping to apply the original image as a texture map. Go to the transform tab and scale and move the texture map around as needed. I'm going to guess that your technique is more flexible. The UV Editor probably lets you morph the texture map more flexibly, and it is likely easier to make certain types of changes to the object. - Jasen.


dlk30341 ( ) posted Mon, 13 February 2006 at 9:11 AM

Superb! Thank you very much!


Patrick_210 ( ) posted Mon, 13 February 2006 at 9:17 AM

One more correction, in step 10 it should say put the image in the translucency channel.


Moonglow ( ) posted Mon, 13 February 2006 at 11:45 AM

Thanks Patrick. Great tut. :)


Kixum ( ) posted Mon, 13 February 2006 at 8:03 PM

Thanks! I'm going to list this thread in the currently mentioned learning link! -Kix

-Kix


ren_mem ( ) posted Mon, 13 February 2006 at 10:13 PM

I would be curious how well a large scale environment w/ the replicator performs using this much uvmapping or even in animation. Any examples w/ stats anybody?

No need to think outside the box....
    Just make it invisible.


Patrick_210 ( ) posted Mon, 13 February 2006 at 11:34 PM

These leaves render very fast because the geometry is simple. The texture map could also be a lot lower in resolution if not seen very close. i've had very good render times with tens of thousands of replicated plants. Raytraced soft shadows will significantly increase render times, without them - fairly fast.


woodboat ( ) posted Wed, 15 February 2006 at 8:38 AM

Thanks for this great tutorial. Has helped me get my understanding around several Carrara concepts I had not figured out yet. regards, wb


CarltonMartin ( ) posted Thu, 16 February 2006 at 12:06 PM

As for the Mac answer to part 7, put the leaf file inside the Carrara 5 application package. Right-click the Carrara 5 program icon, choose open package contents, then find your way to the plants folder inside the data folder, thus: Carrara 5.app/Contents/MacOS/Data/Plants/


Patrick_210 ( ) posted Thu, 16 February 2006 at 3:28 PM

Thanks for the input!


Privacy Notice

This site uses cookies to deliver the best experience. Our own cookies make user accounts and other features possible. Third-party cookies are used to display relevant ads and to analyze how Renderosity is used. By using our site, you acknowledge that you have read and understood our Terms of Service, including our Cookie Policy and our Privacy Policy.