Renderosity Forums / Photoshop
Welcome to the Photoshop Forum
Forum Moderators: Wolfenshire Forum Coordinators: Anim8dtoon
Photoshop F.A.Q (Last Updated: 2025 Feb 11 11:38 am)
Our mission is to provide an open community and unique environment where anyone interested in learning more about Adobe Photoshop can share their experience and knowledge, post their work for review and critique by their peers, and learn new techniques while developing the skills that allow each individual to realize their own unique artistic vision. We do not limit this forum to any style of work, and we strongly encourage people of all levels and interests to participate.
Sharpen your Photoshop skill with this monthly challenge...
Checkout the Renderosity MarketPlace - Your source for digital art content!

Subject: Desperate for Sci-fiWall help - layers, Panels etc


Measure
your mind's height
by the shade it casts.
Robert Browning (Paracelsus)
http://franontheedge.blogspot.com/

Measure
your mind's height
by the shade it casts.
Robert Browning (Paracelsus)
http://franontheedge.blogspot.com/

Measure
your mind's height
by the shade it casts.
Robert Browning (Paracelsus)
http://franontheedge.blogspot.com/

Which I think didn't work too badly - but none of this is a wall, I wanted raised panels, but
a) I'm not sure how to do those,
b) I'm not sure how to add one file to an already made file
c) I'm not sure in what order to have layers,
d) I haven't a clue how to get part of a layer to be transparent. (when I did that I ended up taking it into PaintShop for that, but then I didn't know what to do with it...
Oh I'm just so confused with all this - help!!!
Measure
your mind's height
by the shade it casts.
Robert Browning (Paracelsus)
http://franontheedge.blogspot.com/

Are you looking for on the order of like this Fran?? Maybe a little rustier then you need but was the only texture I had handy this morning.
First link is just a plain wall. Second one is the same wall with a little bump added with PS bevel/texture.
**************************************************************************************
Life may not be the party we hoped for but while we're here we should dance.

Attached Link: The Dark Side of Game Texturing
This book gives detailed instructions for making SciFi textures in PS.
Quote - Are you looking for on the order of like this Fran?? Maybe a little rustier then you need but was the only texture I had handy this morning.
First link is just a plain wall. Second one is the same wall with a little bump added with PS bevel/texture.
Yes it's rustier than I'm thinking of, but it's heading in the right direction. The panels look rather close together (more like bricks) and the grouting is much too big, but it's a lot closer to what I'm thinking of than I could create. I think if I knew how you did that, plus how on earth to get a wall background that's only a little rusty - I'd be a lot closer to getting what I want.
Looks good.
Measure
your mind's height
by the shade it casts.
Robert Browning (Paracelsus)
http://franontheedge.blogspot.com/
Quote - This book gives detailed instructions for making SciFi textures in PS.
Unfortunately I've very strapped for cash at the moment. But thanks for telling me.
Measure
your mind's height
by the shade it casts.
Robert Browning (Paracelsus)
http://franontheedge.blogspot.com/

@ Bushi - I have that book - I LOVE that book! Great resource!
@ Fran:
a - Practice practice practice!
b - I've looked into that and still can't figure out (meaning I don't think it's possible) how to add a multiple layer file to a multiple layer file without pulling each layer over to the next document one by one and lining them up. Can't figure out how to merge them.
c - The order is determined by what you wanna SEE. Think of it this way - as you look at the layer stack and your resulting image - realize you are looking at the layers from the top down. Whatever is on a layer (we'll call it #1) above another (call it #2) will overlap on TOP of that layer - whatever is on #1 will cover up whatever is directly below on layer #2. If you wanna see #2 covering #1 - move #2 up above #1 in the Layer Stack.
d - In the Layer Pallette - at the top right of the stack is a property labelled "Opacity" - with a numeric indicator that by default is set to 100%. Change it to 50% and it becomes HALF transparent - get it?
Sounds like you may be rushing things too fast without learning more of the ins and outs of the program - you are seeming to want to do all the high-end stuff from the start and it does takes some practice and getting used to.
As far as what will raise and lower the bumps - whatever is 128 value grey will not produce a bump. Anything lighter (129-255) will produce a bump, and anything below (127-0) will produce a "dig" meaning it will appear to be below the surface.
And don't be afraid to use photos of rust you can take with a digital camera - or buy collections from the likes of Dosch or 3DTotal, and mess with them in PS. You don't HAVE to hand draw natural elements in order for it to be something of your own.
And it doesn't even have to be rust - it can be side tread of a worn tire - you can take the pattern or scuffing and color it to look like rust in another image - get the idea?
I'll say it again - practice practice practice! This won't come overnight - you'll have a LOT of frustration if you're expecting high end results fairly soon out of the gate.
Hope that helps-
-Lew ;-)

Now lookee here Oh Thundering One - you can't have it both ways. One moment you say "practice practice, practice" and next you say I'm "rushing things". Make up yer mind!
Gordon Bennett!
Lol.
Quote -
b - I've looked into that and still can't figure out (meaning I don't think it's possible) how to add a multiple layer file to a multiple layer file without pulling each layer over to the next document one by one and lining them up. Can't figure out how to merge them.
Oh. And I thought I'd seen it mentioned somewhere... Oh well... Thanks for looking into it for me. It's a pity you can't do it after all... but there we are.
Quote -
c - The order is determined by what you wanna SEE. Think of it this way - as you look at the layer stack and your resulting image - realize you are looking at the layers from the top down. Whatever is on a layer (we'll call it #1) above another (call it #2) will overlap on TOP of that layer - whatever is on #1 will cover up whatever is directly below on layer #2. If you wanna see #2 covering #1 - move #2 up above #1 in the Layer Stack.
d - In the Layer Pallette - at the top right of the stack is a property labelled "Opacity" - with a numeric indicator that by default is set to 100%. Change it to 50% and it becomes HALF transparent - get it?
yes. I know that... so your point is what exactly??? Unfortunately with the daft way R'osity has of doing these reply boxes - I can't see the other messages in this thread soI can't tell what this bit might be in reply to, so I don't know if I've asked something stupid - or what...
Aha!!! NOW I see. What I mean't was that I don't want a layer to be a bit transparent - I want part of a layer - a specific part - to be totally transparent, while the rest of the same layer is totally opaque. How do you do that?
(sorry, it was me, not explaining properly what I meant)
Quote - Sounds like you may be rushing things too fast without learning more of the ins and outs of the program - you are seeming to want to do all the high-end stuff from the start and it does takes some practice and getting used to.
There you go, moaning at me! My problem is there are loads and loads of tutorials on doing things with Poser figures, and very little for anything really useful (useful to me that is! Lol!)
Quote - As far as what will raise and lower the bumps - whatever is 128 value grey will not produce a bump. Anything lighter (129-255) will produce a bump, and anything below (127-0) will produce a "dig" meaning it will appear to be below the surface.
raise and lower the bumps? I wonder what on earth I was asking about here...? :blink:
Quote - And don't be afraid to use photos of rust you can take with a digital camera
My camera just came back from repair today - and it's still not fixed... so it'll have to go back
Quote - - or buy collections from the likes of Dosch or 3DTotal, and mess with them in PS. You don't HAVE to hand draw natural elements in order for it to be something of your own.
No money, still need to pay for camera repairs...gawd knows how.
Quote - And it doesn't even have to be rust - it can be side tread of a worn tire - you can take the pattern or scuffing and color it to look like rust in another image - get the idea?
No. And that's exactly why I've been trying so hard to find tutorials on this sort of thing.
Finally found one - thanks to Taz.
http://67.15.36.49/team/Tutorials/texture_katherine_dinger/dirty_texture01.asp
> Quote - I'll say it again - practice practice practice! This won't come overnight - you'll have a LOT of frustration if you're expecting high end results fairly soon out of the gate.
Now now, don't be silly - you wouldn't say that if you saw MY result of doing this tutorial and compared it to the tutorial's result - I only got up to step 12 though as I didn't have a dingbat/logo thingie to continue on with... anyway, you can see how far I got in the image above - mine is quite different to the tutorial's version...Mine's nowhere near as good.
Measure
your mind's height
by the shade it casts.
Robert Browning (Paracelsus)
http://franontheedge.blogspot.com/

Digital camera in repair? I'd just sit in the corner and cry if that were me! Can't live without my camera(s)!
Okay, PART of a layer to be transparent: 1 of 2 quick ways
1 - Eraser tool - you can set the opacity of the Eraser so that it doesn't COMPLETELY erase things (you can also make it a hard edged brush or soft edged) - just somewhat at a time. Not my favorite way as once it's gone, it's GONE.
2 - My favorite way (and the illustration I attached) - click on the layer you want part of to be transparent. At the bottom of the layer palette click the Layer Mask Icon - little white box will appear. Get your Brush Tool (you'll notice your colors go to black and white) and lower the opacity - try 30% for starters. Hit F5 and click on "Brush Tip Shape - which is in BLUE in the illustration - then choose your hardness. Whatever you paint BLACK will hide what's on that layer - if you paint too much, paint WHITE to see it again.
Why do I like #2 better? It's editable - if you go to far, you can bring it back - it's still there, and you're just hiding the parts you don't wanna see.
The bit about "bumps advice" is just that if you are looking to make it REALLY rusty, you'll be making more extreme bumps of the material - if it's too shallow/flat it'll just be a color texture. I was just giving you a guide to follow if you wanted it shallow or deep.
I think part of the challenge of this thread is that "what you want" is completely subjective to you. We can come up with tutorials to do this or that, but it's probably not be what YOU are looking for, and will just add to your frustration.
I'm a fan of partial rust for my stuff, and colored liquid damage, but above it looks like you want serious rust for the whole thing, so we're not too sure what to suggest as far as achieving a specific image/texture.
BTW - your image from the tutorial looks good! Keep going - they just suggested a decal or something - you can just leave it at that or add more stuff of your own.
Hope this helps-
-Lew ;-)
Okay I took your image above and ran with it - hope you don't mind.
Here is a color map amd a bump (texture) map - just cut the image in half, save as their own TIF image and put them on a wall to see what it is.
The light colored wall and the maroon bands are seperate layers (I also added color to your rust, and some streaks that aren't that noticeable) that I masked part of to see the nasty rust texture underneath. You can also use this technique to have cement block, bricks, wood, whatever you want underneath as well.
Lemme know if this is something you're looking for - hope it helps!
-Lew ;-)

thundering1
Quote - Hiya!
Yeah, I was saying not to rush things - sit back and practice with baby steps to figure out how things work, and it'll give you ideas as to how to achieve the texture you have in mind.
Well I may be wanting to rush things but no matter what I do I pretty much end up doing "baby steps" anyway.
Quote - Digital camera in repair? I'd just sit in the corner and cry if that were me! Can't live without my camera(s)!
Yes, well... I have an advantage over you there, as Ian bought a camera for himself at the same time as I bought mine.... so I just steal his. Lol! It's not as good as mine, as it doesn't allow you to use different lenses, but good enough.
Quote - Okay, PART of a layer to be transparent: 1 of 2 quick ways
1 - Eraser tool - you can set the opacity of the Eraser so that it doesn't COMPLETELY erase things (you can also make it a hard edged brush or soft edged) - just somewhat at a time. Not my favorite way as once it's gone, it's GONE.
2 - My favorite way (and the illustration I attached) - click on the layer you want part of to be transparent. At the bottom of the layer palette click the Layer Mask Icon - little white box will appear. Get your Brush Tool (you'll notice your colors go to black and white) and lower the opacity - try 30% for starters. Hit F5 and click on "Brush Tip Shape - which is in BLUE in the illustration - then choose your hardness. Whatever you paint BLACK will hide what's on that layer - if you paint too much, paint WHITE to see it again. Why do I like #2 better? It's editable - if you go to far, you can bring it back - it's still there, and you're just hiding the parts you don't wanna see.
Okay, saving this for future use... It sounds like just what I need.
Quote - The bit about "bumps advice" is just that if you are looking to make it REALLY rusty, you'll be making more extreme bumps of the material - if it's too shallow/flat it'll just be a color texture. I was just giving you a guide to follow if you wanted it shallow or deep.
Ah right, obviously I need to save this whole thread...
Quote - I think part of the challenge of this thread is that "what you want" is completely subjective to you. We can come up with tutorials to do this or that, but it's probably not be what YOU are looking for, and will just add to your frustration.
I'm a fan of partial rust for my stuff, and colored liquid damage, but above it looks like you want serious rust for the whole thing, so we're not too sure what to suggest as far as achieving a specific image/texture.
I'm meaning the rust/damaged metal to be the basis for the texture with pipes and panels etc part of the texture too... like... like Katherine has done in her other tutorials:
http://67.15.36.49/team/Tutorials/texture_katherine_dinger/dirty_texture01.asp
that link address being just the basic dirty texture, she does go on and do the next stage with pipes etc... and once I can do that tutorial I can make my OWN design of pipes/panels/whatever... (I hope)
Quote - BTW - your image from the tutorial looks good! Keep going - they just suggested a decal or something - you can just leave it at that or add more stuff of your own.
It's that more stuff of your own that I don’t know how to do yet, which is why I need tuts like that. And this.
Quote - Hope this helps-
Oh it all helps. Thank you.
Measure
your mind's height
by the shade it casts.
Robert Browning (Paracelsus)
http://franontheedge.blogspot.com/
Quote - Okay I took your image above and ran with it - hope you don't mind.
Here is a color map amd a bump (texture) map - just cut the image in half, save as their own TIF image and put them on a wall to see what it is.The light colored wall and the maroon bands are seperate layers (I also added color to your rust, and some streaks that aren't that noticeable) that I masked part of to see the nasty rust texture underneath. You can also use this technique to have cement block, bricks, wood, whatever you want underneath as well.
Lemme know if this is something you're looking for - hope it helps!
-Lew ;-)
No, not really because the background looks too different to the damaged part - it all has to look like one texture when it's done.
It may even turn out that what I was trying to do with making PART of a layer transparent may not be the way to get the end effect I want - but at least I now know how to do that - in case it helps.
But I think the only way is to keep going and finish the tutorial I started and see what the end result is like.
Because I found myself halted in doing the tutorial I couldn't sit staring at the computer screen until help arrived, (I mean it could be hours or even days!) I had to go off and do something else while I waited... and of course doing that you loose track of how the tutorial was going and of how you were thinking at the time that you could take it in your own direction.
Measure
your mind's height
by the shade it casts.
Robert Browning (Paracelsus)
http://franontheedge.blogspot.com/
Privacy Notice
This site uses cookies to deliver the best experience. Our own cookies make user accounts and other features possible. Third-party cookies are used to display relevant ads and to analyze how Renderosity is used. By using our site, you acknowledge that you have read and understood our Terms of Service, including our Cookie Policy and our Privacy Policy.
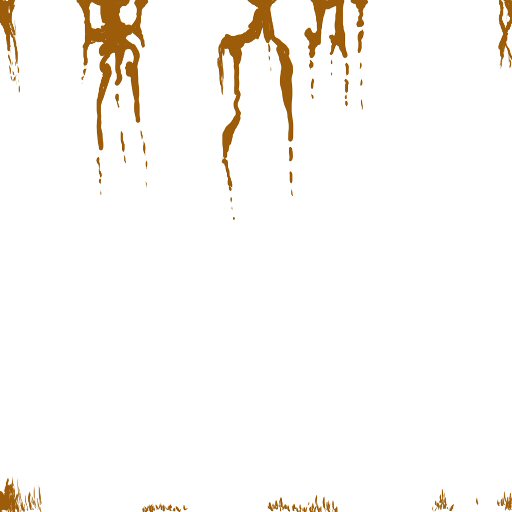
I'm having tremendous difficulty getting a sci-fi wall to look... well... like a sci-fi wall!Here's the first attempt with me trying to do rust (very very badly!) I don't like the rust, the top bits look like distorted dancing dolls and the bottom bits like brown grass, or is it just me getting frustrated? Is it just that it needs more layers???
Measure your mind's height
by the shade it casts.
Robert Browning (Paracelsus)
Fran's Freestuff
http://franontheedge.blogspot.com/
http://www.FranOnTheEdge.com