Thu, Jan 2, 11:32 PM CST

Renderosity Forums / Photoshop


Welcome to the Photoshop Forum

Forum Moderators: Wolfenshire Forum Coordinators: Anim8dtoon

Photoshop F.A.Q (Last Updated: 2024 Dec 30 8:16 pm)

Our mission is to provide an open community and unique environment where anyone interested in learning more about Adobe Photoshop can share their experience and knowledge, post their work for review and critique by their peers, and learn new techniques while developing the skills that allow each individual to realize their own unique artistic vision. We do not limit this forum to any style of work, and we strongly encourage people of all levels and interests to participate.

Are you up to the challenge??
Sharpen your Photoshop skill with this monthly challenge...


Checkout the Renderosity MarketPlace - Your source for digital art content!


Subject: Drawing with Photoshop: The Hair Tutorial


Boni ( ) posted Thu, 29 June 2006 at 3:16 PM · edited Thu, 02 January 2025 at 11:28 PM

file_346800.jpg

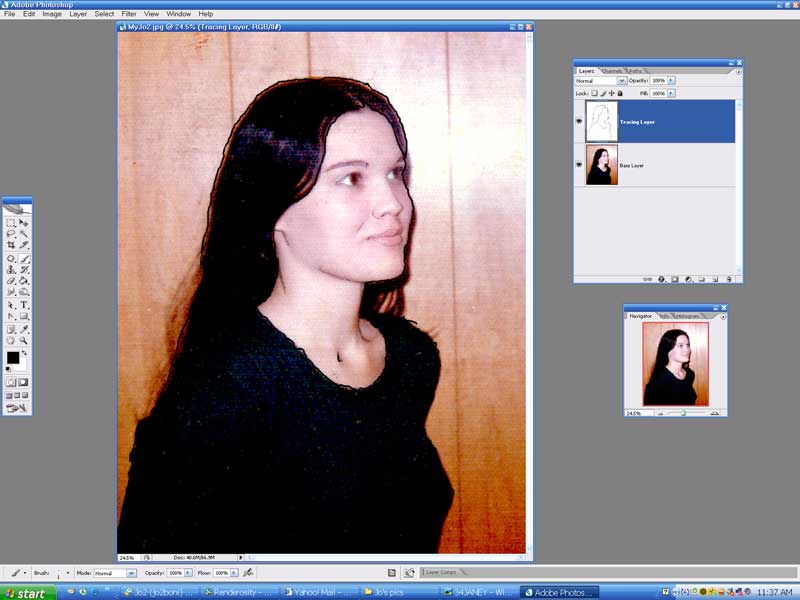
Since I've seen so many responces to my tutorial on basic drawing with Photoshop.  I decided to put up a second tutorial on drawing hair.  No short cuts here.  This is like being at a traditional drawing board and there is a lot of tedious work to get it right.  But the effect, IMHO, is well worth the effort.  Let's get started.
  1. Go through the first section from Tutorial 1.
        a. bring in your photo and enlarge it for detail.  Grayscale if it helps.  I didn't with this particular image.
        b. change your background layer into a  "Layer from Background" and if you wish change the name from "Layer 0" to "Base Layer" and take transparency down to about 52%.
        c. Add layer 1 or "Transparency Layer". This will be your finished drawing in the end.
        d. Draw the outline of the figure in either a large brush size. (I used 12 px for clarity ) or start with the 1 px brush from the beginning ... as I did for outlining the interier features.

Boni


"Be Hero to Yourself" -- Peter Tork


Boni ( ) posted Thu, 29 June 2006 at 3:18 PM

file_346801.jpg

Here is the drawing side of step one.  so it can be seen more clearly.  I've used another picture of "My Jo" so I will finish this piece for my collection. 

Boni


"Be Hero to Yourself" -- Peter Tork


Boni ( ) posted Thu, 29 June 2006 at 3:28 PM

file_346803.jpg

Part Two.
  1. Start with groups of tightly dawn lines representing hair.  For darker areas you can use a tight scribble (back and forth stroke ... quick and close) but for lighter areas, such as highlights you want to have open strokes.  Now remember to keep with the direction of the hair.  And use your judgement and observation.  Sometimes if there is too much darkness you need to create your own highlights to add texture and shine to the hair.
  2. Work with a section at a time.  be patient  but you can still use your strokes very quickly as you keep them tight.

Boni


"Be Hero to Yourself" -- Peter Tork


Boni ( ) posted Thu, 29 June 2006 at 3:32 PM

file_346804.jpg

Further progress using the technique described.   Here we see the  under-photo to see how the hair is flowing on the head.  The arch lines are important.  Follow the flow and where you can see it.  (Not in this photo unfortunately) Follow the "locks" or sections of hair.

Boni


"Be Hero to Yourself" -- Peter Tork


Boni ( ) posted Thu, 29 June 2006 at 3:38 PM

file_346805.jpg

Part Three:
  1. work the whole area you have inlarged.  making sure the darks are balanced and the lights follow the flow and the texture of the hair.
  2. Work back and forth on sections.  Be sure to darken the edge to give the hair more depth.

Boni


"Be Hero to Yourself" -- Peter Tork


Boni ( ) posted Thu, 29 June 2006 at 3:39 PM · edited Thu, 29 June 2006 at 3:40 PM

file_346806.jpg

Part Three B: Without the underpicture showing. Go back and forth between seeing the photo and not to see how the detail is coming out.

Boni


"Be Hero to Yourself" -- Peter Tork


Boni ( ) posted Thu, 29 June 2006 at 3:44 PM

file_346807.jpg

Part Three C: Here is the section we've done in relation to the whole image. 

Boni


"Be Hero to Yourself" -- Peter Tork


Boni ( ) posted Thu, 29 June 2006 at 3:46 PM

I'll wait for you all to catch up and I'll put up more later.  Any questions?  Comments?  Suggestions?  Now is the time. :)

Boni

Boni


"Be Hero to Yourself" -- Peter Tork


Boni ( ) posted Thu, 29 June 2006 at 6:32 PM

file_346818.jpg

Here is the hair section and some detail added to other sections complete.  I will use this image for my next tutorial.  eyes and shadows.  See you soon.  Again, feedback is encouraged.  I want to know that these tutorials are useful.

Boni

Boni


"Be Hero to Yourself" -- Peter Tork


tantarus ( ) posted Fri, 30 June 2006 at 2:48 AM

Excellent, hair tuts. are allways useful. Keep up with youre tuts. :)

Tihomir


Open your mind and share the knowledge!


Mikewave ( ) posted Fri, 30 June 2006 at 5:54 AM

Wow, you are good!!! Thanks for the tut Boni!

Coming soon


Boni ( ) posted Fri, 30 June 2006 at 5:19 PM

Thanks for the incouragement folks.  Next will be a tut on bringing out the eyes.  I will be using the same photo ... and possibly a Poser image too, as they need special treatment.  :)

Boni

Boni


"Be Hero to Yourself" -- Peter Tork


Privacy Notice

This site uses cookies to deliver the best experience. Our own cookies make user accounts and other features possible. Third-party cookies are used to display relevant ads and to analyze how Renderosity is used. By using our site, you acknowledge that you have read and understood our Terms of Service, including our Cookie Policy and our Privacy Policy.