Mon, Dec 23, 11:18 AM CST

Renderosity Forums / Poser - OFFICIAL


Welcome to the Poser - OFFICIAL Forum

Forum Coordinators: RedPhantom

Poser - OFFICIAL F.A.Q (Last Updated: 2024 Dec 23 8:11 am)


Subject: Mini-Tut: Speech Ballons in Photoshop


Elfwine ( ) posted Fri, 09 January 2009 at 3:55 AM · edited Mon, 23 December 2024 at 11:11 AM

file_421444.jpg

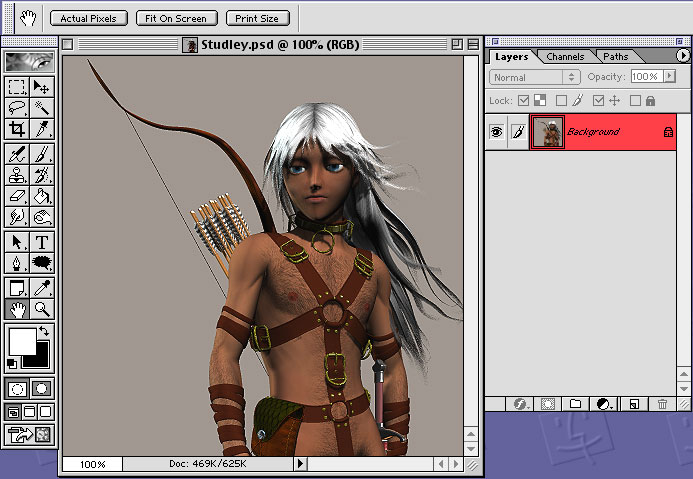
Here's a mini tut. I have 18 pictures to upload, so please hold off commenting until I'm done. Add Speech Ballons Using Photoshop Firstly, you'll need the ballon shapes. These are custom shapes (not brushes) for Photoshop and can be found by doing a Google search for them. The download or web page should have instructions for installing them. It's only a matter of dropping them in the correct folder, and being Poser users I'm sure you all have plenty of experience with that! The ones I use are here: http://graphicssoft.about.com/od/photoshopdownloads/ss/shapes1_9.htm Secondly, you'll see that I'm using an old version of Photoshop (version 6). However, I expect that the tools still perform these functions. So... after installing the custom shapes, let's make some speech ballons! : D 1. Load your image and under the menu Windows, select Show Layers.

 Don't sweat the petty things, and don't pet the sweaty things!  ; )


Elfwine ( ) posted Fri, 09 January 2009 at 3:58 AM · edited Fri, 09 January 2009 at 4:03 AM

file_421445.jpg

2. Click on the menu Layer, and select New, then Layer.

 Don't sweat the petty things, and don't pet the sweaty things!  ; )


Elfwine ( ) posted Fri, 09 January 2009 at 3:59 AM · edited Fri, 09 January 2009 at 4:04 AM

file_421446.jpg

3. The dialog box that appears will ask you to give the layer a name. Name it "ballons".

 Don't sweat the petty things, and don't pet the sweaty things!  ; )


Elfwine ( ) posted Fri, 09 January 2009 at 4:07 AM · edited Fri, 09 January 2009 at 4:10 AM

file_421447.jpg

4. Click on the Rectangle Tool and scroll down to select the Custom Shape Tool.

 Don't sweat the petty things, and don't pet the sweaty things!  ; )


Elfwine ( ) posted Fri, 09 January 2009 at 4:12 AM

file_421448.jpg

Clicking on the little diamond will bring up a drop down menu where you can select your desired ballon shape.

 Don't sweat the petty things, and don't pet the sweaty things!  ; )


Elfwine ( ) posted Fri, 09 January 2009 at 4:14 AM

file_421449.jpg

Click and drag your mouse and the ballon shape appears and grows larger as you drag. The ballon looks good, but the tip needs to point at the speaker.

 Don't sweat the petty things, and don't pet the sweaty things!  ; )


Elfwine ( ) posted Fri, 09 January 2009 at 4:16 AM

file_421450.jpg

Click on the Pen Tool and scroll down and select the Convert Point Tool.

 Don't sweat the petty things, and don't pet the sweaty things!  ; )


Elfwine ( ) posted Fri, 09 January 2009 at 4:19 AM

file_421451.jpg

Click somewhere outside the ballon and drag across the entire shape. This will cause these little anchor points to appear.

 Don't sweat the petty things, and don't pet the sweaty things!  ; )


Elfwine ( ) posted Fri, 09 January 2009 at 4:20 AM

file_421452.jpg

Using the Convert Point Tool, you want to click on the anchor point at the tip of the speech ballon. Here, I've zoomed in all the way so you can see it.

 Don't sweat the petty things, and don't pet the sweaty things!  ; )


Elfwine ( ) posted Fri, 09 January 2009 at 4:21 AM

file_421453.jpg

After clicking on the anchor point you can see that it has darkened, indicating that it has been selected.

 Don't sweat the petty things, and don't pet the sweaty things!  ; )


Elfwine ( ) posted Fri, 09 January 2009 at 4:23 AM

file_421454.jpg

Using ONLY the arrow keys, you can move just that one point to where you want it.

 Don't sweat the petty things, and don't pet the sweaty things!  ; )


Elfwine ( ) posted Fri, 09 January 2009 at 4:25 AM

file_421455.jpg

Go to the Layers menu and double-click on the ballons layer.

 Don't sweat the petty things, and don't pet the sweaty things!  ; )


Elfwine ( ) posted Fri, 09 January 2009 at 4:28 AM

file_421456.jpg

This will bring up the Layer Style dialog box.

 Don't sweat the petty things, and don't pet the sweaty things!  ; )


Elfwine ( ) posted Fri, 09 January 2009 at 4:30 AM

file_421457.jpg

Click once on the word Stroke. Now you can adjust the width of the line around your ballon as well as the color of it.

 Don't sweat the petty things, and don't pet the sweaty things!  ; )


Elfwine ( ) posted Fri, 09 January 2009 at 4:32 AM

file_421458.jpg

Go back to the top menu and click on the menu item Layer, and select New, then Layer. The dialog box that appears will ask you to give the layer a name. Name it "text".

 Don't sweat the petty things, and don't pet the sweaty things!  ; )


Elfwine ( ) posted Fri, 09 January 2009 at 4:34 AM · edited Fri, 09 January 2009 at 4:37 AM

file_421459.jpg

Click the Text tool and type your text. Then use the Move tool to position the text within your ballon.

 Don't sweat the petty things, and don't pet the sweaty things!  ; )


Elfwine ( ) posted Fri, 09 January 2009 at 4:40 AM

file_421460.jpg

Finally, click on the ballons layer and adjust the Opacity to suit your taste. da end!

 Don't sweat the petty things, and don't pet the sweaty things!  ; )


mrsparky ( ) posted Fri, 09 January 2009 at 9:49 AM

Thank you - I'm not a photoshop user and your tutorial here is perfect for learning about layers.

Pinky - you left the lens cap of your mind on again.


Privacy Notice

This site uses cookies to deliver the best experience. Our own cookies make user accounts and other features possible. Third-party cookies are used to display relevant ads and to analyze how Renderosity is used. By using our site, you acknowledge that you have read and understood our Terms of Service, including our Cookie Policy and our Privacy Policy.