Renderosity Forums / Photoshop
Welcome to the Photoshop Forum
Forum Moderators: Wolfenshire Forum Coordinators: Anim8dtoon
Photoshop F.A.Q (Last Updated: 2025 Jan 14 1:57 am)
Our mission is to provide an open community and unique environment where anyone interested in learning more about Adobe Photoshop can share their experience and knowledge, post their work for review and critique by their peers, and learn new techniques while developing the skills that allow each individual to realize their own unique artistic vision. We do not limit this forum to any style of work, and we strongly encourage people of all levels and interests to participate.
Sharpen your Photoshop skill with this monthly challenge...
Checkout the Renderosity MarketPlace - Your source for digital art content!
Subject: Tone Mapping
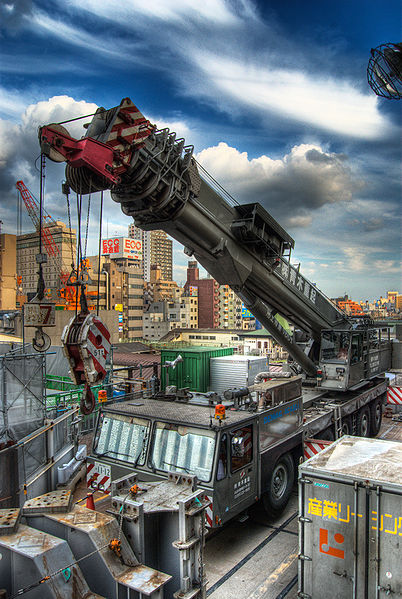
Based on what I can find on this HDR photo process this image ("Machinery") was done using Photomatrix Pro by photographer Heiwa4126...his photostream can be viewed on Flickr…here (this particular image can be found on page 22). Acccording to this web site the artist used three exposures: -2EV, 0EV,+2EV. Photomatrix Pro is a stand-alone software package but it distributes a free software trial and a Photoshop plugin trial for CS2, CS3, CS4 which can be gotten at the bottom here.

Above is what I got by taking the original and doing a 50% opacity overlay then a 15% unsharp mask and then Shadow/Highlights effect. Is that similar to yours?
Photoshop "HDR" tutorial
A tone mapped picture may be the RESULT of HDR manipulations but is not itself HDR, that is nothing that not Photoshop can handle. If something is missing from the original raw material just put it back again.. or add something entirely new, :)
For example Pawel Wewiorski aka bolandrotor professional photographer HDR expert par excellence got second place in a HDR competition with a picture that was done from only one image. Where after one of his fellow competitors remarked, "It's interesting how a non-HDR image places in the top 3 in an HDR challenge!"
http://forums.dpreview.com/forums/read.asp?forum=1005&message=32166859
Adobe Lab color space
Just as tone mapped images is made up by manipulating HDR photos we can do something similar by manipulating Lab images. Lab color space like HDR has a much larger dynamic range than computer displays, printers or even human vision. So the first thing we do is making a copy of your original and change the color mode to Lab. Then right-click on the new layer and choose "Convert to a smart object".

Privacy Notice
This site uses cookies to deliver the best experience. Our own cookies make user accounts and other features possible. Third-party cookies are used to display relevant ads and to analyze how Renderosity is used. By using our site, you acknowledge that you have read and understood our Terms of Service, including our Cookie Policy and our Privacy Policy.


Is the best way to simulate tone mapping effect with a single source image the Shadow/Highlight effect or is their an other way that would be understandable to a novice user like me? The objective is to get that strange CGI-ish look in which all parts of the scene seem equally well exposed. I used to do this in conventional photography by using a split compensating developer... let me shoot by available light and get an even illustrative look.Here is an example from the Wikipedia entry on Tone Mapping.