Renderosity Forums / Poser - OFFICIAL
Welcome to the Poser - OFFICIAL Forum
Forum Coordinators: RedPhantom
Poser - OFFICIAL F.A.Q (Last Updated: 2025 Feb 02 2:22 am)

Subject: Textures


Attached Link: http://www.cgtextures.com/
 Try the Attached Link: (above) ... they have a few (*thousand*?). :lol:
cheers,
dr geep
;=]
Remember ... "With Poser, all things are possible, and poseable!"
cheers,
dr geep ... :o]
edited 10/5/2019

Why not try using the Material Room? You can get some extremely good - and seamless - textures for all kinds of architectural uses. I almost always use my own procedural stuff for interiors and quite often, exteriors, too.
BagginsBill is the undisputed expert in this area, so a look through his threads is always a worthwhile education. You could also buy some of the Dreamland Models sets he's collaborated on, since they have some superb textures for wood, paint, metals, leather and all sorts of useful things.
Coppula eam se non posit acceptera jocularum.

http://www.mayang.com/textures/
is another good one
lots of textures can be made seemless (not painless but not rocket surgery ;-) just dont try the really hard ones unless you like headbanging)
and what SamT said is true for a big wall or something procedual is best!! clever use of nodes can knock an image texture into touch

Just my take on this, I find tiled textures difficult to work with and control to a high degree. I uv map and place fully mapped images on everything, even large walls. Sometimes you have to break up walls into a couple of areas but for me its way I prefer to work. This means textures will sometimes be as large as 8196 but todays computers can handle it.
It also gives you far more control over how things look. A good and fun way to build up a texture inventory is to carry a camera with you and take shots of interesting surfaces. Its also fun to spend a day going downtown and photographing old brick walls, sidewalks etc.
Old churchs can be a very good source of interesting textures

Quote - Just my take on this, I find tiled textures difficult to work with and control to a high degree. I uv map and place fully mapped images on everything, even large walls.
Just my take on this, but you're crazy. ;-)
Let's say the texture is something repetitive and fairly uniform like clean brickwork or floortiles or decking. And lets say you're starting off with a 1024x1024 photo of some brickwork which covers an area, say, 5 bricks wide. If you need to cover a large wall with those bricks, surely it is simpler and way more efficient to let the renderer repeat tile that texture across the surface than it is to go into photoshop and make up a bunch of 8k mapped textures by tiling the same photo yourself?
If you need dirt, weathering, etc to add variation to a large surface, they can still be applied over the top using fairly low res mapped textures or procedurals, but the basic brick tex is a sharp photo of a small area, tiled at render time. So in a render where part of the wall is close to the camera the bricks are still as sharp as they were in the original photo.
I've been doing this a long time, I beleive I know what I'm doing. But yes I beleive I am a little crazy. If your really doing artwork a small repeated pattern of brick will give you just that a small repeated pattern of brick. I go out and photograph (multiple images) the entire side of a building "old brick buildings downtown are great for this" and use these images to map an entire wall! Like I said sometimes you may need to break it up unto 2 or more maps

Quote - ... but I think this would be hard to do with a tiled texture.
Yes, with a tiled texture you won't get specific features like the old plaster (lower right corner) or the bricked up opening (top left) but it is possible to achieve a similar overall effect, that of grungy old brickwork, at a fraction of the memory footprint.
If one was doing a render called 'Naked Vicky with a wall' and the texture of the wall is pretty much the whole point of the render, then I agree that the best way to do it is a full mapped texture made by stitching high-res photos, the memory hit is no big deal. But if you consider that this is just one wall (which is probably going to be partly obscured by furniture) in a room which may be rendered with quite a number of people in it, all with hair, clothes, shoes, props etc, then efficient use of memory becomes more of an issue.
While that particular wall isn't an ideal candidate for a repeated texture, the floor tiles certainly are. Every white tile is identical to every other white tile. A single square texture having 2 whites and 2 blacks is all that is needed, and you will probably achieve sharper edges in your final render than if you make up a large texture for the whole floor in photoshop.

Quote - Just my take on this, I find tiled textures difficult to work with and control to a high degree. I uv map and place fully mapped images on everything, even large walls. Sometimes you have to break up walls into a couple of areas but for me its way I prefer to work. This means textures will sometimes be as large as 8196 but todays computers can handle it.
It also gives you far more control over how things look. A good and fun way to build up a texture inventory is to carry a camera with you and take shots of interesting surfaces. Its also fun to spend a day going downtown and photographing old brick walls, sidewalks etc.
Old churchs can be a very good source of interesting textures
The most I'll go for a wall is 4096, using an ImageSynth texture that I bake to a UV map.
www.youtube.com/user/ShawnDriscollCG
Quote - Yes, with a tiled texture you won't get specific features like the old plaster (lower right corner) or the bricked up opening (top left) but it is possible to achieve a similar overall effect, that of grungy old brickwork, at a fraction of the memory footprint.
But at the cost of rendering speed if you are using really good lined edge fractals.
www.youtube.com/user/ShawnDriscollCG

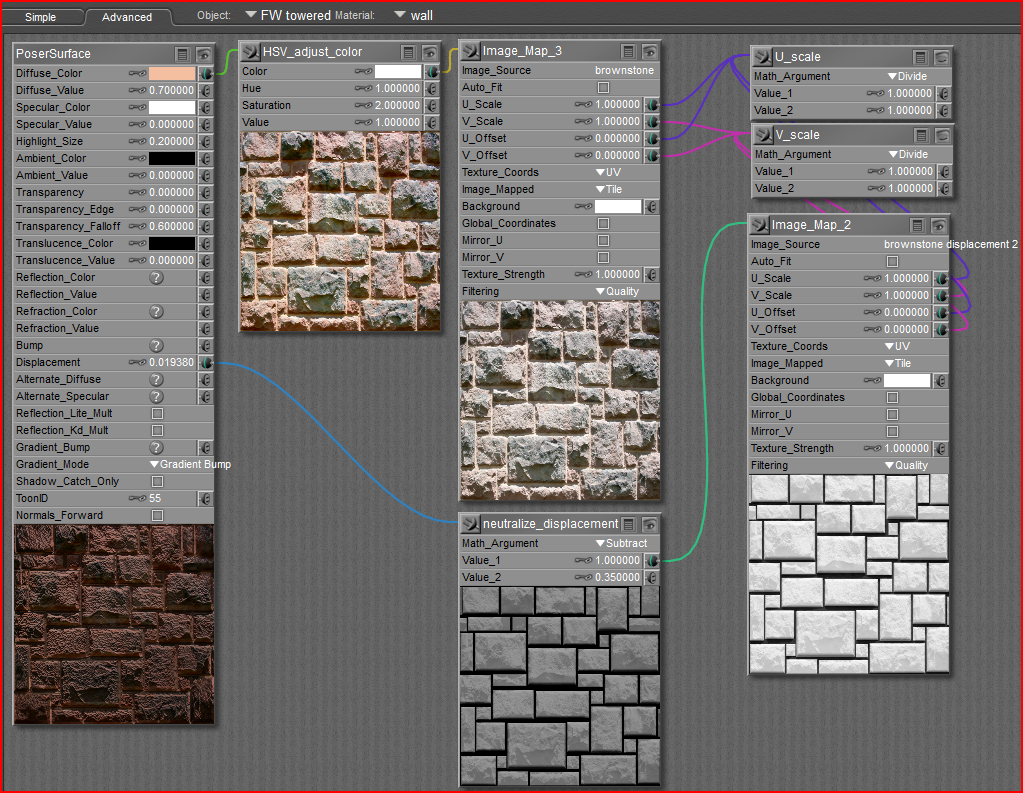
I used the same image for the bump, I let the renderer desaturate it and invert it, no point in doing that in photoshop and loading it as a separate image in this case.
I added 3 lo-res grungy images to dirty the brickwork up and break up the pattern repeat a bit.
The effect obviously isn't anywhere near as nice as yours, particularly as a large expanse of bare, evenly-lit wall, but as a backdrop in a populated scene I think it would do the job. And the memory hit is tiny, so when you hit the render button it could mean the difference between being able to render the scene and an error message.
The floor is a 348x348 image with 2 whites and 2 blacks on it.
Quote - > Quote - But at the cost of rendering speed if you are using really good lined edge fractals.
What are 'really good lined edge fractals'?
The ones that show wear on just the edges of objects. See Anything Goos for Carrara. If you bake the fractals then rendering just zooms through it.
Walls can also be rendered separately as a layer to use in Photoshop. Then RAM errors are not an issue.
www.youtube.com/user/ShawnDriscollCG
Quote - > Quote - The ones that show wear on just the edges of objects. See Anything Goos for Carrara.
So it's a procedural? Like modo's AO shader? I'm not sure what that has to do with tiled textures.
It has to do with not using them.
www.youtube.com/user/ShawnDriscollCG
Quote -
It has to do with not using them.
Procedural edge-related dirt/wear is object specific, it's not something that can be tiled like bricks or floortiles or decking, so it is kinda moot, isn't it? Anyway, it sounds like the dirt shader is slow, not the tiled textures, so why not just bake the dirt/wear map and apply it over the tiled main texture? Dirt maps seldom need to be high resolution.

You can use tiled images to cover a large area and still avoid obvious repetition, or even have distinct areas such as the brick wall's blocked-up doorway.
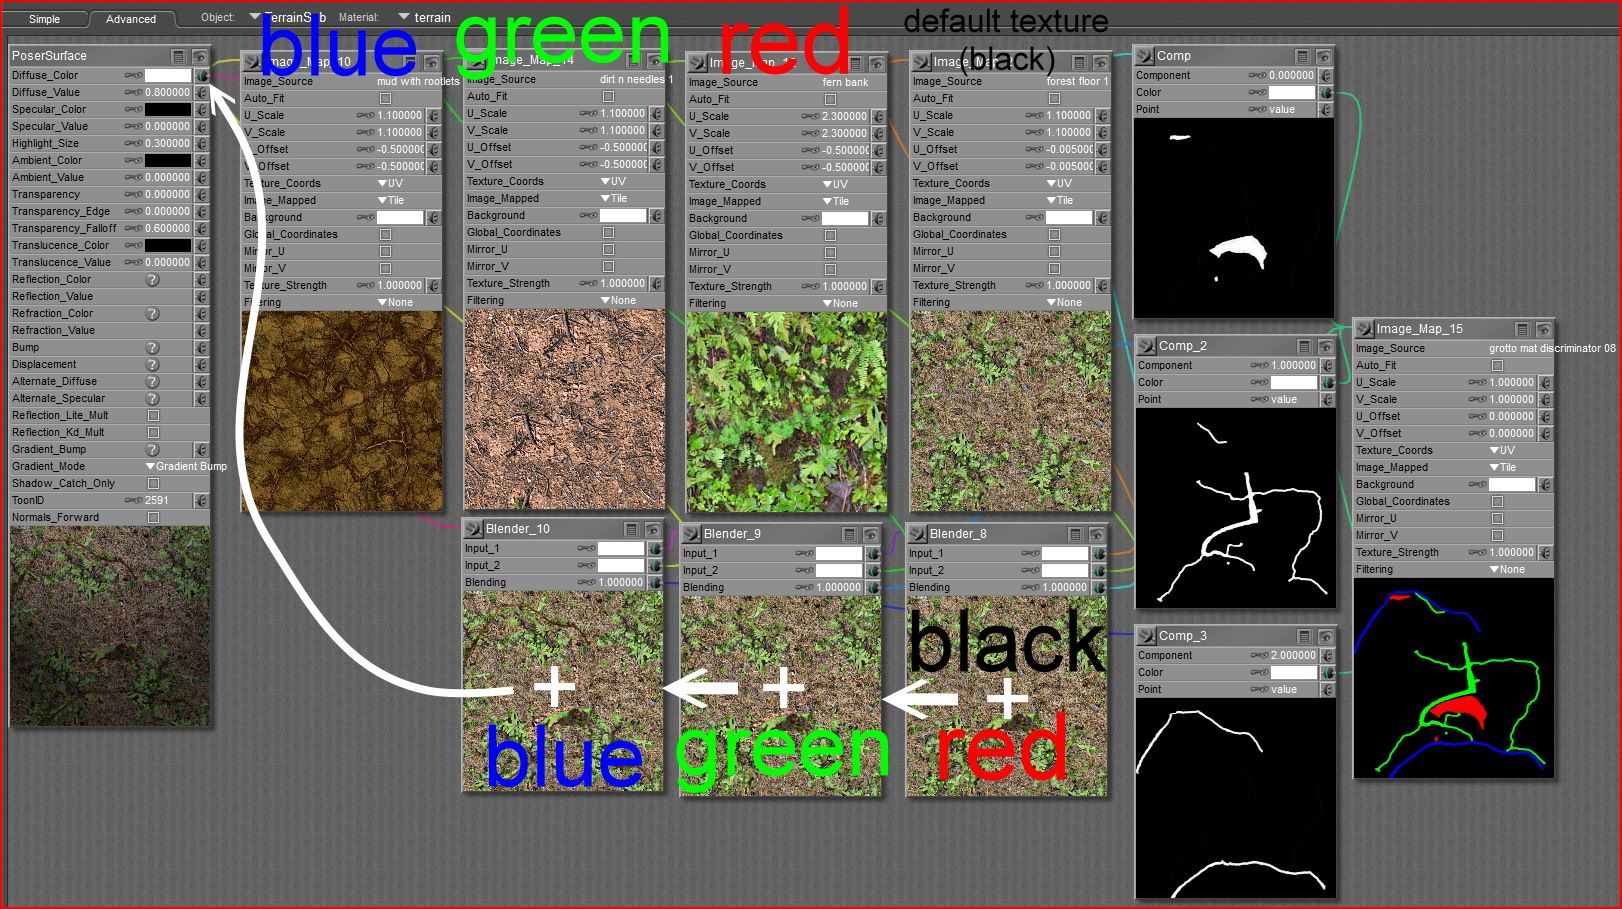
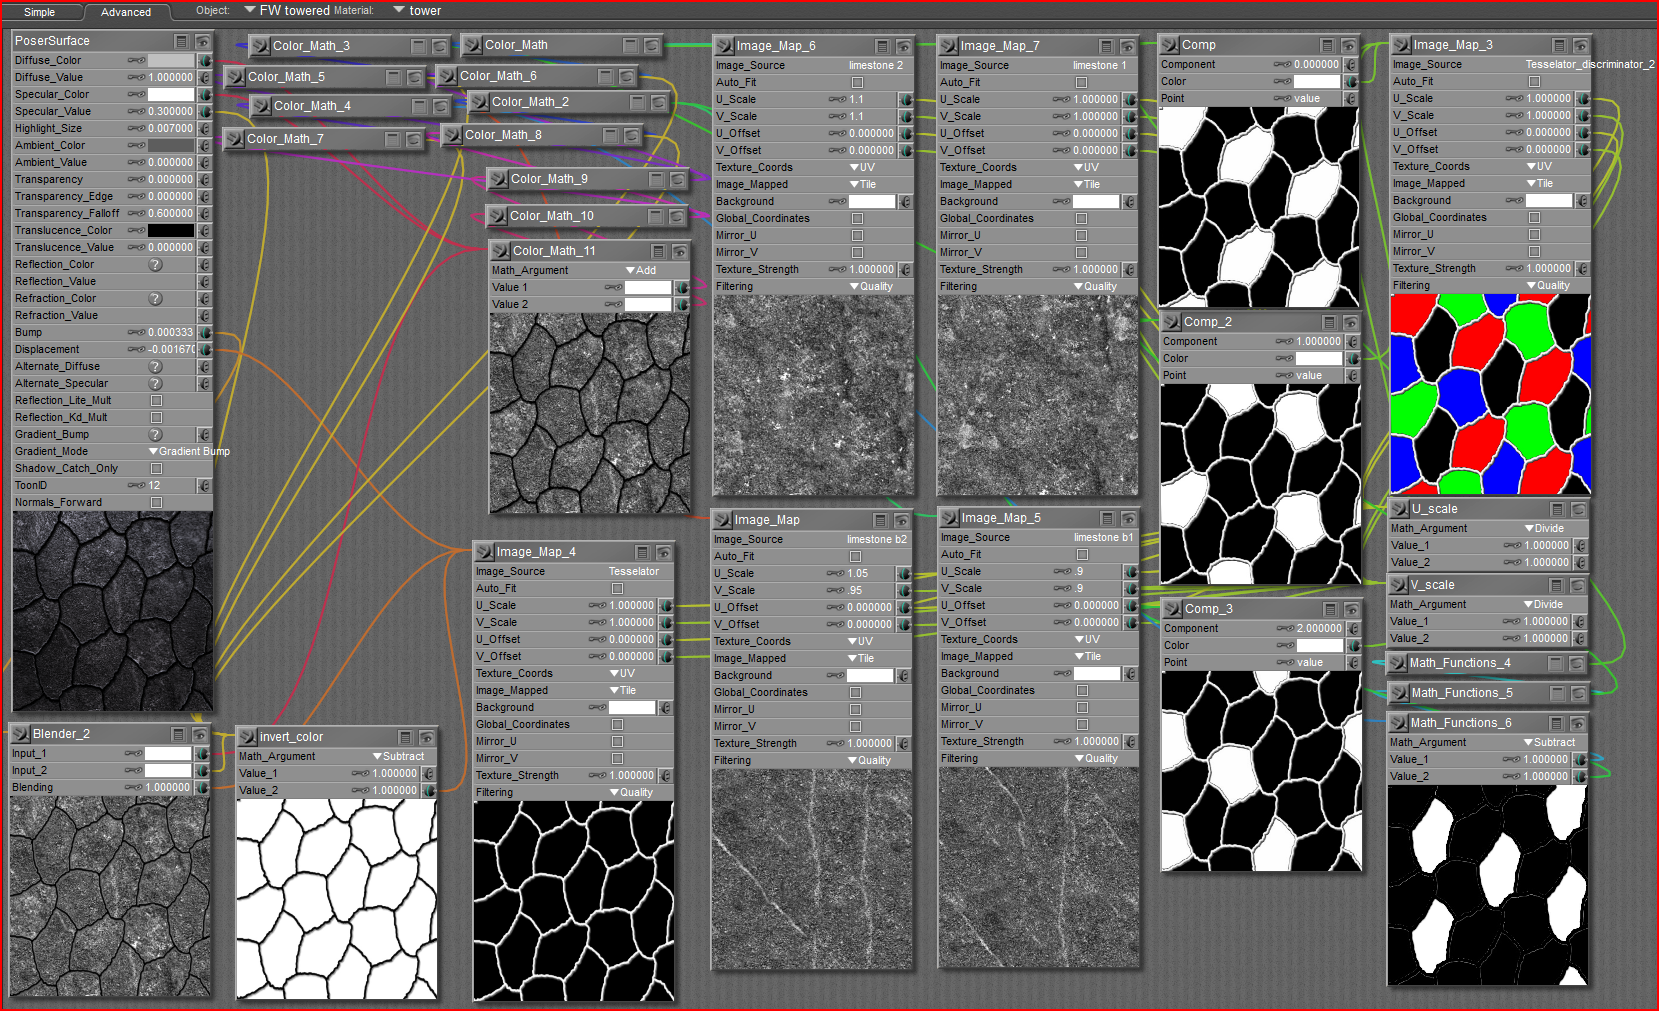
Use two similar -but different- tiles, and a randomizing map (or spots procedural) to break up the repetition. Make distinctly different areas by using an RGB map as a discriminator (mask) to control which texture prevails in a given area.
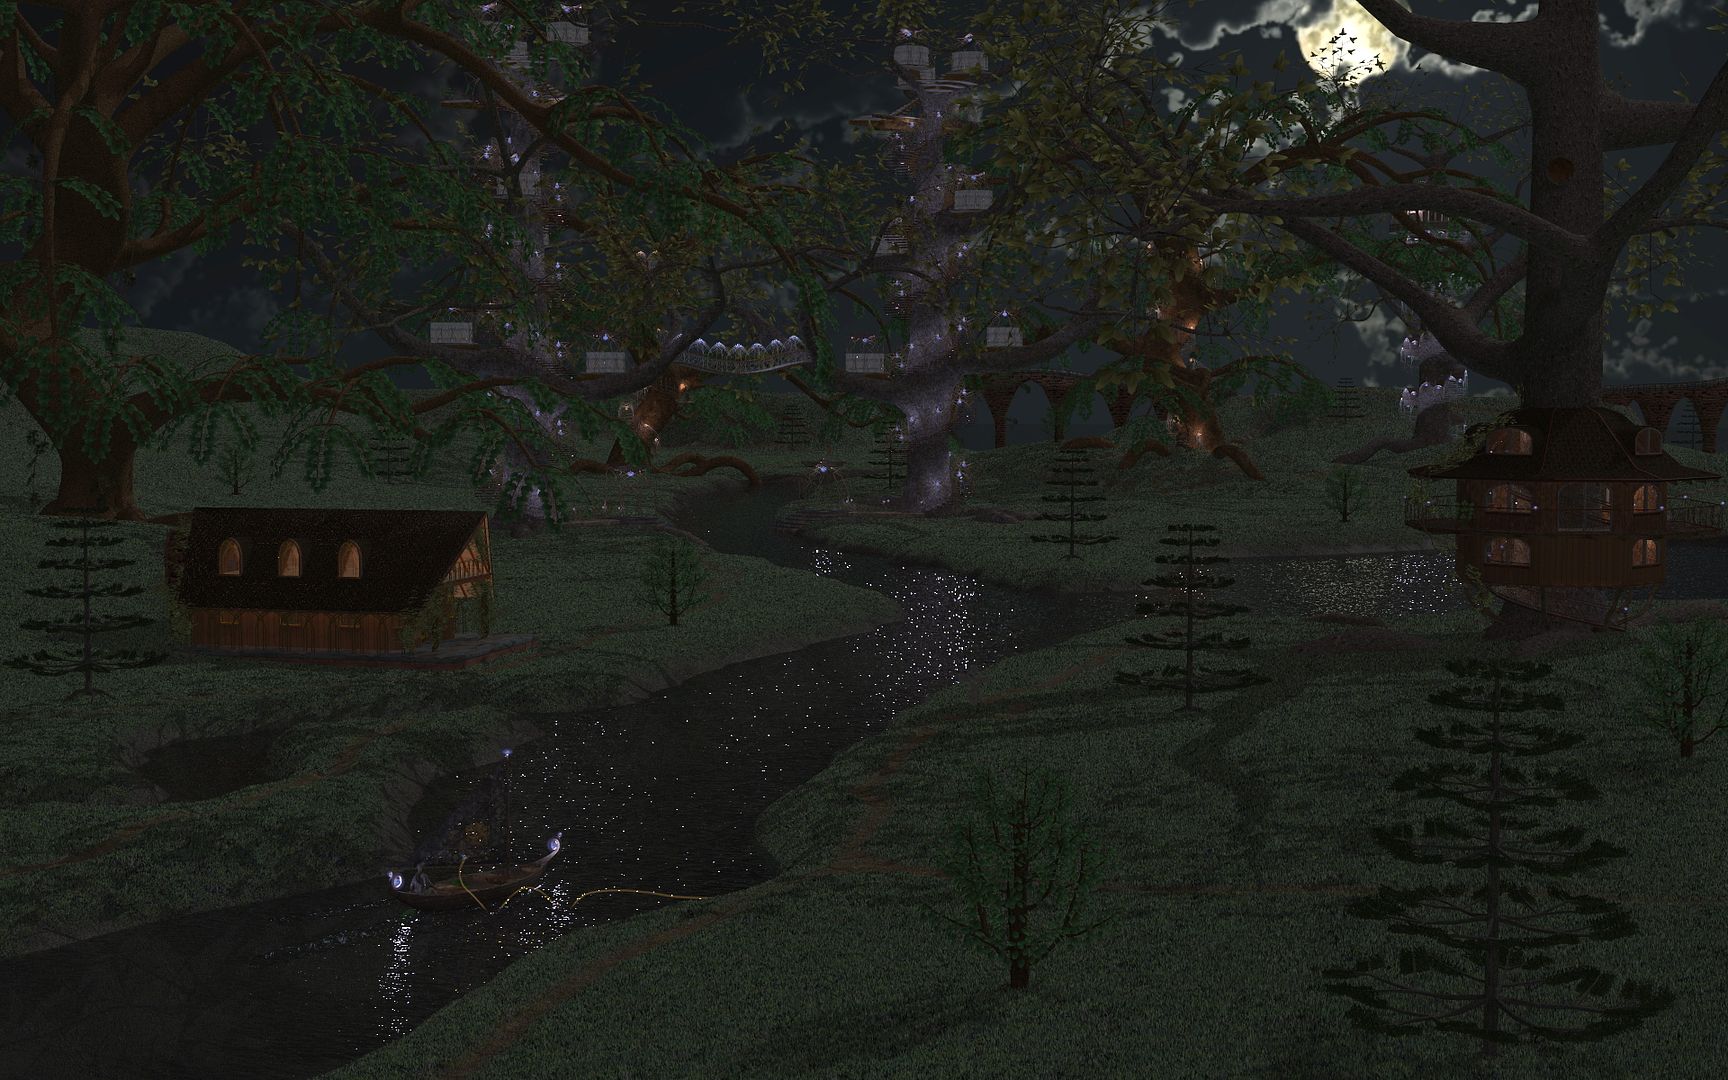
This terrain is too large for even an 8196 map to texture with acceptable detail. Repeating a single tile umpteen times would betray a checkerboard sort of pattern. By using randomized alternate tiles, it avoids repetition. By using the RGB discriminator mask, it can have bare footpaths, muddy streambanks, and stony outcroppings amongst the grassy groundcover. The big trees use the same technique for bark texturing.
 .
.
The nodework looks hideous,
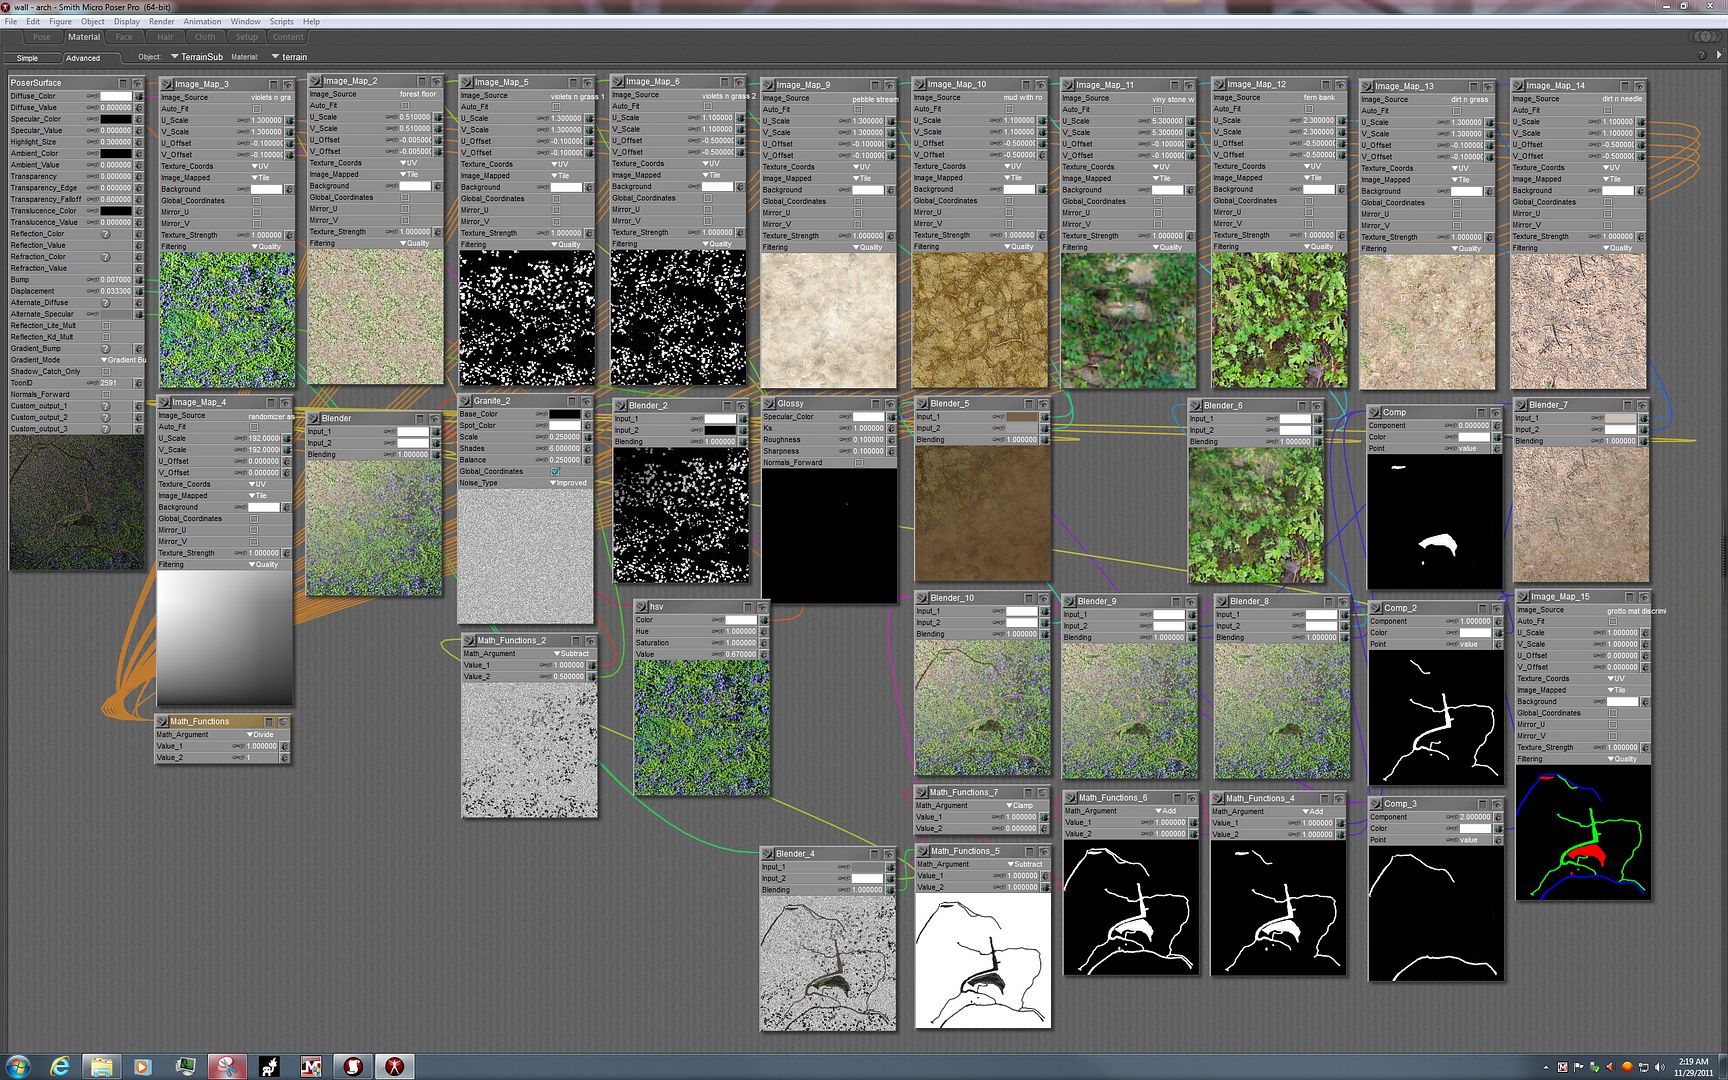 .
.
...but it's really just a daisy chain of the randomized two-alternate-tile node set,
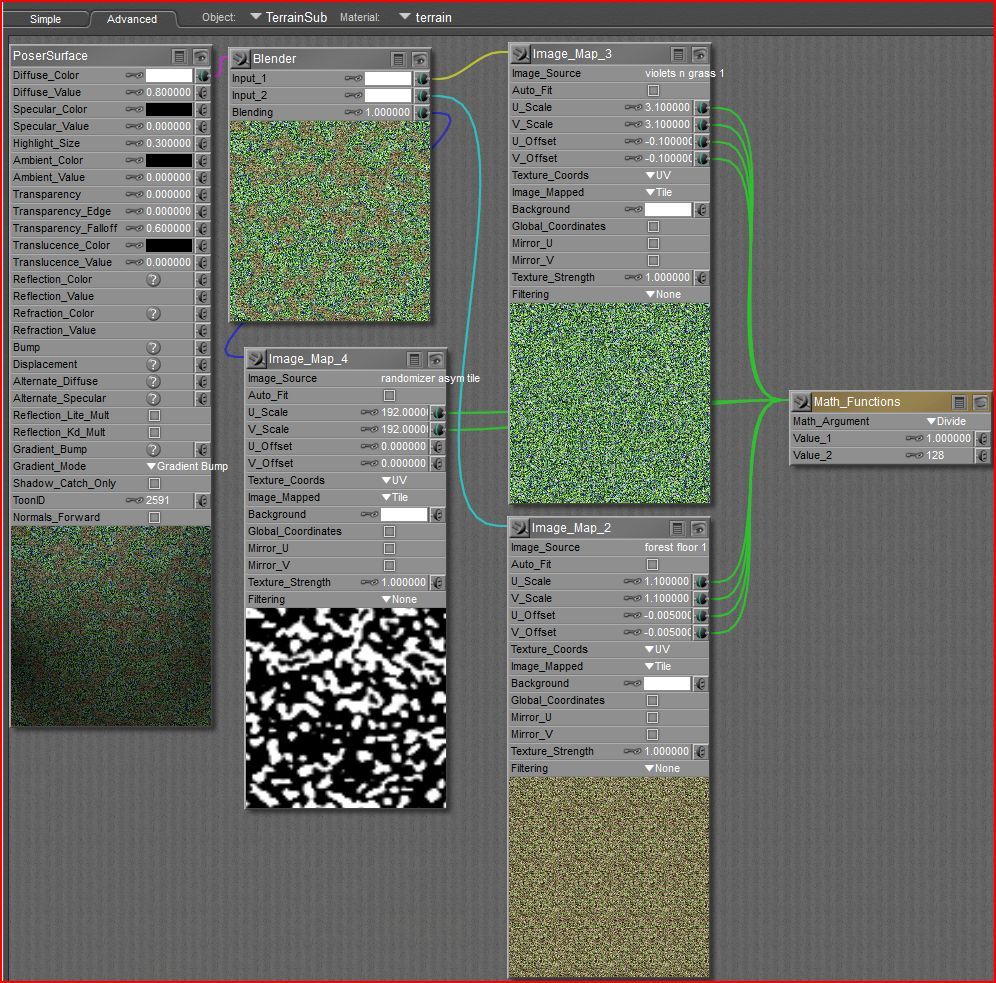 .
.
...combined with the RGB discrimnator mask:
 .
.
This method will cover a massive model at modest memory cost, yet still provide good detail for close shots:
 .
.
Oh, aaaargh! The click-links open the Photobucket album page, instead of expanding the image to full size; I don't know how to fix that.
Poser 12, in feet.
OSes: Win7Prox64, Win7Ultx64
Silo Pro 2.5.6 64bit, Vue Infinite 2014.7, Genetica 4.0 Studio, UV Mapper Pro, UV Layout Pro, PhotoImpact X3, GIF Animator 5

Thank you, primorge, and Chris. Funny, the images are opening correctly now. Did a mod fix the links?
 (if so, Thank you!)
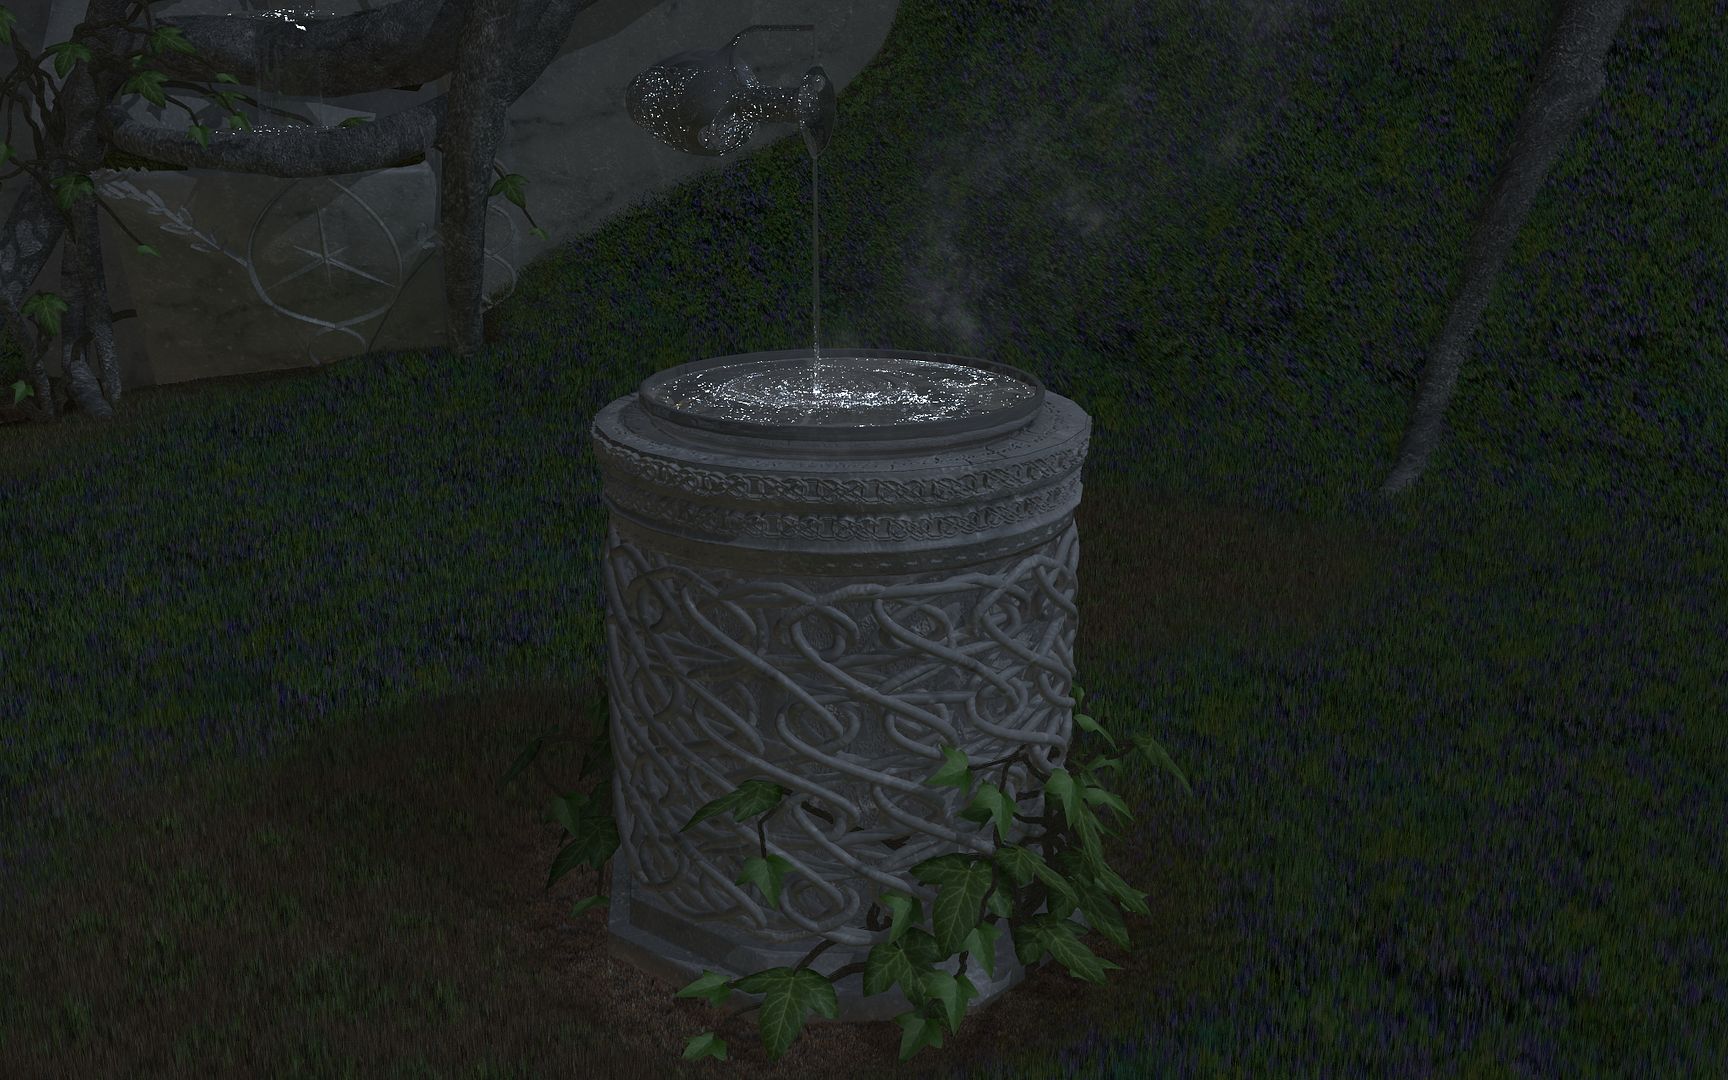
 The Galadriel's mirror image isn't very big. Here is a larger render (should expand to 2048x1280) showing more detail:
 .
.
Poser 12, in feet.
OSes: Win7Prox64, Win7Ultx64
Silo Pro 2.5.6 64bit, Vue Infinite 2014.7, Genetica 4.0 Studio, UV Mapper Pro, UV Layout Pro, PhotoImpact X3, GIF Animator 5
(Sheedee) > Quote - Does any one happen to know where i can
find textures to apply to props like
tile textures, brick for walls etc.
the important thing is that they all
have to be seamless, and especially for
Poser props...like room props and floors.
I make a lot of such texturing images. You'll also want them to be asymmetrical seamless tiles, to avoid that glaringly obvious "checkerboard" effect. By "especially for Poser", I'm guessing that you mean that the materials are set up for Poser, not just tiled images?
The utility company is now finished replacing poles (storm damage from months ago), so now I can start using my workstations again. I could put together a package consisting of material files (.mt5 - the ones in the materials section of the Poser library) and their associated texture images. The materials would have a master scale control, to fit the scale of your model.
Many of these materials use displacement and other effects, so it's best if I have them already set up; that way you get a one-click-to-apply material. Might take some time for me to put such a pack together, though.
This makes brownstone walls:
 .
.
This will roof your house with wood shakes:
 .
.
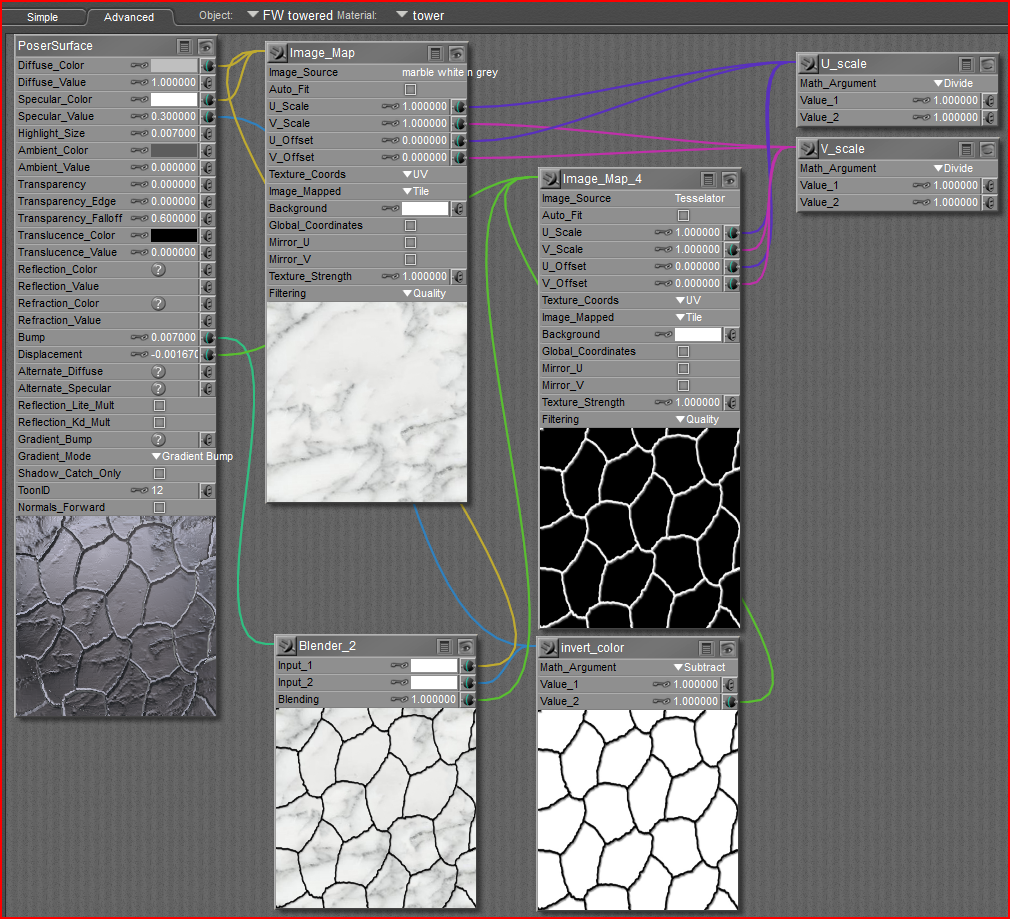
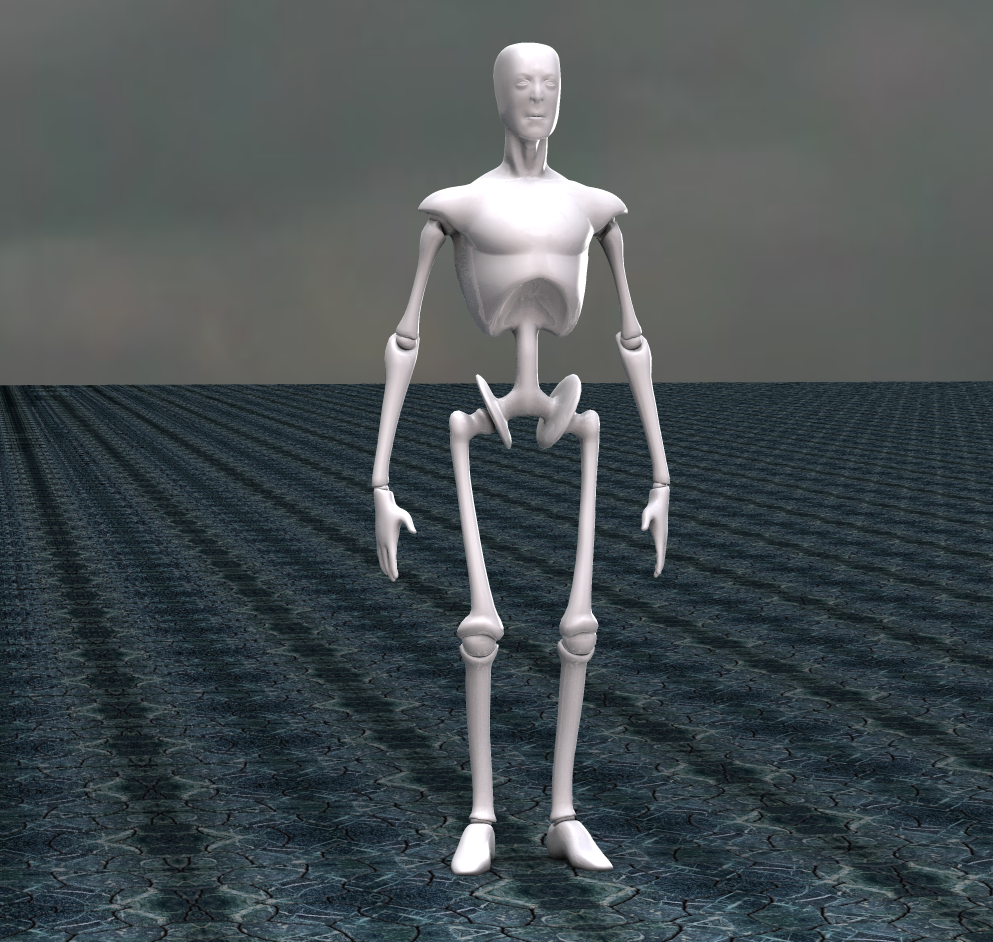
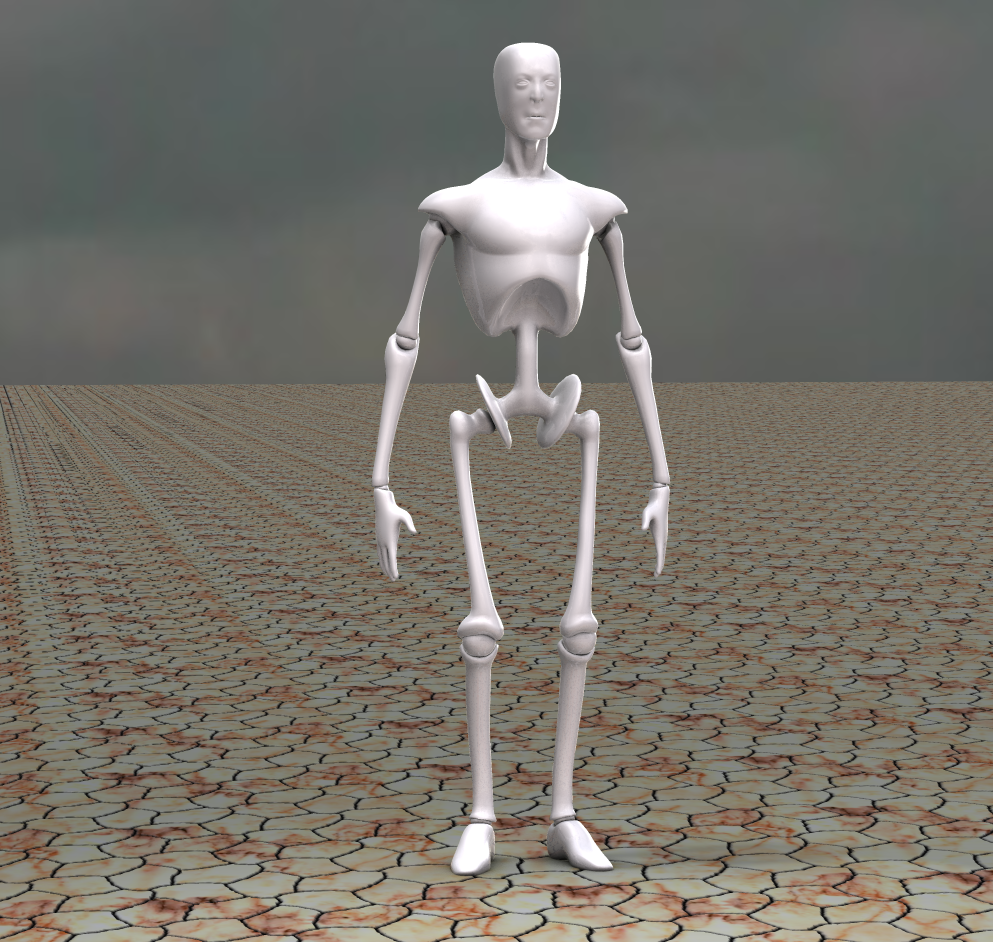
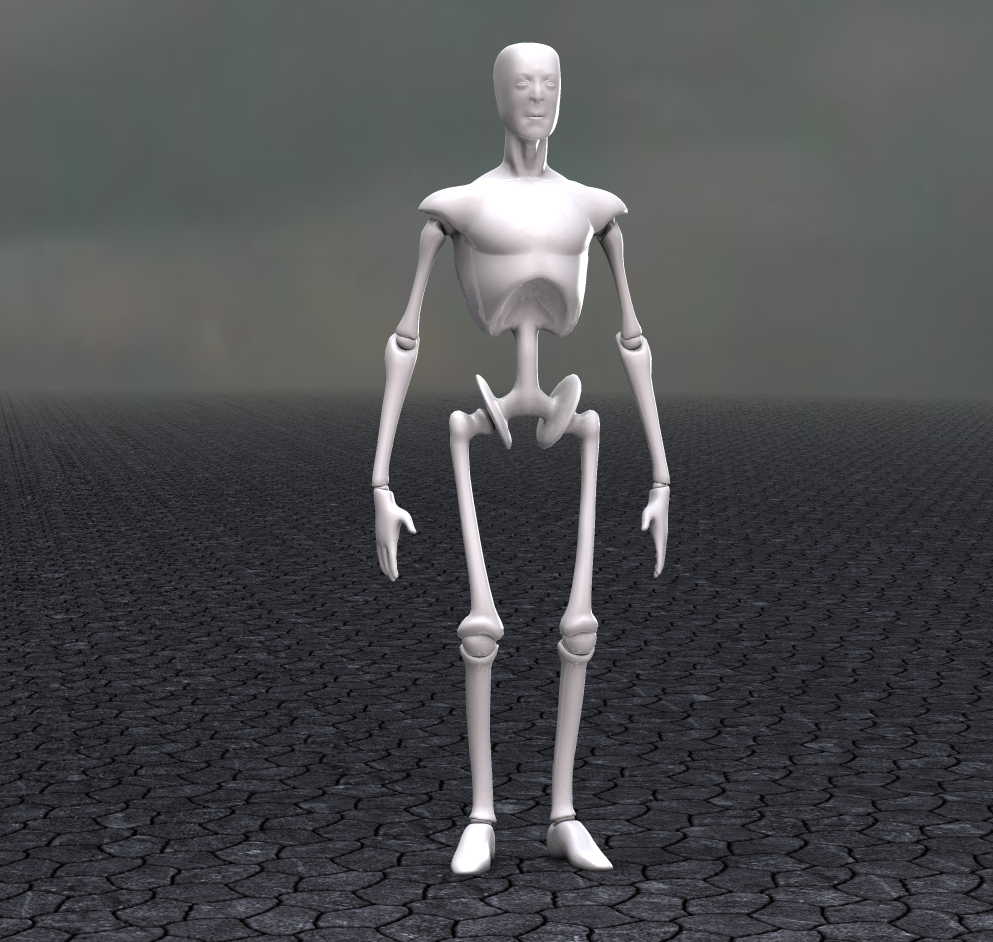
This will cover a courtyard with tesselating blocks:
 .
.
I don't like seeing the marble veins running across blocks; unless you cut up a huge single slab of marble into the blocks, that isn't realistic. Using the RGB discriminator mask technique, you can make every block unique. However, the nodework looks kinda gnarly:
 .
.
This is tesselated paving blocks textured with a simple mirrored image; the repetition is painfully obvious:
 .
.
Using an asymmetrical seamless tile and scaling it slightly differently than the tesselation block tile, yields better results quickly, though you can still see repetition, and as in the first image, I don't like the marble veins continuing across blocks:
 .
.
This mat uses four asymmetrical tiles, an RGB map to separate the textures for each block, and a "spots" randomizer to ensure that no two blocks are the same:
 .
.
Poser 12, in feet.
OSes: Win7Prox64, Win7Ultx64
Silo Pro 2.5.6 64bit, Vue Infinite 2014.7, Genetica 4.0 Studio, UV Mapper Pro, UV Layout Pro, PhotoImpact X3, GIF Animator 5
Privacy Notice
This site uses cookies to deliver the best experience. Our own cookies make user accounts and other features possible. Third-party cookies are used to display relevant ads and to analyze how Renderosity is used. By using our site, you acknowledge that you have read and understood our Terms of Service, including our Cookie Policy and our Privacy Policy.
Howdy;
Does any one happen to know where i can
find textures to apply to props like
tile textures, brick for walls etc.
the important thing is that they all
have to be seamless, and especially for
Poser props...like room props and floors
thanks.