Mon, Jan 13, 2:00 PM CST

Renderosity Forums / Poser - OFFICIAL


Welcome to the Poser - OFFICIAL Forum

Forum Coordinators: RedPhantom

Poser - OFFICIAL F.A.Q (Last Updated: 2025 Jan 12 9:36 pm)


Subject: Tutorial - HDR Shop with any background image


PapaBlueMarlin ( ) posted Fri, 09 March 2007 at 5:46 PM · edited Mon, 13 January 2025 at 1:56 PM

Attached Link: http://www.physicalc-software.com/tutorials/ibl/

file_371177.jpg

I've gotten some interest in how I create my images.  My technique is derived from a tutorial by face_off.

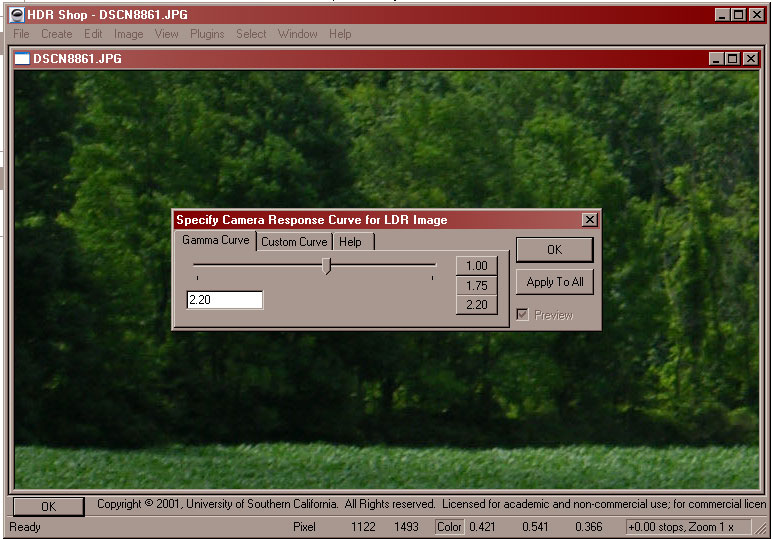
First, in HDR Shop load the image that you want to create you image-based lighting from.  Go to File --> Open and select your image.  A pop up will appear, just click "OK".


PapaBlueMarlin ( ) posted Fri, 09 March 2007 at 5:47 PM

file_371178.jpg

Now, our light must come from different directions.  So go to Image --> Panarama --> Panaramic Transformations


PapaBlueMarlin ( ) posted Fri, 09 March 2007 at 5:49 PM

file_371179.jpg

A pop up will appear... you can experiment with different options.  I typically use either Angular Map or Longitude/Latitude.


PapaBlueMarlin ( ) posted Fri, 09 March 2007 at 5:49 PM

file_371180.jpg

Your image will appear warped...


PapaBlueMarlin ( ) posted Fri, 09 March 2007 at 5:53 PM

file_371181.jpg

Then go to plugins --> lightgen plugin.  BTW, your lightgen plugin should be installed in a folder titled "plugins" in the same location you have HDR Shop installed.


PapaBlueMarlin ( ) posted Fri, 09 March 2007 at 5:53 PM

file_371182.jpg

This pop up will appear...


PapaBlueMarlin ( ) posted Fri, 09 March 2007 at 5:55 PM

file_371183.jpg

Click the browse button to set a name and location for your light file.  Reset the number of lights from 20 to about 5.  Lastly, click the button for "scale light output."


PapaBlueMarlin ( ) posted Fri, 09 March 2007 at 5:57 PM

file_371184.jpg

Click the "Execute" button.  During the calculation, an error message may appear.  Just click "OK."


PapaBlueMarlin ( ) posted Fri, 09 March 2007 at 5:58 PM

file_371185.jpg

Now in photoshop, open the same background image.


PapaBlueMarlin ( ) posted Fri, 09 March 2007 at 6:00 PM

file_371186.jpg

Now crop out the area of the image you may want to use as your background in poser.  Then go to image --> image size and change the dimensions so that it will fit in your preview window in poser.


PapaBlueMarlin ( ) posted Fri, 09 March 2007 at 6:04 PM

file_371187.jpg

In order to provide, depth of field, the background image must be blurred.  If blurring doesn't take place, if you render at a larger render size, your background may appear pixelated.  Go to filter --> blur --> gaussian blur and adjust the blur to your desire...


PapaBlueMarlin ( ) posted Fri, 09 March 2007 at 6:05 PM

file_371188.jpg

Save your image with a new file name.  Then in poser go to file --> import --> background image...


PapaBlueMarlin ( ) posted Fri, 09 March 2007 at 6:06 PM

file_371189.jpg

The preview image will resize to the dimensions of your background.  Now it's time to import our lighting.  Go to file --> run python script


PapaBlueMarlin ( ) posted Fri, 09 March 2007 at 6:08 PM

file_371190.jpg

Browse to the location of where you have saved the ImportLightsfromHDRShop python.  Select and click open...


PapaBlueMarlin ( ) posted Fri, 09 March 2007 at 6:10 PM

file_371192.jpg

You will then see a pop up labelled "tk" and then another pop up prompting you to open your light file.  Browse to the location where you saved your lights using HDR Shop...


PapaBlueMarlin ( ) posted Fri, 09 March 2007 at 6:11 PM

file_371193.jpg

Then you will see another pop up asking what percentage to assign to the IBL light... You can experiment, although the recommended 30 is usually best...


PapaBlueMarlin ( ) posted Fri, 09 March 2007 at 6:12 PM

file_371194.jpg

Then a texture manager pop up will appear, select the original image that you based your lighting off of and click open.


PapaBlueMarlin ( ) posted Fri, 09 March 2007 at 6:13 PM

file_371195.jpg

The background will be assigned to the IBL light, click OK...


PapaBlueMarlin ( ) posted Fri, 09 March 2007 at 6:14 PM

file_371196.jpg

Then a pop up will appear demonstrating that the script is completed.  Just click the close button.


PapaBlueMarlin ( ) posted Fri, 09 March 2007 at 6:15 PM

file_371197.jpg

In poser, set your rendering settings...


PapaBlueMarlin ( ) posted Fri, 09 March 2007 at 6:17 PM

file_371199.jpg

Then do a practice render.  In this case, our lighting is a little severe.  Because we are using normal images rather than HDR images, there is a bit of trouble shooting that may need to be performed.  This can include shifting the positions of some of the lights or changing the colors slightly.


PapaBlueMarlin ( ) posted Fri, 09 March 2007 at 6:18 PM

file_371203.jpg

In this case, I will make the color of each lighter slightly paler.


PapaBlueMarlin ( ) posted Fri, 09 March 2007 at 6:19 PM

file_371205.jpg

Then re-render...


PapaBlueMarlin ( ) posted Fri, 09 March 2007 at 6:20 PM

file_371206.jpg

Now use whatever props you may desire in order to make your figure look less pasted on a background...


PapaBlueMarlin ( ) posted Fri, 09 March 2007 at 6:23 PM

file_371208.jpg

Render to your desire image size.  Then in photoshop, we are going to intensify the saturation of the colors.  In the actions tab, select either "oil paint" or "soft poserize."  Change the layer setting to "soft light" and adjust the opacity to your desired effect.  Then select your background and create a duplicate layer.  Go to filter --> stylize --> find edges.  Move this layer to the top and set the layer setting to "soft light" and decrease the layer opacity to 10%.


PapaBlueMarlin ( ) posted Fri, 09 March 2007 at 6:24 PM · edited Fri, 09 March 2007 at 6:25 PM

file_371210.jpg

Go to Layer --> flatten image.  Here is the end result...


JHoagland ( ) posted Fri, 09 March 2007 at 6:25 PM

Very nice tutorial. It reminds me a lot of Eric Van Dyke (Traveler)'s Poor Mans HDRI tutorial. But, your images use a later version of Poser. ;)


VanishingPoint... Advanced 3D Modeling Solutions


PapaBlueMarlin ( ) posted Fri, 09 March 2007 at 6:32 PM

Attached Link: http://www.renderosity.com/mod/gallery/browse.php?user_id=27965

I haven't seen that tutorial before, but yes it's basically the same principles.  This tutorial was made using Poser 6, but it works for Poser 7 as well.  I haven't tested it in Poser 5.

For examples on how HDR Shop images might appear, you can check out my gallery here to decide whether it is something you desire to implement into your renders.

Hope this tutorial is helpful...


RAMWorks ( ) posted Fri, 09 March 2007 at 9:57 PM

Nice tutorial there PBM!! 😄

---Wolff On The Prowl---

My Store is HERE

My Freebies are HERE  


Indoda ( ) posted Sat, 10 March 2007 at 6:48 AM

Great tutorial - should it go into the tutorial section of the site makes it easier to find later? Thank you for sharing all this information.

The important thing is not to stop questioning.
- Albert Einstein

Indoda


MariaM05 ( ) posted Sat, 10 March 2007 at 11:04 AM · edited Sat, 10 March 2007 at 11:07 AM

file_371251.jpg

Hey, i followed your tutorial, and heres what I did... how is it..


dphoadley ( ) posted Sat, 10 March 2007 at 12:04 PM
PapaBlueMarlin ( ) posted Sat, 10 March 2007 at 12:06 PM

Attached Link: http://www.renderosity.com/mod/gallery/index.php?image_id=1217007&member

Try to reimport  your background.  When it tells you that it will change the dimensions of the preview window, click OK.  The background you selected has no natural light.  It's still okay, but it means that you will have to change the color of some of the lights and possibly reposition a few.

It's what I did for the image in the link - so it can still look natural.


PapaBlueMarlin ( ) posted Sat, 10 March 2007 at 12:13 PM

Attached Link: http://gl.ict.usc.edu/HDRShop/

HDR Shop is a program from which you can create light files that can be imported into poser.


PapaBlueMarlin ( ) posted Sat, 10 March 2007 at 12:19 PM

file_371259.jpg

Maria, this should be the screen pop up you see when you first select to import your background.  click the yes button.


MariaM05 ( ) posted Sat, 10 March 2007 at 12:46 PM

Ok, so then i did two more... to see if i knew what u was talking about...


MariaM05 ( ) posted Sat, 10 March 2007 at 12:48 PM

file_371262.jpg

Ok, so then i did two more... to see if i knew what u was talking about...


MariaM05 ( ) posted Sat, 10 March 2007 at 12:48 PM

file_371263.jpg

then another...


dphoadley ( ) posted Sat, 10 March 2007 at 12:53 PM

Would this method also work on background images pasted to primitimes, such as flattened cubes or curved surfaces?  With a bsckground image pasted to a primitive, I can use displacement and bump values to enhance the 3d effect.
DPH

  STOP PALESTINIAN CHILD ABUSE!!!! ISLAMIC HATRED OF JEWS


PapaBlueMarlin ( ) posted Sat, 10 March 2007 at 1:17 PM

file_371269.jpg

Maria: It looks to me that your light change was done in photoshop rather than poser.  You will have to change some of the colors of your lights.  Specifically all of the green ones to make them more pale.

DP:
It could be done that way, but remember your background image is blurred to provide depth of field.  Plus, too many curves could cause the lights strange angles on your background.  But feel free to experiment and see if it works for you.


MariaM05 ( ) posted Sat, 10 March 2007 at 1:36 PM

file_371270.jpg

How about now? Almost?


MariaM05 ( ) posted Sat, 10 March 2007 at 2:19 PM

file_371271.jpg

ok im done, im loving my outcomes!


PapaBlueMarlin ( ) posted Sat, 10 March 2007 at 5:31 PM

Much better!  I think you're getting the hang of it :)


Privacy Notice

This site uses cookies to deliver the best experience. Our own cookies make user accounts and other features possible. Third-party cookies are used to display relevant ads and to analyze how Renderosity is used. By using our site, you acknowledge that you have read and understood our Terms of Service, including our Cookie Policy and our Privacy Policy.