Renderosity Forums / Photoshop
Welcome to the Photoshop Forum
Forum Moderators: Wolfenshire Forum Coordinators: Anim8dtoon
Photoshop F.A.Q (Last Updated: 2025 Jan 14 1:57 am)
Our mission is to provide an open community and unique environment where anyone interested in learning more about Adobe Photoshop can share their experience and knowledge, post their work for review and critique by their peers, and learn new techniques while developing the skills that allow each individual to realize their own unique artistic vision. We do not limit this forum to any style of work, and we strongly encourage people of all levels and interests to participate.
Sharpen your Photoshop skill with this monthly challenge...
Checkout the Renderosity MarketPlace - Your source for digital art content!

Subject: Ask:How does it make to Bump?


You're on the right lines. Looking at your original post again, I think the creator probably went over the mortar with the burn tool set to shadows and a fairly high exposure. That would explain why the mortar lines are so much darker. If you do that you should get the same sort of effect as the original.
Steve


The difference between the red circled sections is the difference between specific processes. These detail variations are why we use homemade bumps.
At a guess, I would say that they decreased the overall contrast and then painted in the mortar with a black brush of some type. There are a variety of ways to do this, and all of them are equally valid.
For example, you could add a grey fill layer set to Color blending mode, or make the transformation with Curves or Levels. I could also do this with a Screen-mode curves layer. There are other methods, but these are sufficient.
It sounds like you're unsure of the reason you're doing this, the why which underlies the method. Please tell me if I'm wrong, but if I'm not, it would be helpful to you to learn this first.
They had chained him down to things that are, and had then
explained the workings of those things till mystery had gone out of
the world....And when he had failed to find [wonder and mystery] in
things whose laws are known and measurable, they told him he lacked
imagination, and was immature because he preferred dream-illusions
to the illusions of our physical creation.
-- HP Lovecraft, The Silver Key

A good way to make bump maps if your using photoshop is to use the lighting effects filter.
Set the style to parallel directional, light type to directional, and adjust to get the effect you want. Set texture channel to blue or green and adjust height- flat to mountanous to get the intensity of the map you desire.
You must use an image with color info for this filter to work, then convert to greyscale after you have acheived the results you want. This method requires a little experimentation to get just what you are wanting. Sometimes if you are wanting are very subtle effect just a plain greyscale image will work.
Privacy Notice
This site uses cookies to deliver the best experience. Our own cookies make user accounts and other features possible. Third-party cookies are used to display relevant ads and to analyze how Renderosity is used. By using our site, you acknowledge that you have read and understood our Terms of Service, including our Cookie Policy and our Privacy Policy.
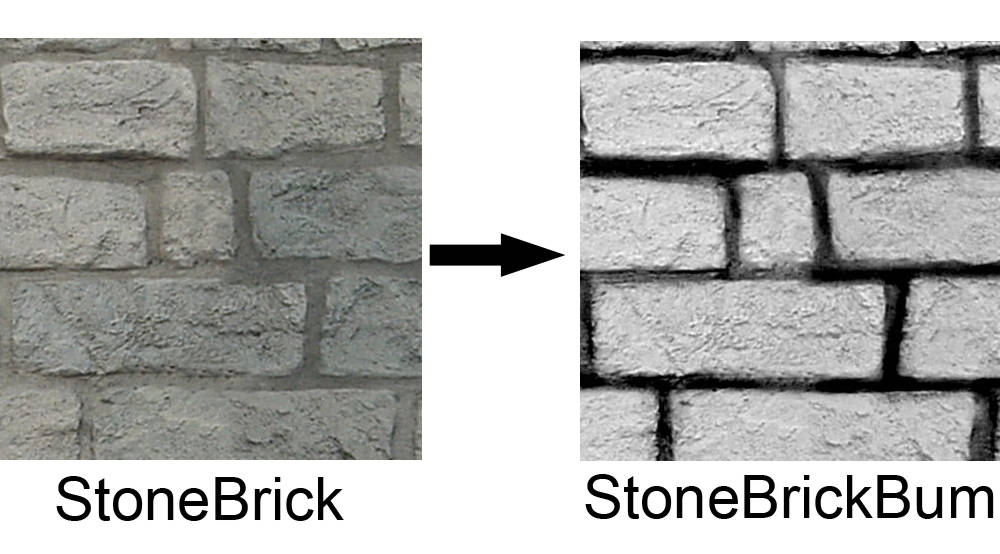
How does the picture"StoneBrick" change into the picture"StoneBrickBump"?