Renderosity Forums / 3D Modeling
Welcome to the 3D Modeling Forum
Forum Moderators: Lobo3433
3D Modeling F.A.Q (Last Updated: 2024 Sep 15 9:12 pm)
Freeware 3D Modeling Software Links:
Blender | Trimble Sketchup | Wings 3D | Anim8or | Metasequoia | Clara IO (Browser-based 3d modeler)
Check out the MarketPlace Wishing Well, as a content creator's resource for your next project.
"What 3D Program Should I buy?" Not one person here can really tell you what's best for you, as everyone has their own taste in workflow. Try the demo or learning edition of the program you're interested in, this is the only way to find out which programs you like.
Checkout the Renderosity MarketPlace - Your source for digital art content!

Subject: What I've learned since my first humanoid

- 1
- 2

Hmmm... interesting. The topic of your post got me thinking about what I have learned since my first humanoid. Definitely a lot. The most important thing I would say, though, is this: understand that everyone has an opinion and everyone has a technique they prefer and that you should take the opnions that help, use them and be greatful, and respectfully decline the suggestions that for whatever reason do not lead to your own artistic satisfaction because at the end of the day you only have yourself, your choices and your own work to take pride in and be happy with. Not exactly a technical sort of 'what have I learned", but something to consider nonetheless. -Les
Content Advisory! This message contains nudity

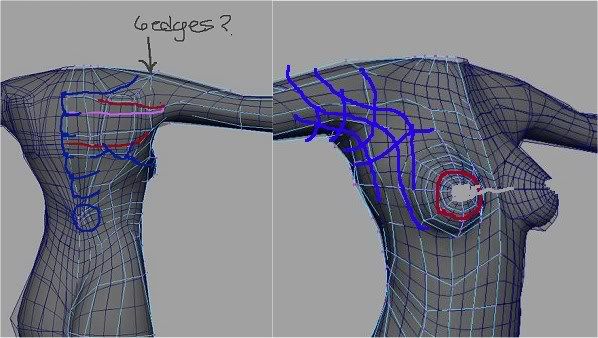
Anyway, here's a torso screenshot. The front pretty much looks the same as last time....

A couple things I would point out, just from a quick look at what you've posted...
1: i think you might actually be working just a bit higher res than what is really necessary. It's something that comes with a lot of experience, but eventually you start to really get a feel for where the subdivided mesh will flow based on the low poly cage. Once you get that, you really start to find yourself using fewer and fewer polys at the control cage stage. What you have isn't bad by any means, just a bit more dense, especially around the breasts, than what I would be shooting for. You could easily reduce that just by collapsing some edge rings around the breasts. Breasts are just sooo easy to get fixated on though... :p
- If you look at the back, you'll see where you have three areas where six polys are connected around a single vertex. These appear at lower inside point of the scapulas and again in the small of the back. I would offer that you should try to avoid the six-way connections whenever possilbe. Whenever you can, try to have no more than four polygons connected by a single vertex. Keeping that in mind will help give you some tremendously improved and efficient topology. Also, the cleaner the topolgy at the lowest level the easier the uv's are to develop, especially since you're using Maya.
I myself and a die hard Maya disciple. Been loving on the Maya since version 3; switched to it from Max and never looked back. Nothing wrong with Max really, but the workflow in Maya always clicked well with me so since you're using it, I might be able to help you out a bit more than I otherwise might. -Les
The posted pics are subdiv proxy meshes so there's 4x more detail than what's actually there. There is quite a bit of breast detail which I'm not sure yet if I will keep or discard. I did spend more time getting the shape correct.
Six sided pole - hadn't noticed that. At this stage I'm more interested to establish topology for major muscle group and go quad crazy before I begin the limbs. The last mesh was all quads / no tris but also lacked detail.
Yeah, I've been using Maya for a few years and I discover something new everyday.

Was gonna respond the other night and ask if you'd post screenshots of the base mesh. Usually people don't post wires of their subdivided humanoids, just wires of the base mesh, and a smoothed version that doesn't show any wires. It's hard to tell what the base mesh looks like with the screenshots you have here.

The front side hasn't changed much. At odf's suggestion I removed some detail from the breasts but it had no effect on poly weight so I've decided to keep the current level of detail.
Because I'm working in subdiv proxy mode (rather than lo-res poly + smooth and undo as I did with the first version), I'm gonna ask for a little latitude for viewing the meshes. Though it's a bit difficult for me to work in this mode, it's easier for me to see how the "control" mesh affects the smooth mesh without the whole "smooth / undo" workflow I was using the last time.
Anyway, I've spent the evening detailing the back. Muscle flow and skeletal structure are the key points here. I'm sculpting the broad strokes of the scapula, trapesizus, latissimus dorsi and dorsolumbar fascia here....


First - 32,000 isn't low poly. It's mid poly. Low poly would be closer to 15,000 and under really. Something to shoot for in the future perhaps.
Now, I won't go heavy into critiquing your mesh because it's still a work in progress and things may be aware to you already. So, I'll just point out things that are glaring to me and you can decide what, if anything, to do about it.
The first thing that jumped at me was how relatively well kept and clean the front of the body looked and how jumbled and pinched the back of the body looked in terms of mesh flow. You will want to smooth the back out so that the polygons are more evenly spaced. Not only will this make editing the mesh a bit easier but it will also lead to cleaner deformation when animating the figure.
I don't know about anyone else but it's easier for me to see problems in a mesh either in the low res or in the high res. This overlap of the two actually makes things a bit harder to sort out for critique and will only become more so as the density increases. That having been said, if you're following a reference image or better yet, a set of reference images, then you'll likely end up in a good place if not a perfect one.
When starting out in organics, capturing form is more important than clean mesh flow initially, as most folks get shapes completely wrong to the point of lunacy when they first start out. This is usually because many don't use references or use poor ones (in which case the fault isn't completely their own). Clean mesh flow comes with practice and a deeper understanding of both the form you're trying to capture and the program you're using to capture it with. So, keep at but if you're intent is to sell this, do yourself a favor and spread out the areas in the back that are bunched together.
Attached Link: Guerrilla CG.ORG
You may also want to check out the attached link to see some subdivision artifacts you may run into and how to avoid them...
nice video Teyon
Hope ya don't mind that I painted stuff on your pics..
you might want to get rid of the pole.. vertex connecting 6 edges. One of the things that jumped at me.. besides the back, is that you're using a lot of edges to create her breast, but you have one edgeloop around the shoulder?... the shoulder is probably going to have a lot more movement than her chest so it'll probably need a little more loops. One way to help the shoulder along is to kinda follow the direction of the blue lines I drew on there. The breast should be fine if you get rid of 1 or 2 edgeloops, just tweak the remaining mesh to get the shape you want.

The goal with the scapula was to mimic the muscle flow. I was having difficulty removing some n-gons so I decided to delete it all until I guess after the smooth phase.
The book I'm working from suggests adding all the breast edgeloops but not much regarding the shoulder flow. I think I like what you have going there.


Also using a gen 1 foot. I've always kinda liked it though It has unnecessary detail which I will probably rework on a gen 3 model. For the moment I'd really rather be animating.
I'm not so worried about the back pinching right now because I'm currently more interested in refining topology. We're currently viewing two smooth meshes; combining them and merging vertices will eliminate the central seam.

Hi Replicand
Lookin' good! Some advise though, pre-plan and stick to your plan. Content creep will ruin any project.
Also, at this point; add the animation edgeloops, uvmap your figure, create the thin and heavy morphs and rig your figure. Your uvmap and morphs should automatically update as you detail out. Rigging early will allow you to check mesh deformation while detailing. Doing all of these at the low poly stage will save a lot of headaches and jcm's down the road.
Quote - Also, at this point; add the animation edgeloops, uvmap your figure, create the thin and heavy morphs and rig your figure. Your uvmap and morphs should automatically update as you detail out. Rigging early will allow you to check mesh deformation while detailing.
I don't know what an animation edge loop is, but I can attest to the merits of early rigging. A misplaced pole, too much or too little mesh density at a critical spot, and you're in for a world of pain. If you rig early on and go through your test poses on a regularly basis, you can catch that kind of thing easily.
-- I'm not mad at you, just Westphalian.
Before I was replicand, I was squid69. Replicand currently has 999 posts and is saving the 1000th post for the unveiling of the new mesh, which will happen very soon. I am currently detailing the base mesh and I'm starting to get the impression that this is a project that I can never finish (thanks odf for ruining my world re: three years between preliminary and final mesh).
Patorak: thanks for your support - it is truly appreciated. Rigging was tested during the development of the previous mesh. The smoothed / low poly design philosophy guarantees relatively pain-free rigging. I have no plans to distribute it and it is not designed for use in Poser (so JCMs, et al do not apply). But since it is low density, I'm wondering if I should make it available to the Poser community to see what they will do with it. I will consider this.
I have spent considerable amount of time integrating muscle flow into the topology but animation loops have been a challenge - there aren't many present yet. Particularly the knee and the elbow, I really want to get those looking right. I've found though, that adding an extra bone / joint for those areas help to keep things neat.
Quote - I have no plans to distribute it and it is not designed for use in Poser (so JCMs, et al do not apply).
I'm not sure I'm understanding that statement correctly. Depending on the level of realism you're aiming at, it might still be necessary to use joint-dependent morphs, no matter what you call them in your application. Weight-painting can only get you so far, although probably much farther than Poser's strange in/out spheres.
-- I'm not mad at you, just Westphalian.


blendshapes. And there's a free plug-in he can use, which is comet's pose deformer. It is kinda like blendshapes, you push/pull verts to fix bad deformations, but it's based on the rotation of joints.
There's a guy on cgtalk who used a combination of blendshapes and pose deformers for all the facial expressions on his Mary character.. the plus side to using comet's plug-in is it kept the scene light, but I think he used mel scripts to convert the blendshapes he already had so they were controlled by joints for the plug-in. In this case, mel scripts aren't needed for that.
Trying to rig with just joints and painting weights.. I tried that. And I ended up complaining a little in the body topology thread, and people responded pretty much with the same thing Odf just said.. but without the poser bit.
I'd be willing to give that a try. The thing is that on a mesh so light I don't know if it will be necessary. Vicky 3 at 72,000 polys is a nightmare. I tried rigging that mesh for two years with various results. Then I heard of rigging with wrap deformers. That's part of what got me started on the low-poly kick. But first things first - layout UVs and painting textures.
I think the workflow for a lot of Maya users is to rig the base mesh and a smooth proxy for rendering. And use the base mesh to create blendshapes. Depending on your computer, you can tweak an elbow, and see how it effects the proxy side-by-side in real time. That bogs my computer down, so I would just click the layers to see how the proxy looks with the blendshape. No biggy.
But the shoulder area on your base mesh... I don't think you're going to have enough geometry there to get a realistic deformation there unless you plan on tweaking a subdivided version.. which I don't see why you would do that when you really don't have to.
Quote - The main problem appears to be a collapse on the shoulder outside / top.
Yep, that sounds familiar. Basically, one ends up pulling vertices out of ruts at every joint after basic rigging.
Which is where you start to really appreciate working with a low-poly mesh. :biggrin:
-- I'm not mad at you, just Westphalian.
now that I'm thinking about it, what can probably help you at this point is to bring the arms half-way down to a semi t-pose, and then you can add the edges you need to support that pose for the shoulder. The semi t-pose helps to make rigging easier too.
The few times I've rigged in Maya, the main problem was the arm pit area, and the sides of the torso being influenced by the shoulder joints. With this character, the outside/top of the shoulder did ok right after binding it to the skeleton.. it didn't collapse on me. But it was modeled in a semi t-pose, that probably helped a lot. I have screenshots of the topology in my gallery, I think it's the 2nd or 3rd page. 
*After rigging the mesh with a simple skeleton with no controls, I agree that I will need more surface detail to get the shoulder to react properly. The main problem appears to be a collapse on the shoulder outside / top.
Spin the quads in the arm pit area this will form the first animation edgeloop in the shoulder. Shoulder needs two to keep it from collapsing, though.
Hi DivineRAiN
Excellent topo!

Sigh - so much to learn. I just googled shoulder topology and stumbled across a blender tut where the shoulder flows up from the breast. I'll keep that in mind for gen3.
In the meantime I added another edgeloop on the arm side of the shoulder. When smoothed it introduces detail which should keep the inner shoulder from collapsing but I'm not sure how it will affect the outer shoulder until I rig it tomorrow.
Need some clarification of "spin the quads".
My bad...Maya doesn't have a spin quad tool like Lightwave. Check out the link http://forums.cgsociety.org/archive/index.php/t-36015.html
Hmmm...maybe that's why my bud's say they use Maya at work and Lightwave at home.
http://www.subdivisionmodeling.com/forums/showthread.php?t=907&page=3
this "quad spinning" should be easy to implement since nearly all the mesh is "quadded". I don't think a tool is necessary to produce this result. Thanks for the direction though.
You're welcome.
*The difference is in the poles. Also, earlier I said that the Spin Quad are not logical well, after looking it a little closer I can now say that it's very logical!
Whew glad Someartist saw the light.
See what they are caliing poles in mathematics they're called manifolds. http://en.wikipedia.org/wiki/Manifold
And manifolds placed just right will give you muscle and skin movement during animation, without the aid of morphs.
Nope! A pole is not the same as a (mathematical) manifold. Pretty much unrelated concepts, in fact.
The first paragraph of the Wiki article states pretty clearly what a manifold is, so I'm not going to repeat it. The meshes we build in our modeling applications are in fact 2-dimensional manifolds.
What that means in that particular case is that an edge can never belong to more than two faces, every edge or vertex belongs to at least one face, and the collection of faces that share a common vertex is always a single circular sequence. That last condition is, however, as I found out after some bad welding accident when exporting from DAZ Studio, not generally recognized or enforced by modelers.
At any rate, whether you have a pole or not, the whole thing is still a manifold. Poles are important for another reason: if you had only quadrangles and no poles, you could never form a closed, spherical shape. And since we generally don't model the digestive tract, a human is in effect a deformed sphere. So one needs at least eight 3-poles in any human figure; more if there are also 5-poles (or, shudder to think, n-poles with n > 5).
An edge loop is, incidentally, a 1-manifold.
-- I'm not mad at you, just Westphalian.
*Nope! A pole is not the same as a (mathematical) manifold. Pretty much unrelated concepts, in fact.
Physics is physics whether in the real world or 3d world.
*At any rate, whether you have a pole or not, the whole thing is still a manifold.
Yep! And, if you would like to delve deeper into the mathematics of 3d modeling, google "tensors"
Tensors are an extremely general concept. So general in fact, that they can be applied to everything and nothing. Any boring vector or matrix is a special case of a tensor. However, the Wiki articles on (classical treatment of) tensors refers to the one on curvature, which is a winner.
Gotta love the Gauss-Bonnet theorem. :biggrin:
Now on with your regularly scheduled thread...
-- I'm not mad at you, just Westphalian.

- 1
- 2
Privacy Notice
This site uses cookies to deliver the best experience. Our own cookies make user accounts and other features possible. Third-party cookies are used to display relevant ads and to analyze how Renderosity is used. By using our site, you acknowledge that you have read and understood our Terms of Service, including our Cookie Policy and our Privacy Policy.
Don't get me wrong: I'm really proud of my first humanoid mesh because I didn't think I could model an organic shape. And during some very informal tests I've found that it will do exactly what I'm looking for (see thread entitled "my first humanoid") - but - my mom once told me that once you're aware of a situation, you're responsible for its outcome.
With that in mind, I humbly thank odf, DivineRain, ShawnDriscoll and Phantom3d for their criticism as it has been most insightful. Now that I am aware of the shortcomings of my original Omnimesh, I have begun designing the 2nd generation Replicand Omnimesh (which, I think is funny since the first generation never made it to production - but I could never, in confidence, send it further up the pipeline knowing that certain aspects could be improved upon).
The basic tenets still apply: it must have a light poly count - I imagine the target poly count at 32k; still designed for rendertime subd smoothing; still catering to rigging flexibility and computational ease of SSS calculations via brick mapping.
Enhancements will include: all new mesh constructed from the ground up; increased muscle definition via mesh topology; improved aesthetics.
I will post milestone images for your approval or critique.