Renderosity Forums / Poser - OFFICIAL
Welcome to the Poser - OFFICIAL Forum
Forum Coordinators: RedPhantom
Poser - OFFICIAL F.A.Q (Last Updated: 2025 Feb 02 4:55 pm)

Subject: Help? Trying to make a conforming dress....

I'm not a content creation expert but I think you should work a Conformer/Dynamic hybrid so you can drape the sleeves and the skirt portions
A word is not the same with one writer as with another. One tears it from his guts. The other pulls it out of his overcoat pocket
Charles Péguy
Heat and animosity, contest and conflict, may sharpen the wits, although they rarely do;they never strengthen the understanding, clear the perspicacity, guide the judgment, or improve the heart
Walter Savage Landor
So is that TTFN or TANSTAAFL?
I was actually trying to avoid anything dynamic only because Poser seems to try to "stretch" the fabric for some reason. It is probably my fabric settings though. I can kinda-sorta use the cloth room, but am a noob at it too. Really, I am only good at using the Pose room LOL.
*I do know how to get clothing to drape by putting the T-Pose on frame 1 and the final pose on frame 30, etc etc. It is only fabric behavior that I lack knowledge of.
EDIT: Also, I did try making it a normal dynamic dress, but the shoulder puffs...
"deflated." How do I solve that if I did the hybrid?
How would I do the Dyn/Conf hybrid?
It sounds to me -correct me if I am wrong- like I still do the grouping (AutoGroup Editor) and boning (QuickConform) like I already did, , but then use the cloth room once I get V4 posed. Am I right?
I can try the hybrid thing either tomorrow or the day after AND once I get confirmation on how to do it. However, I would still like to do the conforming version if I can. I just prefer conforming because it is easier to use (apparently it is harder to make though LOL).

As far as i can tell you did everything right you just need to adjust the joints, i'm about to head out so here is a quicky with more later if you need it, select the shldr and bend it down about half way (to recreate the problem)......open the joint editor and change the drop down from center to bend, now at the top of your scene where you select body parts go into props and select the innermatsphere then go to your dials and adjust the scale, i'd just scale everything way up to see the effects it has, then undo and go back and experiment to see which way you need to scale the sphere, do this for all the joints down one side then use figure symmetry to copy the joints to the other side........Steve
Steve... you pretty much fixed my problem!
I do have some Q's though for you when you get back:
- I cannot get my scale dials to move. (I am adjusting the green font xScale, yScale, zScale dials). They scroll, but they stay at 0.00. Are these the scale dials you meant?
I WAS able to adjust the green "rods" within the Setup window though. By doing this, I managed to get things working (I will need to fine tune it later though... time for bed now), but I would still like to know what dials you were referring to.
-
How do you do the figure symmetry?
-
This one is somewhat-related to all this, but I was hoping that maybe you know more about this stuff and can better explain it to me because I played around with it on my last outfit, but couldnt really understand it:
Can you explain what the four dials under the Bulge Settings mean? I need to apply bulge too (I ALWAYS get elbow poke on all my clothes), but I cannot figure out exactly what all the dials do. It is difficult to tweak a dial, go to Pose window, see the effect, return to Setup, tweak a dial again, return back to Pose window to see any changes, repeat, repeat, repeat.
You have: right neg, right pos, left pos, left neg; each one can have either a + or - value.
Wait... an update to my previous post (editing time expired, so I cannot edit it)
- Nevermind, I figured the dials out. They WERE the green scale dials, but their values quickly change (it took me only a slight nudge and they were at 100%) and 100% seems to be the max. Setting all the scales to 100% fixes the problem though. :D
Also, the green rods I mentioned before... well, I guess I dont want to mess with them afterall. They change the way the bend looks.
The other two questions still stand though.
Privacy Notice
This site uses cookies to deliver the best experience. Our own cookies make user accounts and other features possible. Third-party cookies are used to display relevant ads and to analyze how Renderosity is used. By using our site, you acknowledge that you have read and understood our Terms of Service, including our Cookie Policy and our Privacy Policy.

I am honestly stumped right now and dont know what else to do. I REALLY need the help of someone who knows what they are doing, but can "dumb down" their explanations for me.So here is the situation:
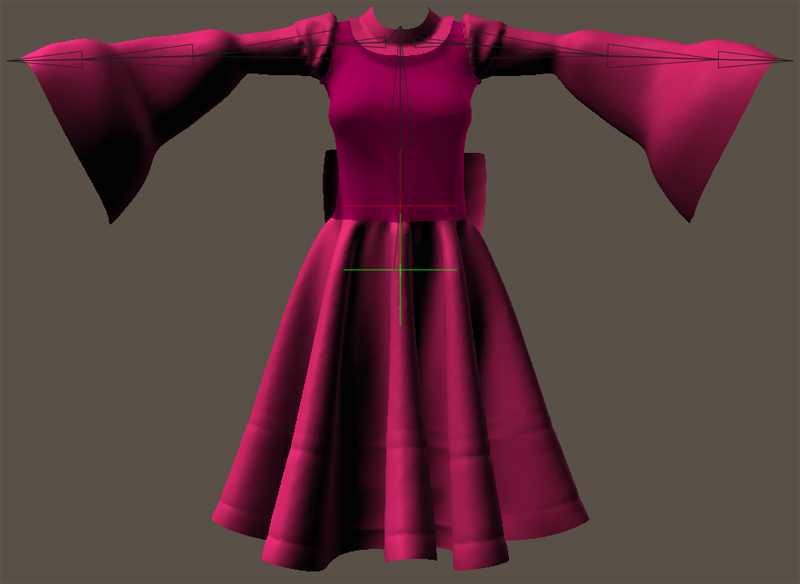
I spent DAYS creating a dress in Marvelous Designer 2 and want it to be a conforming outfit for V4. I made one other conforming outfit using MD2 before, but the sleeves on this dress are very wide, while the previous outfit was fairly narrow (see pic to see what I mean by "wide sleeves").
Currently, I have it so that the dress conforms to V4, but when I move V4's arms in certain ways, some parts of the sleeves refuse to move (see pic).
So, here is what I did up until this point:
Exported the obj file from Marvelous Designer 2 (MD2).
I used AutoGroup Editor to add groups to my dress based on V4.
I made the following groups: Chest, Abdoman, Hip, R/L Collar, R/L Shoulder, R/L Forearm, and R/L Hand (since the dress covers the hands).
I tried two methods: 1) I used a donar dress because it also had additional bones to allow me to move the skirt portion of the dress to accomodate for the movement of V4's legs. 2) I also used V4 herself as the donor.
Both methods give me slightly different LOOKING issues, but the problem is exactly the same: not ALL of the sleeve is moving with V4!!!!
PLEASE HELP!
If anyone could help me out here, I would REALLY appreciate it!
I am still a noob at rigging, which is why I was using AutoGroup Editor and Quick Conform, which I thought would do all the work for me. I have looked at SEVERAL online rigging/boning tutorials, but they are all a little too advanced for me.
Also, I learn by DOING and not so much by only READING, so I would REALLY appreciate it if someone could maybe give me step-by-steps on what I need to do here. (tell me where things are in the Setup room, what dials mean, etc).
Can anyone help me fix my problem so that in the future, if I run into this sort of headache, I will know what to do?
I await anxiously for any help.