Renderosity Forums / Poser - OFFICIAL
Welcome to the Poser - OFFICIAL Forum
Forum Coordinators: RedPhantom
Poser - OFFICIAL F.A.Q (Last Updated: 2024 Dec 02 5:01 am)
Subject: Poser 9 - mesh as a light - how to do it ?
I'd be making an image file with those bits that are meant to glow in the image, and with the rest black. I'd material group the mesh so that those bits corresponding to "glowing points" used that image. Then, just set the ambient_value to > 1 (diffuse_value to 0) and your lights will glow and emit light if that value is set high enough.
Monterey/Mint21.x/Win10 - Blender3.x - PP11.3(cm) - Musescore3.6.2
Wir sind gewohnt, daß die Menschen verhöhnen was sie nicht verstehen
[it is clear that humans have contempt for that which they do not understand]
Sparky, I've found that if you keep the ambient level down to a realistic soft glow, the mesh doesn't cast enough light. You could jack up the ambient, but then instead of a soft glow, you'd get searing burnt-out white.
My suggestion is to use modest ambient for the glowy parts, but to add unseen IDL emitters. In a modeler, select the glowy polys and extrude them out slightly, so that they will overlay the visible glowy panels, and be far enough offset so that the emitter's high ambient doesn't blow out the visible soft glowy panel's color. Save out each of the emitter overlays (some may be combined, if they'll use the same material settings or they are mapped without overlap).
Import the IDL emitter overlays into Poser. Crank the emitter's ambient up (try 7-15 for starters). Untick the "casts shadows" box and untick the "visible in camera" box. With these settings, the emitter will cast light (if IDL is engaged), yet the emitter itself will remain unseen.
Here, Andy's laptop monitor screen is casting light, using an unseen emitter:
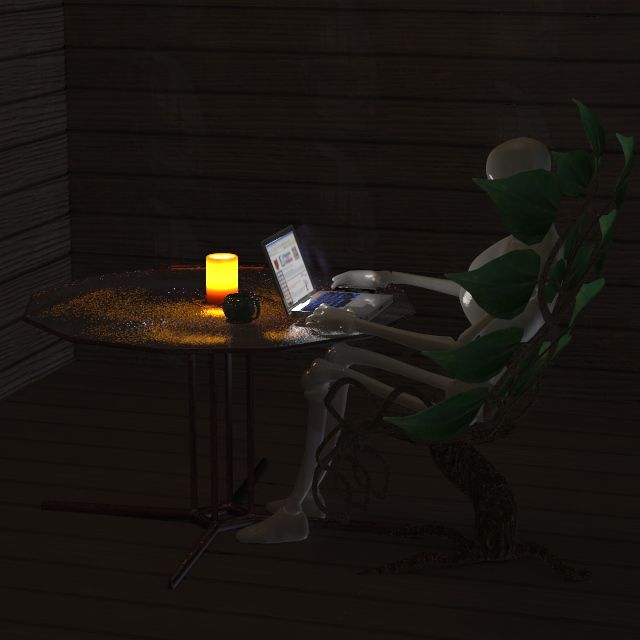
The Matrix version:

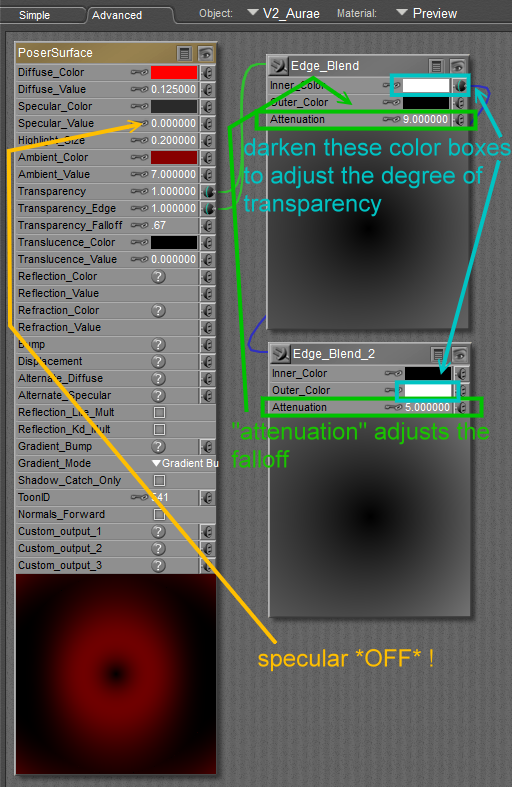
For an aura, I make a bubble/dome extending out from the visible panel, and use a double edge-blend node to control its transparency.
aurae around paper lanterns:
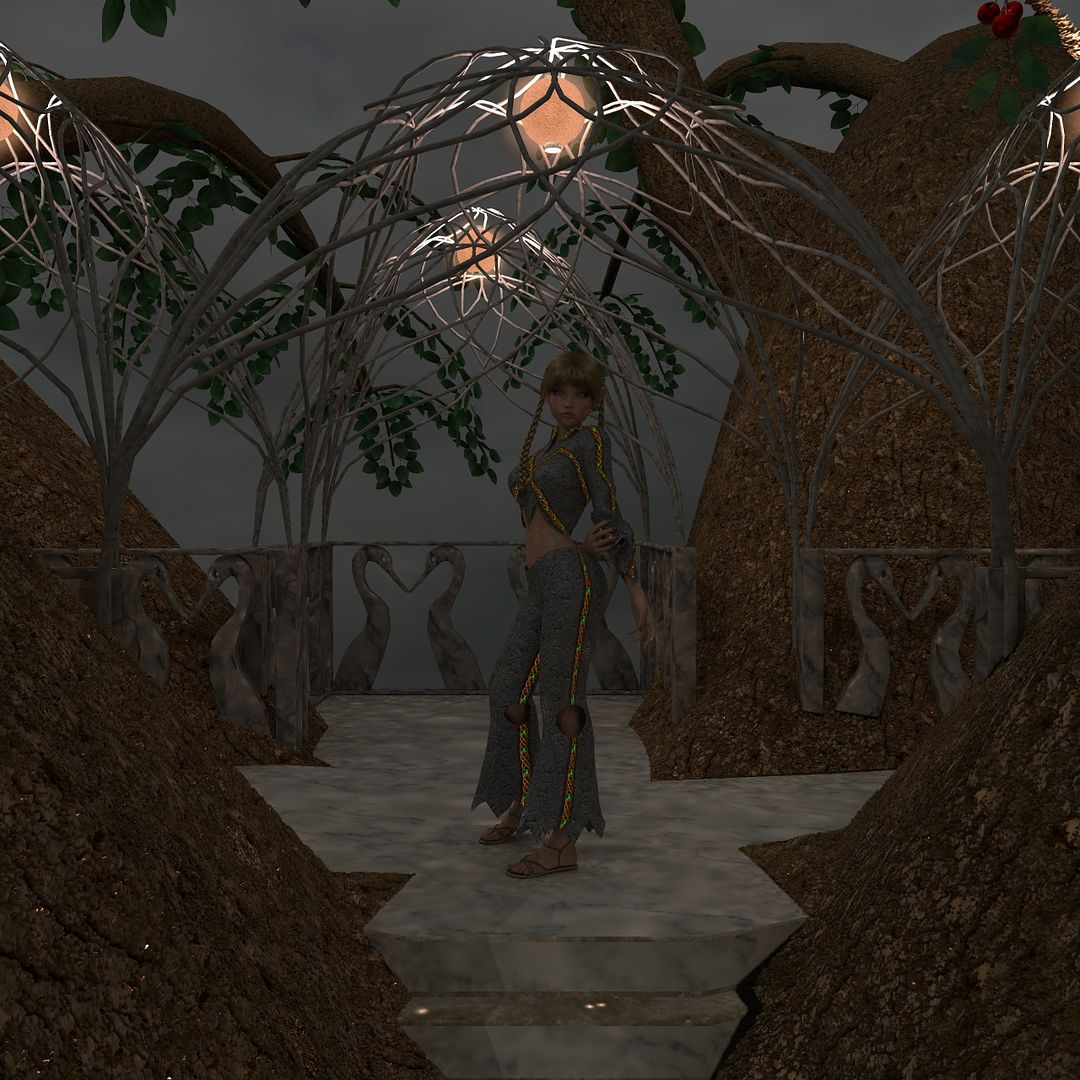
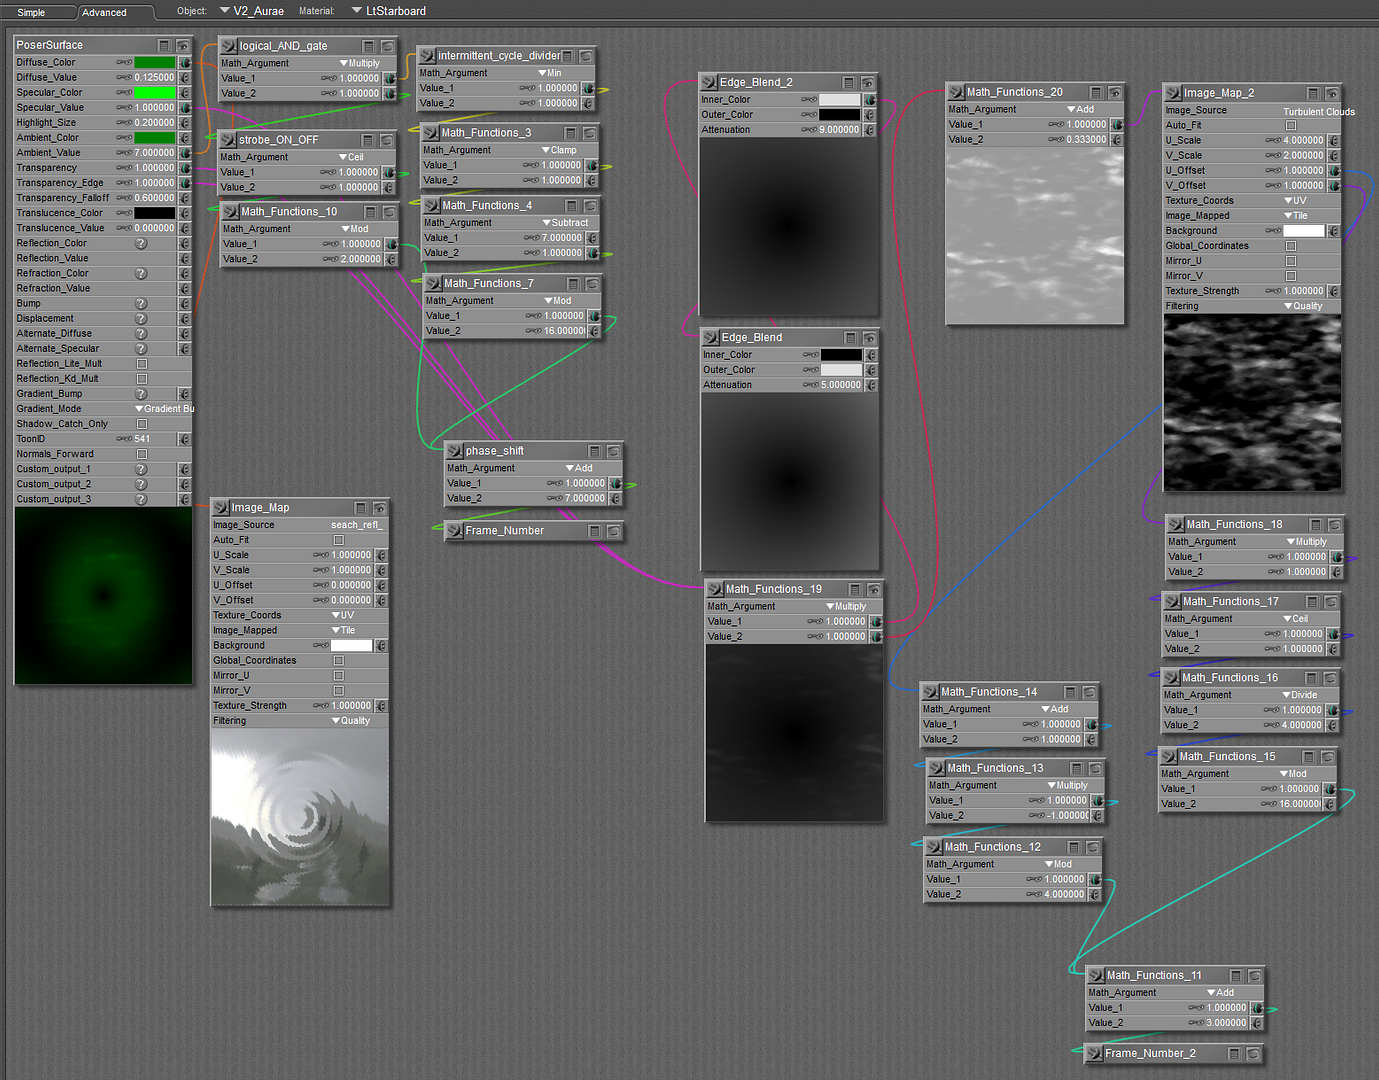
I have some material setups which will make the glowy panels (and their emitters) flash like a strobe in a flash-flash-flash... flash-flash-flash... pattern, and another which will gently pulsate on-off, with optional color shifting if desired. I'll log onto my workstation later and pack them as mt5 files. You may use them in your freebie model.
If it would help, I could make a sample panel with these features, which you can reverse-engineer to adapt the method to your model.
Poser 12, in feet.
OSes: Win7Prox64, Win7Ultx64
Silo Pro 2.5.6 64bit, Vue Infinite 2014.7, Genetica 4.0 Studio, UV Mapper Pro, UV Layout Pro, PhotoImpact X3, GIF Animator 5
damn man you are good :)
OS: Windows7 64-bit Processor Intel(R) Core(TM)
i5-2430M CPU @ 2.40GHz, 2401 Mhz, 2 Core(s), 4 Logical
Processor(s) 6GB Ram
Poser: Poser Pro 2012 SR3.1 ...Poser 8.........Poser5 on a bad
day........
Daz Studio Pro 4.5 64bit
Carrara beta 8.5
Modelling: Silo/Hexagon/Groboto V3
Image Editing: PSP V9/Irfanview
Movie Editing. Cyberlink power director/Windows live movie
maker
"I live in an unfinished , poorly lit box, but we call it home"
My freestuff
link via my artist page
Thanks for the responses everyone. seachnasaigh - that looks perfect for whats needed! So yes your kind offer of a test panel would be perfect. Thanks for that. Certainly agree about how the mesh would affect the lighting as well. So on things like the roof lights, I've made the lights fit within a frame which I assume would make them "constrain" or "direct" light a bit. Or on the 2nd picture the light next to the 1st aid box stands proud, so would spill light everywhere. As I'd like to get this out there for everyone to enjoy, I'd rather not go back and add areas to act as emitters. But on the next models I'll be making, like with this weekends easter freebie, I will add this as it makes a lot of sense. Plus it fits with how I make stuff. Thanks again and looking forward to seeing the test panel. Though just one thing, can you include some screen shots of how to make stuff glow as I'm not that hot on using the P8 plus material tab.
Pinky - you left the lens cap of your mind on again.
I was just working on the demo panel! ^^ When finished, it will have IDL emitters and aurae around the lights, and I'll pack it into a zip. That way you can see each material and how each prop's parameter characteristics are set.
I'll include a P8/PP2010 version and a P9/PP2012 version, with a "readme" explaining what the differences are, and why they different. P9 can use the P8 method, but P9 can get better results -results which P8 can't match- if you take advantage of P9's new options.
Yes, a light panel set within a housing will cast light in a constrained pattern. I'll have a monitor screen on the demo panel, and the monitor will be housed within a bezel. I can add a ceiling with a countersunk light.
I can make some mat room screenshots, with labeling to clarify what's going on.
Poser 12, in feet.
OSes: Win7Prox64, Win7Ultx64
Silo Pro 2.5.6 64bit, Vue Infinite 2014.7, Genetica 4.0 Studio, UV Mapper Pro, UV Layout Pro, PhotoImpact X3, GIF Animator 5
The problem that comes, as I've recently discovered, is when/if you go to animate. To put it simply ... "IDL+Shadows+Animation in Poser = Shadow Spazz/Noise". :( IDL in Poser looks great and is easy to achieve an control, but I haven't found a solution to the Shadow-Spazz issue other than doing separate render passes.
Best,
Tim
@timoteo1 I'm not really sure what you're referring to, but my PoserPro Ref manual in the IDL section (ch 19 pg 401) says:
Animation Considerations: When rendering out an animation while using IDL, make sure that multi-threaded rendering is not being used (set Number of Threads to 1 in the Render tab of the General Preferences dialog). If you leave the setting at 2 or higher, your renders will come out jittery, as the shadows and lighting will not line up from frame to frame.
Perhaps that can be of help.
- - - - -
Usually I'm wrong. But to be effective and efficient, I don't need to be correct or accurate.
visit www.aRtBeeWeb.nl (works) or Missing Manuals (tutorials & reviews) - both need an update though
Here is a test render of the demo panel. No Poser lights are on. The indicator lights are animated (strobe, pulse, or color shift), as are the "chaser" strip lights. The spotlight cones have animated haze. There is an aura around the lights when they are lit up.
All of this is done in the material room, so the end user of your model will not need to do any keyframing. Also, I used matrices, instead of using an AVI in the movie node, so the materials will run regardless of whether the system is 32bit or 64bit.
Click on image to enlarge:
Cameron is cranking out animation frames now; I'll try to post a SWF when it's done, if the materials come out well.
I still need to make material room screenshots and label them.
Poser 12, in feet.
OSes: Win7Prox64, Win7Ultx64
Silo Pro 2.5.6 64bit, Vue Infinite 2014.7, Genetica 4.0 Studio, UV Mapper Pro, UV Layout Pro, PhotoImpact X3, GIF Animator 5
Very cool, Seach ... great idea with the matrices vs. the avi's!
Artbee: Hi, thanks ... but I spotted that a while back and actually found that it didn't really make a difference ... in fact, it was my experience that it (inexplicably) made things slightly worse. Although it could just be the nature of IDL and Irradiance Caching in Poser that makes the results different every time.
See my thread here for further discussion on the topic.
Best,
Tim
Thank you, Tim. ^^ If I get the posting right, clicking on the image will open a ShockWave Flash animation showing the animated materials. No Poser lights are on.
. I would like to rename some of the nodes, but I'll have to load the scene file into an older version of Poser to use that Python wacro. Then I'll take mat room screenshots, and label them in a photo program. With the addition of a "mini user's manual" readme, it'll be ready to pack up.
Poser 12, in feet.
OSes: Win7Prox64, Win7Ultx64
Silo Pro 2.5.6 64bit, Vue Infinite 2014.7, Genetica 4.0 Studio, UV Mapper Pro, UV Layout Pro, PhotoImpact X3, GIF Animator 5
Thank you, Timoteo and Miss Nancy.  The aura around the lights on the wall are modeled as a bubble surrounding the light. It's important to smooth off corners in order to use the double edge blend node method, because it emphasizes eccentricity - tight bends and sharp corners are more visible than gently curved areas. The monitor aura is much the same as the aura for the block lights.
I've gotten the nodes neatly arranged and renamed for each type of material; now I need to apply them to the other lights/emitters/aurae, with appropriate phase shifts. I'll post material room screenshots as I get them done.
Poser 12, in feet.
OSes: Win7Prox64, Win7Ultx64
Silo Pro 2.5.6 64bit, Vue Infinite 2014.7, Genetica 4.0 Studio, UV Mapper Pro, UV Layout Pro, PhotoImpact X3, GIF Animator 5
seachnasaigh - I was just hoping it might be possible to light a few bits without using any poser lights. Never thought posers lighting could be that adaptable. Certainty never considered animating lights. So I'm seriously impressed here. Just hope when I add the lights I get it right and can do your work justice. Also thanks for the info about AVI's and 32/64 bit versions, didn't know there was a problem there. Finally quick question, when you say material room does this mean I can simply drag/drop your materials from the library pallete onto parts of the model. I'm not that hot on the material tab, normally stick with bitmap textures only for app compatability.
Pinky - you left the lens cap of your mind on again.
Hello MrSparky! I'm just getting back in from doing real life tasks, and now am rebuilding the RAID mirror (the motherboard has a glitchy HD socket and drops port 0 occasionally). I'll have dinner while the mirror rebuilds, then back to it.
Most for-purchase AVI packs use a compression codec, in particular, it's generally a 32bit codec. If your 64bit computer doesn't have -or can't run- that codec, then the AVI won't work. You can load the AVI into a video editor, and re-save it in a different codec, or without compression if it's small enough, and then use it.
Besides a complete demo prop, I will include mt5 material files which the pack will unzip to the material part of your runtime library. To apply such a material, enter the material room, and select your model's material zone. Double-click the library mt5 file (or drag-n-drop directly from library palette to the item/zone in the scene), and you're done. I'd be glad to help you with any particular project you've got going. The sreenshots of the material room and object parameter settings should help.
It is possible to light the scene with no Poser lights on, but to get natural specular highlights and such, I much prefer to use both self-illuminated meshes (for the myriad little lights) and use a few Poser lights in the scene to get best results.
Poser 12, in feet.
OSes: Win7Prox64, Win7Ultx64
Silo Pro 2.5.6 64bit, Vue Infinite 2014.7, Genetica 4.0 Studio, UV Mapper Pro, UV Layout Pro, PhotoImpact X3, GIF Animator 5
I only have to make readme files and then extract/pack the demo prop set zip. ^^ Meanwhile, I'll begin the explanation.
Overall, we'll use three categories of props:
- visible light - this simply may be material areas of your model, or they may be separate meshes
- aura - a "bubbled" mesh surrounding the light
- IDL emitter - usually an offset/scaled copy of either the light mesh or the aura mesh
These are three separate props because the object parameter properties (visibility and casting shadows) must be set differently for each category. I'll make screenshots showing these settings.
This is the basic double edge blend setup with which to texture an aura. The edge blend node is sensitive to the angle at which the camera views a given polygon, so it tends to make sharply curved areas very visible, whereas flatter areas tend to fade into transparency. So, form your aura mesh so that it is a rounded bubble surrounding the light piece. Be sure to shut off the specular (value=0), otherwise your mesh may look like clear plastic.
This is a doll textured with a double edge blend aura:
. This is the basic double edge blend node setup...
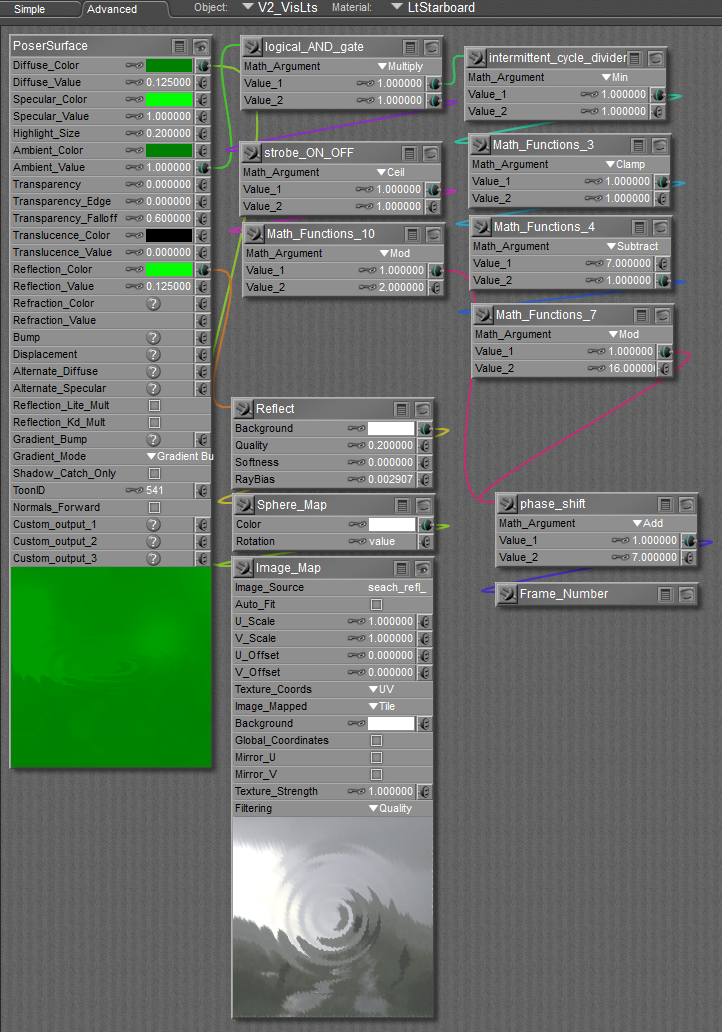
. This material is a strobe light which flashes three times, pauses, and repeats. For animations, there is no need for keyframes; the animated material works by running off of the frame number variable node in the material room. Look at math function node #7; see the "16" value? That sets the length of the repeat cycle. So here, it repeats every sixteen frames.
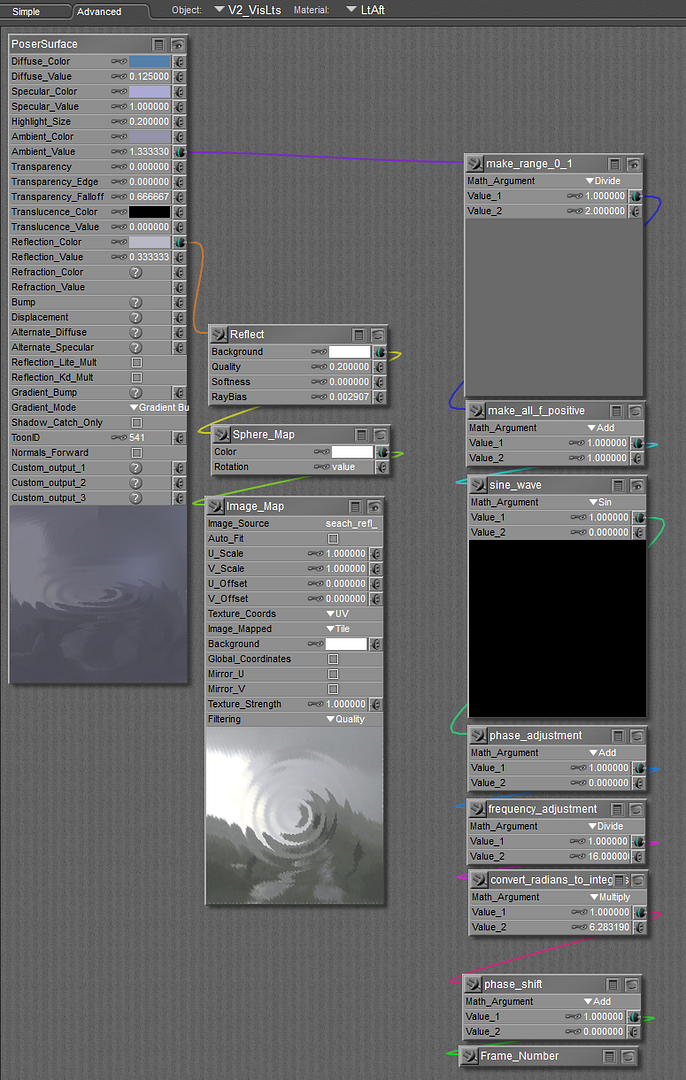
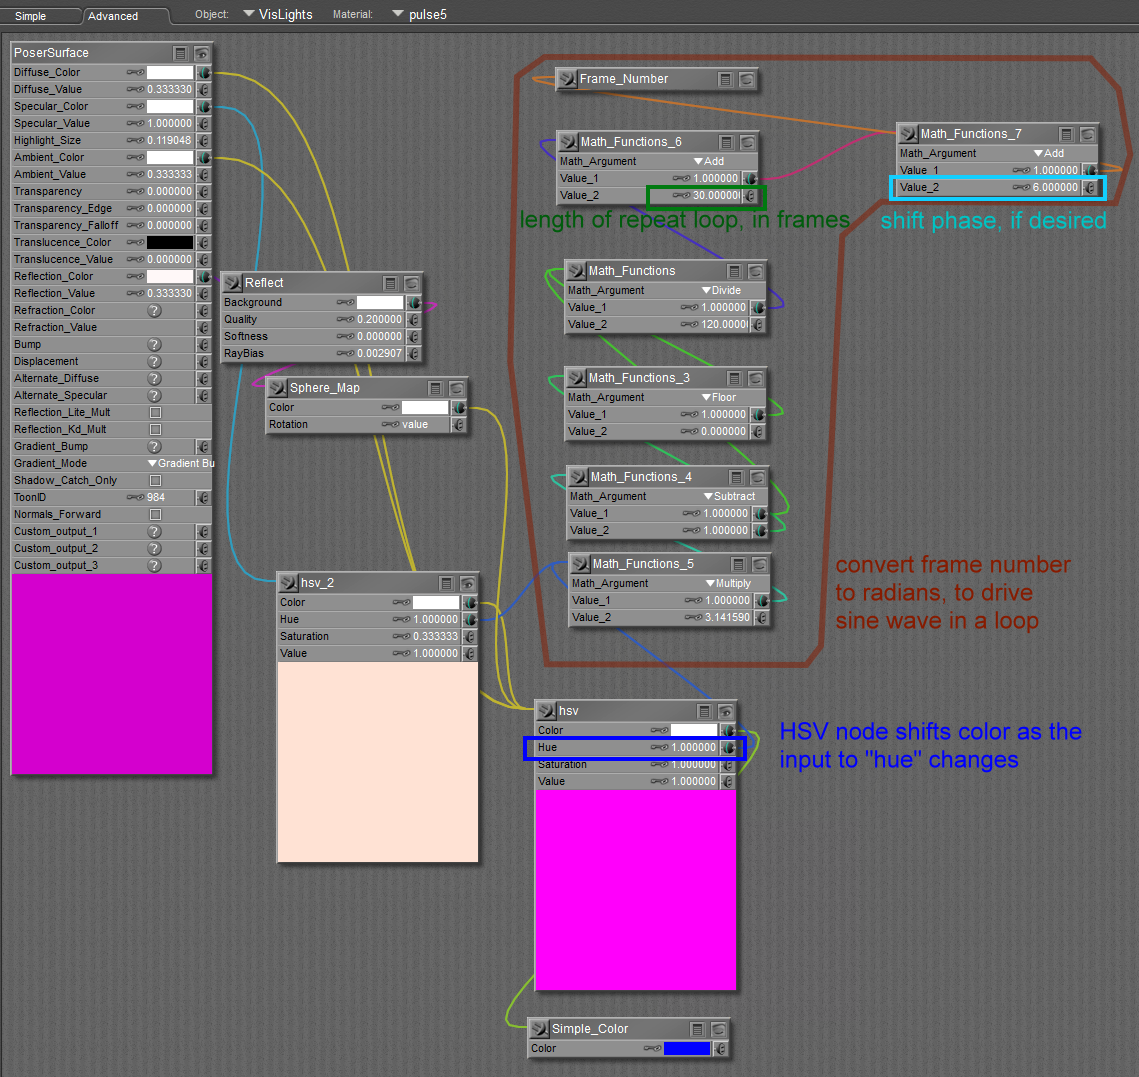
. This material pulses gently on/off, waxing and waning in sine wave fashion. Frequency adjustment (a relabeled math function node) sets the length of the repeating cycle.
.
Poser 12, in feet.
OSes: Win7Prox64, Win7Ultx64
Silo Pro 2.5.6 64bit, Vue Infinite 2014.7, Genetica 4.0 Studio, UV Mapper Pro, UV Layout Pro, PhotoImpact X3, GIF Animator 5
Object parameter properties:
For the visible light props...
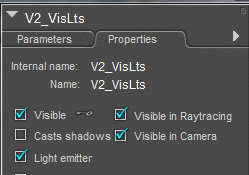
If you are using a one-piece wall with the lights just being material zones of that one prop, then leave the default "casts shadows" ticked.
For the glowing aura prop surrounding the light...
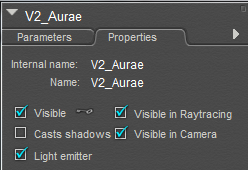
Un-tick "casts shadows".
For the unseen IDL emitter prop...
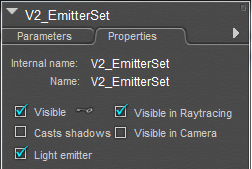
Un-tick both "casts shadows" and "visible in camera". Visible in camera is only available as of P9/PP2012. The demo panel prop set includes two pieces which demonstrate why this is a big improvement over P8/PP2010. With these settings, the prop will not be visible itself, but it will cast light in IDL. Whereas the visible light prop must be limited to a gentle ambient value to keep it from blowing out to white, the unseen emitter prop can have it's ambient cranked up as needed to cast as much light as you need. You are not limited to 0-1. I believe Poser tops out at an ambient value of about 30 or 32, so if you type in 135, it will still be reckoned as about 30.
Poser 12, in feet.
OSes: Win7Prox64, Win7Ultx64
Silo Pro 2.5.6 64bit, Vue Infinite 2014.7, Genetica 4.0 Studio, UV Mapper Pro, UV Layout Pro, PhotoImpact X3, GIF Animator 5
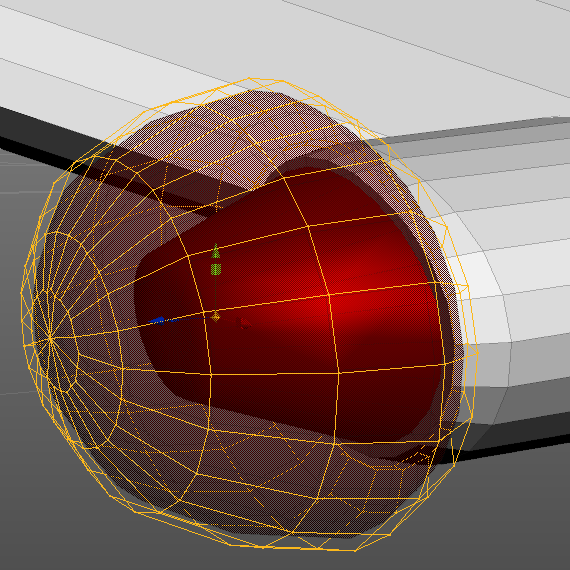
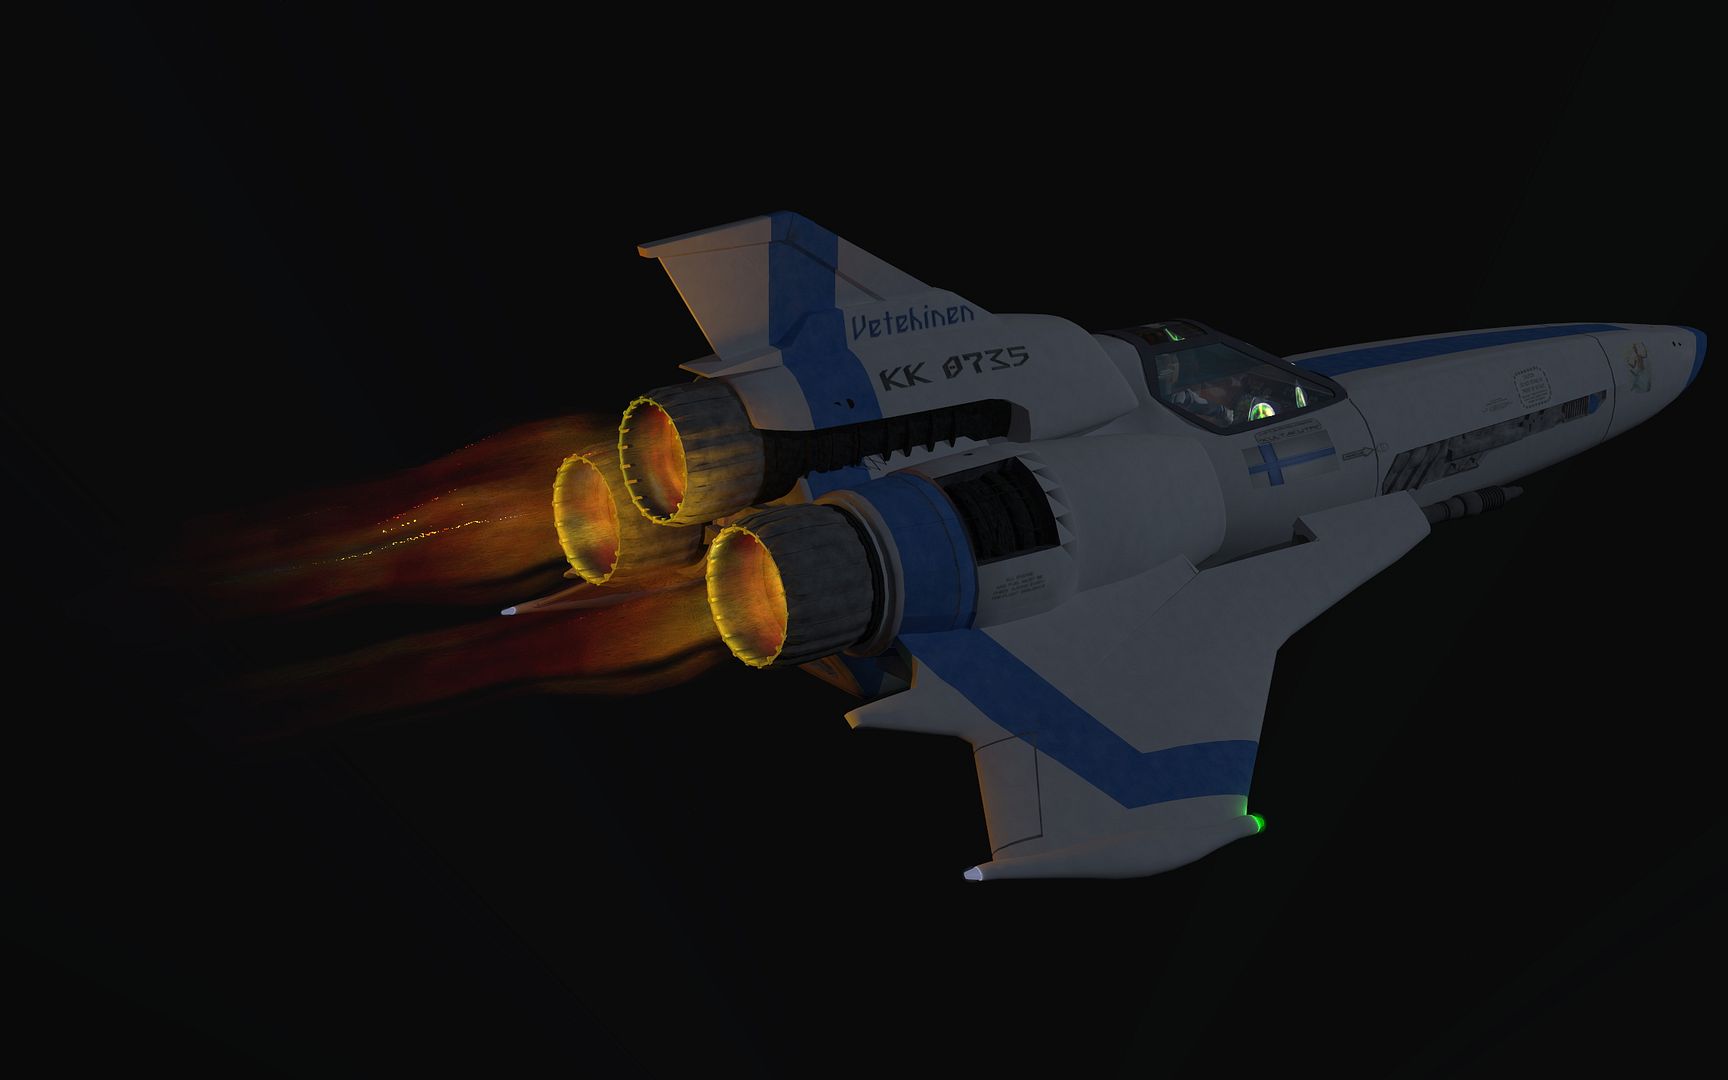
Nested IDL meshes, as seen in a modeler (Silo). The solid-looking innermost mesh (red truncated cone) is the visible light mesh. It fits very closely over the navigation light part of the existing model (John Hoagland's Viper MkII). The dark shadowy bubble surrounding is the aura mesh. and just outside is the unseen IDL emitter (yellow wireframe). Note the softly curved shape of the aura (the dark transparent shadow mesh), because of the double edge blend node's sensitivity to shape. Click image to enlarge.
.
I also made VisLight, aura, and emitter props for the cockpit monitor and engine exhaust...
click picture for large still frame:
. Click picture for ShockWave Flash animated demo:
. If John Hoagland gives permission, I'll release this IDL prop set as a smart-propped P9+ accessory for his Viper model (you'll need to have his Viper model).
Poser 12, in feet.
OSes: Win7Prox64, Win7Ultx64
Silo Pro 2.5.6 64bit, Vue Infinite 2014.7, Genetica 4.0 Studio, UV Mapper Pro, UV Layout Pro, PhotoImpact X3, GIF Animator 5
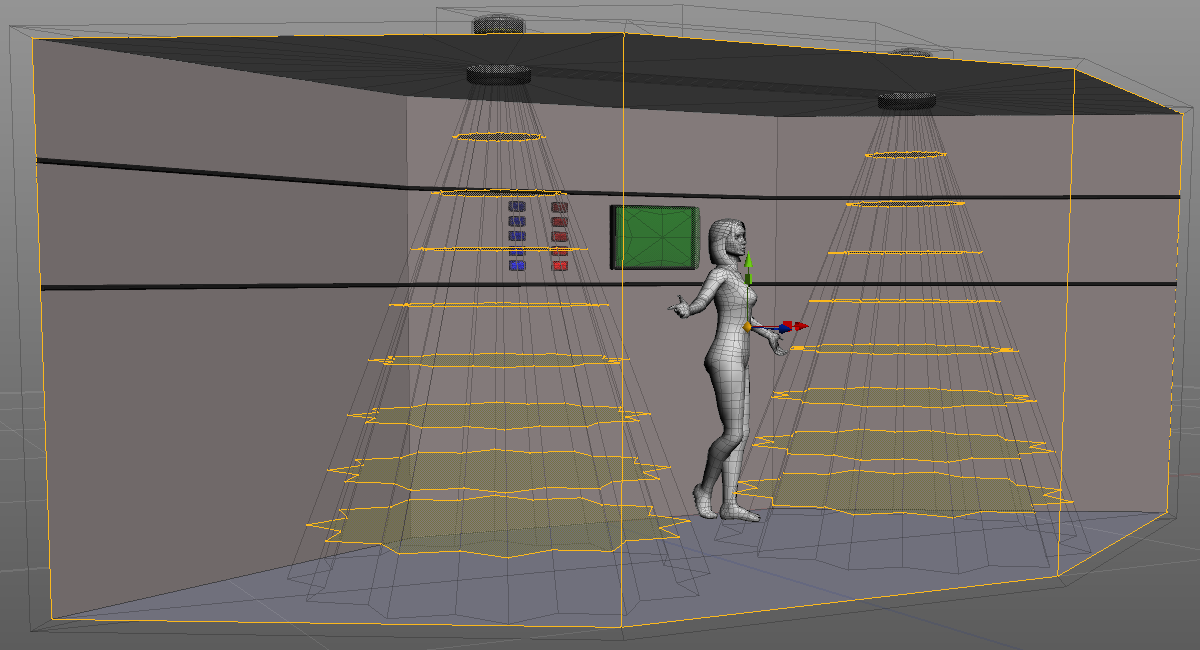
Another Silo modeler screenshot. The yellow-highlighted meshes are IDL emitters which are within the camera's field of view, yet are unseen by the camera - remember the unticked visible to camera box in the emitter object's parameter properties?
This is a wonderful thing. Why? Because the amount of IDL cast by the spotlight emitter inside the light housing is quite limited, even with ambient=30, because of its small surface area. But those star-shaped slices in the spotlights' cones have a lot more surface area from which to emit light. They can have a pretty modest ambient value and still light the scene. The reason for having a stack of several is so that if anything is placed inside the cone, even the upper surfaces (head, shoulders) will receive light.
Now, lay this cone aura and star-slice emitter assembly down 90 degrees, and you have a car headlight. :D Oh, the reason that the aura cones are fluted instead of being simply a circular cone is because the double edge blend will show as streaks ("godrays") of light. ^^
Not obvious at first, but there is another piece, the "wall" surfaces (just three rectangles) on the near side of the little set. If it were not for P9's visible to camera box being unticked, these wall panels would block the camera I used for the demo shots earlier in the thread. This prop is another unseen IDL emitter. And it has a lot of surface area indeed. So much so that even with the ambient dialed down to a small fraction of 1, it emits the background lighting for the scene, and does so evenly and without splotches. :)
The moral of the story is: use large emitters at lower ambient value when you can, and with P9 you can hide them in plain sight.
Poser 12, in feet.
OSes: Win7Prox64, Win7Ultx64
Silo Pro 2.5.6 64bit, Vue Infinite 2014.7, Genetica 4.0 Studio, UV Mapper Pro, UV Layout Pro, PhotoImpact X3, GIF Animator 5
I'm trying to upload the zip to my 4shared account; that site is really slow this morning.
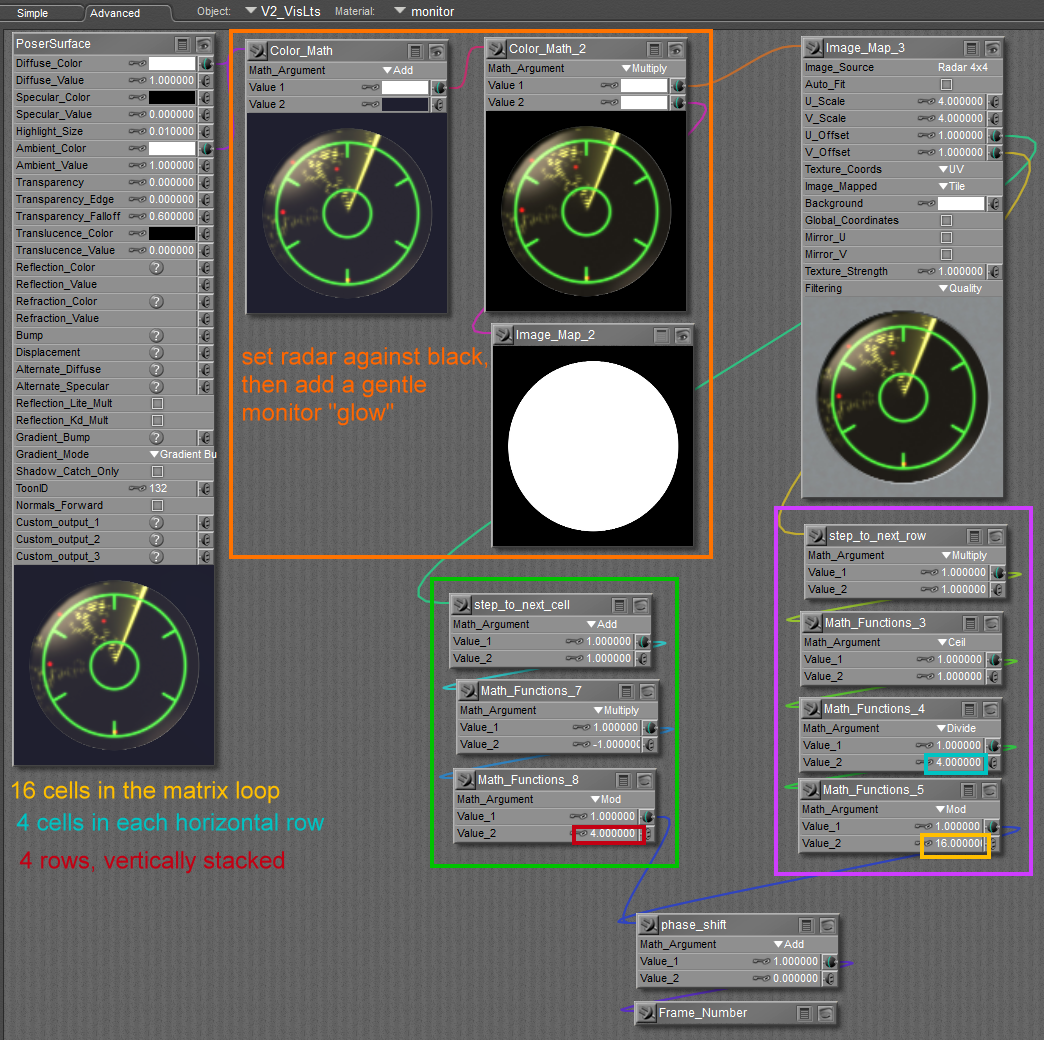
If you can get/make an AVI which your OS can read, then you simply use the movie node to drive the ambient channel. If not, this shows how to use a matrix image to provide an animated material. I made a 4x4 celled matrix of a radar scanner. The math nodes read one cell of that image per animation frame.
. The area blocked off in orange is not relevant to the matrix; it just tweaks the appearance of the image. The stack of math nodes boxed in magenta steps from cell to cell in a row; once a row is finished, the math nodes boxed in green step down to the next row.
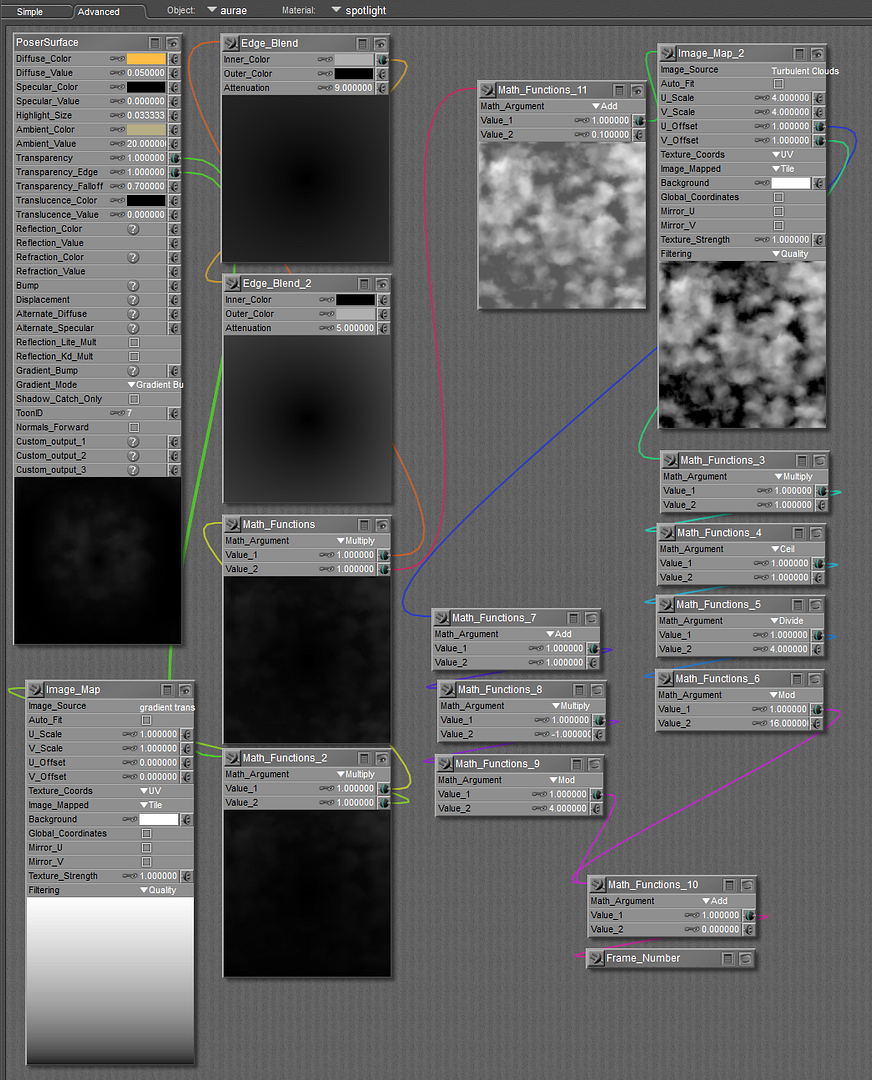
This next material combines a matrix (of turbulent haze) with the double edge blend nodes to make an animated aura for the spotlight "cones" or light shafts. The added image map of a gradient which fades to black at the bottom makes the light shaft aura fade away the further it is from the spotlight.
. Another combination, this time of the triple-flash strobe with the double edge blend nodes, to create the aura for the flashing navigation lights on the Viper's wing tips and for the aura of the blocky indicator lights on the wall of the Sci-Fi panel.
.
Poser 12, in feet.
OSes: Win7Prox64, Win7Ultx64
Silo Pro 2.5.6 64bit, Vue Infinite 2014.7, Genetica 4.0 Studio, UV Mapper Pro, UV Layout Pro, PhotoImpact X3, GIF Animator 5
This runtime zip contains the demo sci-fi panel and some sample mt5 material files which you can click to apply to your own model's mat zones.
EULA: unlike most of my freebies, I will allow you to copy/use these materials -including the texturing images- and the meshes (the bubbled aura meshes may be useful) in your own freebie and commercial projects for redistribution. Copyright seachnasaigh 2012
40.2 MB runtime zip: Sci-Fi P9+ IDL demo panel
. P.S. If you have trouble downloading this zip, let me know; I could maybe break it into 3-4 smaller zips.
Poser 12, in feet.
OSes: Win7Prox64, Win7Ultx64
Silo Pro 2.5.6 64bit, Vue Infinite 2014.7, Genetica 4.0 Studio, UV Mapper Pro, UV Layout Pro, PhotoImpact X3, GIF Animator 5
Correction: In my explanation for the 4x4 matrix, it should say that the math nodes boxed in green step from cell to cell in a row, and that at the end of each row, the math nodes boxed in magenta then step down to the next row.
. Also, here is the material for the color-shifting lights on the sci-fi panel. Like the pulsing light, it converts frame number to radians and drive a sine wave node, but instead of the sine wave output driving ambient value, here the sine wave output drives the hue channel of an HSV (huesaturationvalue) node, thus changing the color.
.
Poser 12, in feet.
OSes: Win7Prox64, Win7Ultx64
Silo Pro 2.5.6 64bit, Vue Infinite 2014.7, Genetica 4.0 Studio, UV Mapper Pro, UV Layout Pro, PhotoImpact X3, GIF Animator 5
Thank you, timoteo1, and you are welcome! 
John Hoagland has graciously given permission for the Viper P9+ IDL light kit, and provided a link where you can get his Viper MkII base model.
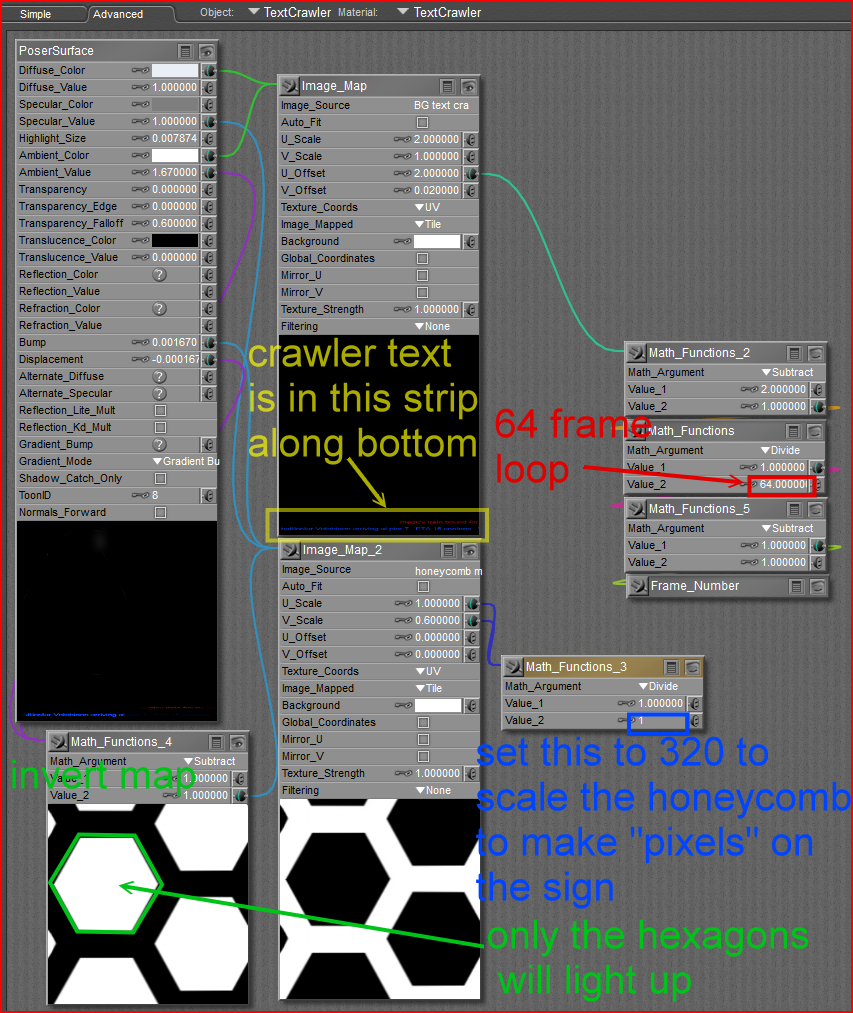
Another material which I thought might be useful is the text-crawler sign, as you might see in an airport, train station, or cinema. I used one on a movie theatre in the TinkerBell's Drive-In Cafe' playset. I'll make a generic sample model.
Poser 12, in feet.
OSes: Win7Prox64, Win7Ultx64
Silo Pro 2.5.6 64bit, Vue Infinite 2014.7, Genetica 4.0 Studio, UV Mapper Pro, UV Layout Pro, PhotoImpact X3, GIF Animator 5
I made a long box to use as a "text crawler" sign. Because I UV mapped it with minimal distortion, the template is just a strip along the bottom of the standard UV 0-1 space square. My template was 1024 pixels wide, but I made the text objects 2048 pixels wide. Remember, not all of the text is on screen at any given time.
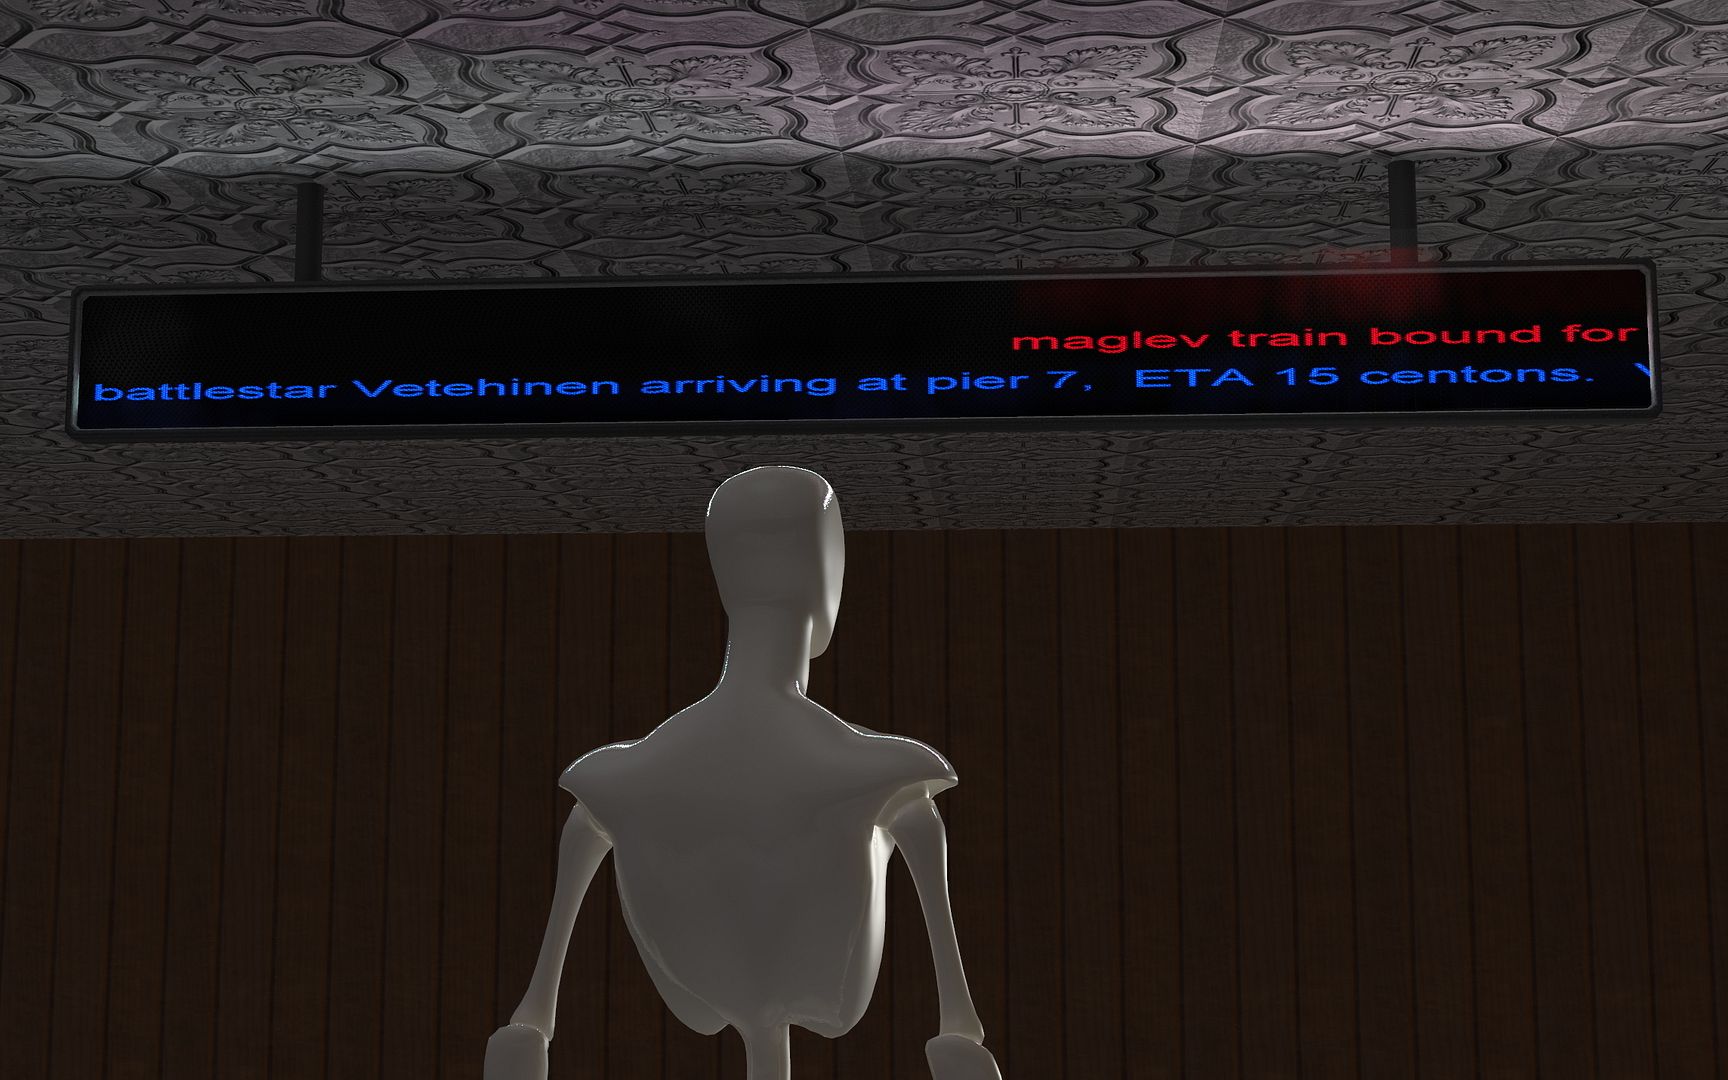
Use the frame number variable node to nudge the U offset, and the text will slide leftward. I also tiled a honeycomb pattern (320 times) to give the text a pixelated look.
. ShockWave Flash animation of text crawler sign:
. This enlarges to a still frame render to show pixelated text:
. Runtime zip of the text crawler sign here.
Copyright 2012 seachnasaigh. EULA: The text crawler sign is intended as a tutorial prop. You may copy the materials and use the meshes and the texturing images in your own models, including for redistribution, both freebie and commercial.
The following images demonstrate the restrictions on P8/PP2010 IDL light casting objects, and the advantages in using P9/PP2012 for self-lit objects.
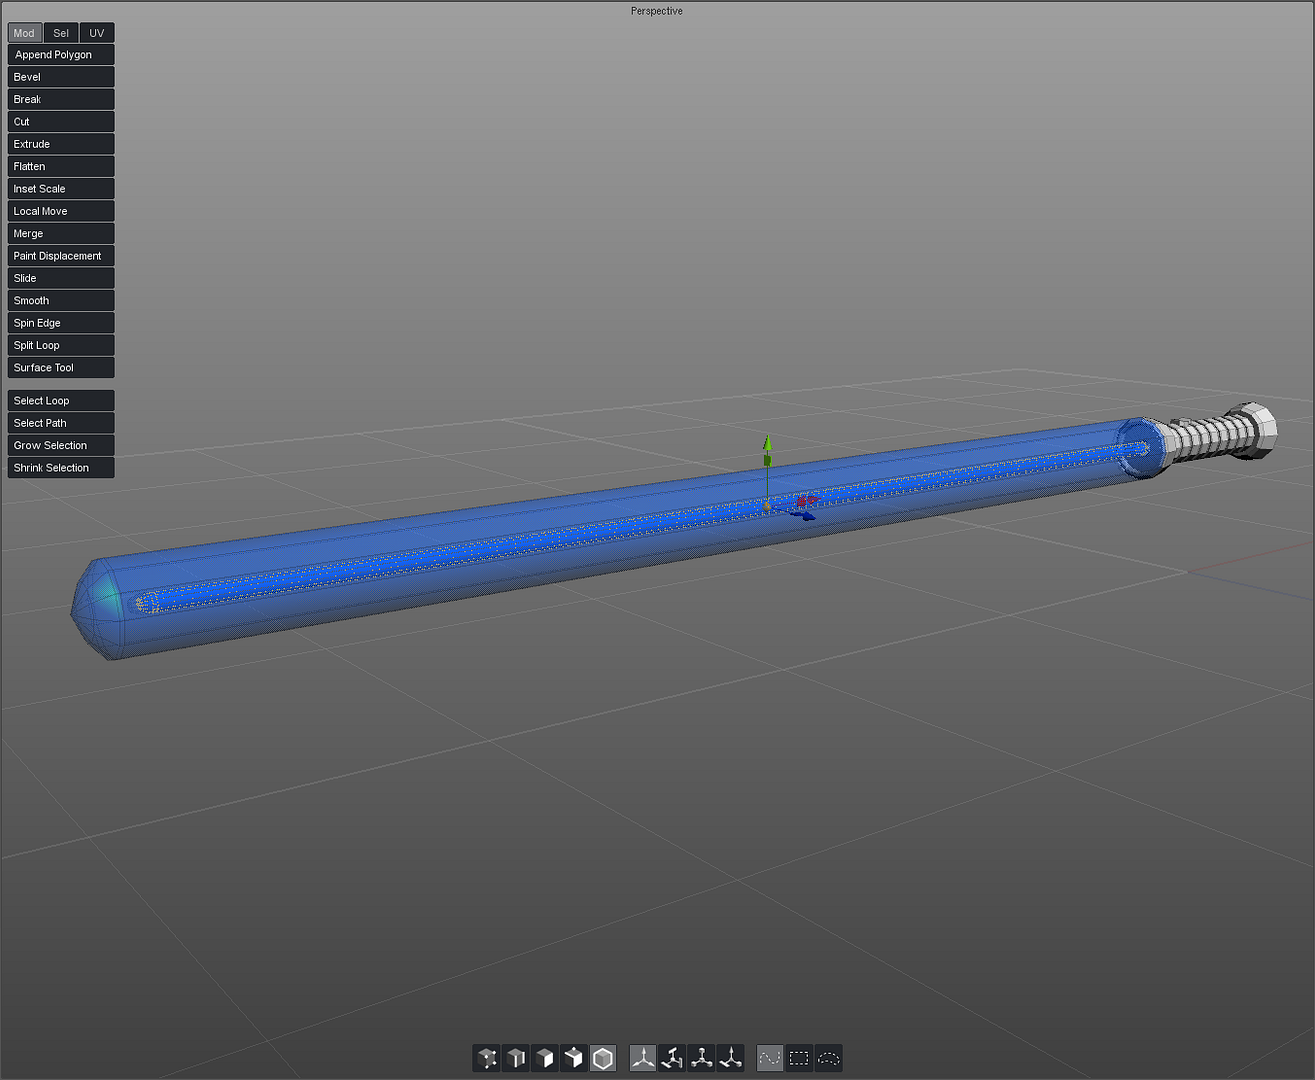
This is the P8 version of a lightsabre; the aura is ghosted, the blade within is solid-shaded, and I have selected (yellow highlighting) the IDL emitter concealed just inside the blade. This way, P8 renders will show the blade, and the IDL effect of the emitter, without the emitter itself being visible. However, the emitter's surface area is small, so it's cast light may be splotchy and insufficient.
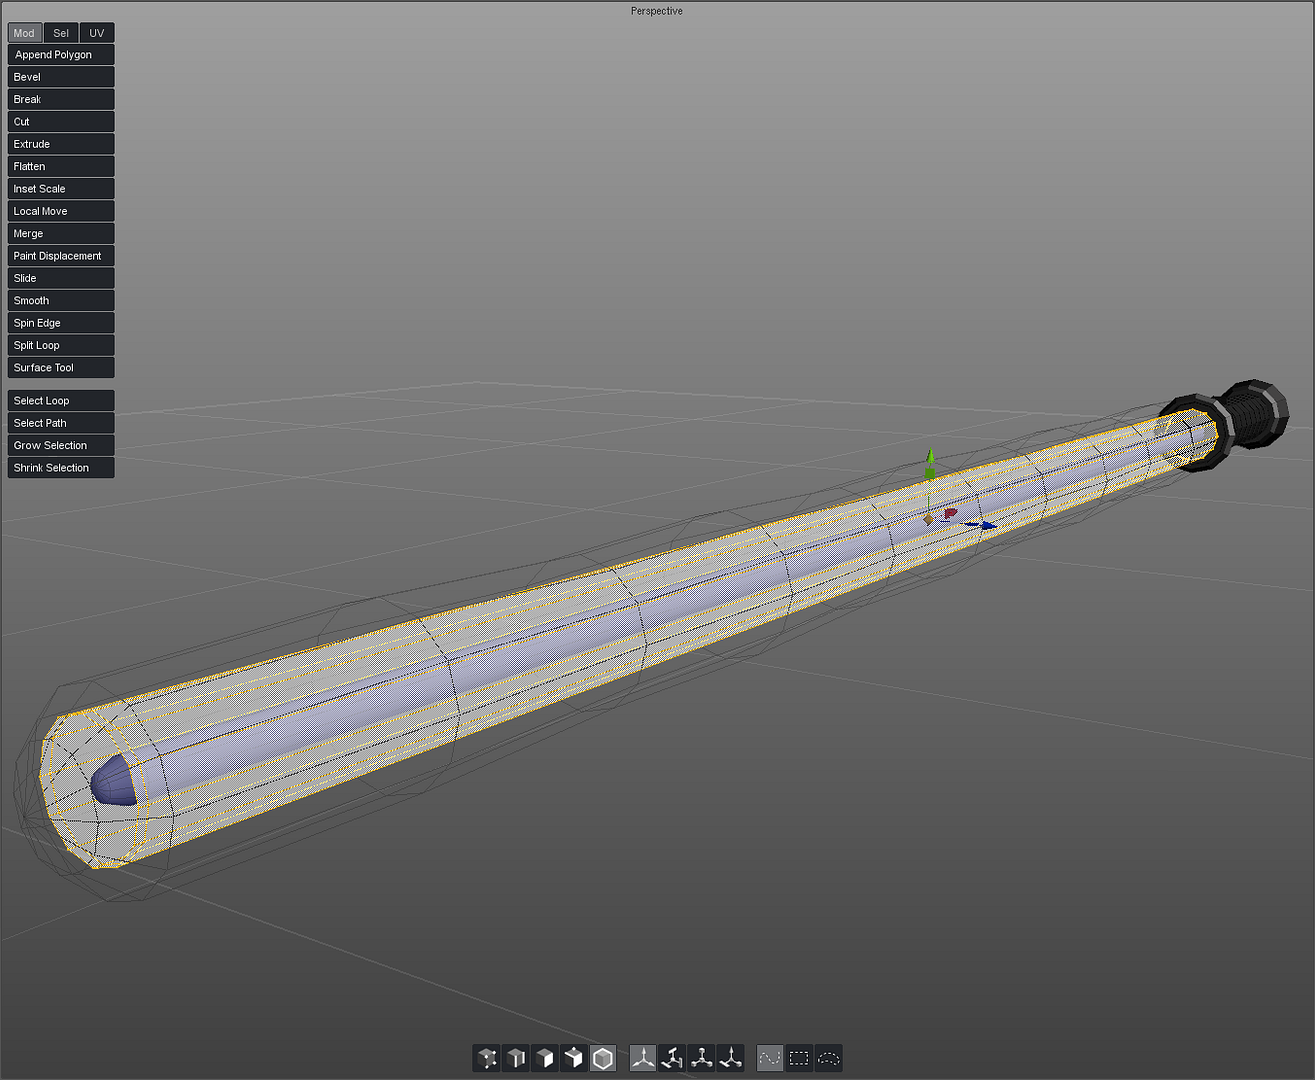
. Compare this to the IDL emitter on the P9 version; the emitter is about three times the diameter of blade, and so has much more surface area from which to cast light than the P8 emitter. We can get away with having the P9 emitter "exposed" well outside of the blade because of P9's visible in camera box, which we'll un-tick for the emitter. 
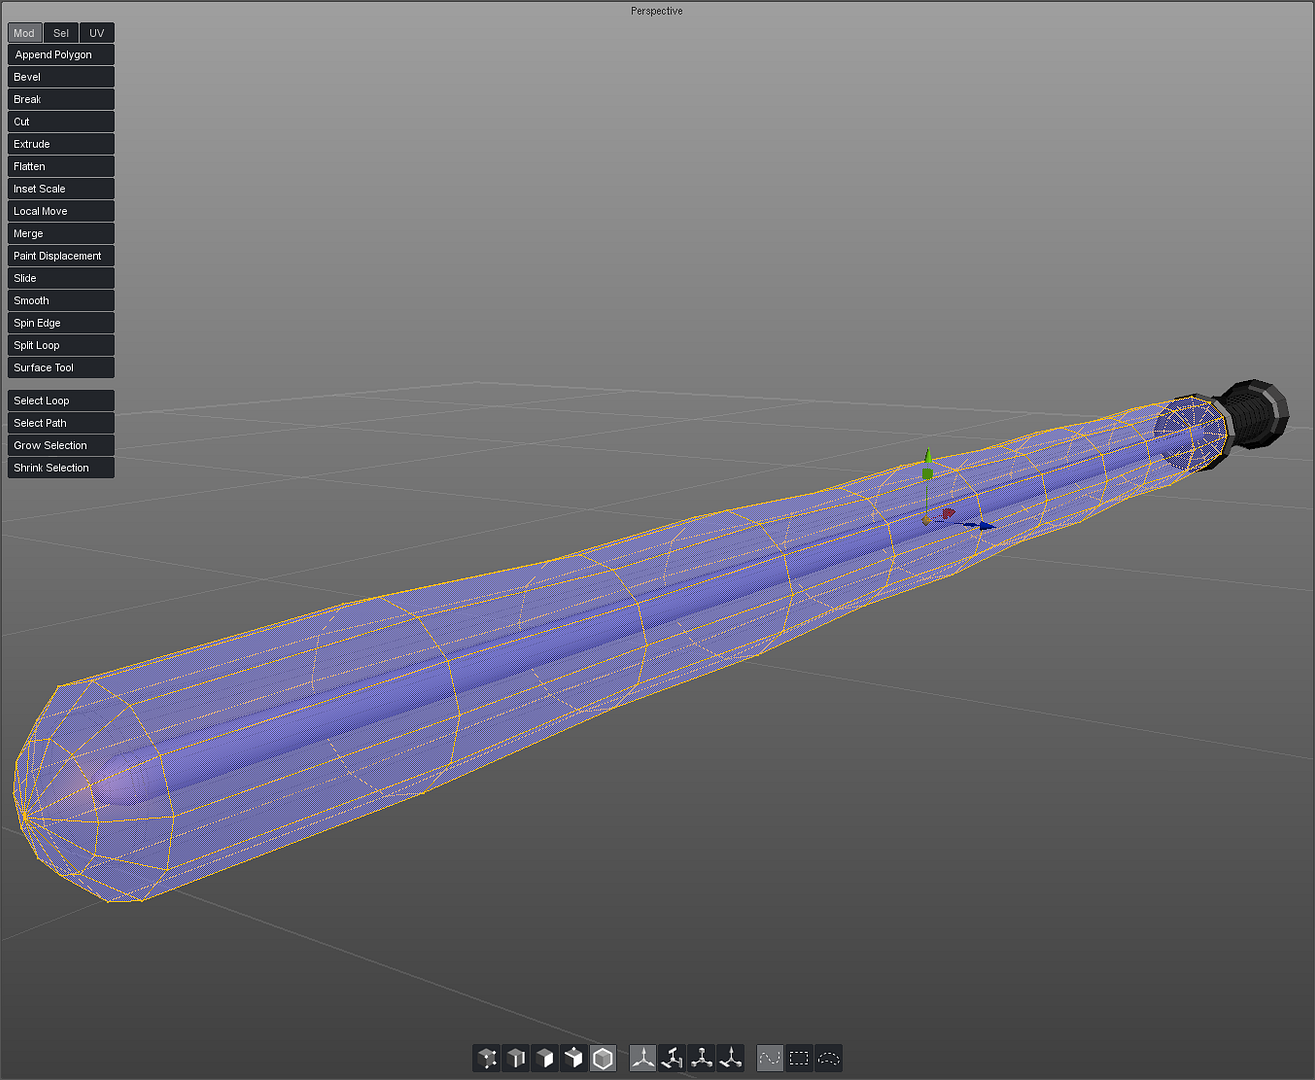
. Another refinement was to re-form the aura with undulating waves, so as to make the aura's visibility more consistent.
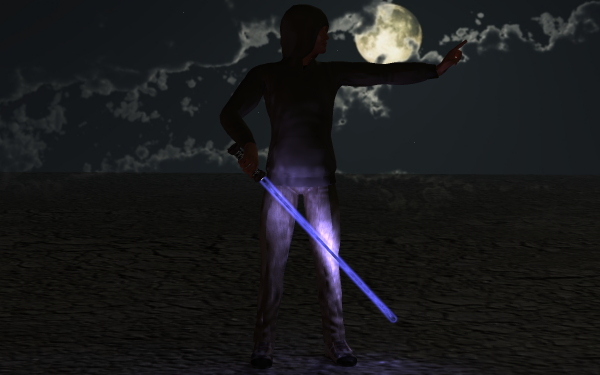
. Here's a render of the P8 lightsabre...
. And this is the P9 lightsabre...
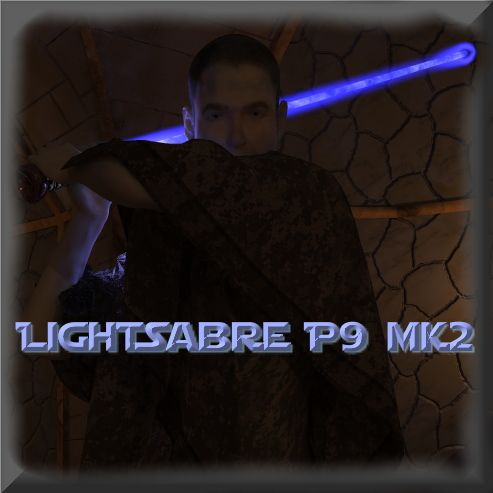
. P9 Lightsabre in runtime zip. Copyright seachnasaigh 2011. EULA: This model is free for both personal and commercial renders. Do not redistribute.
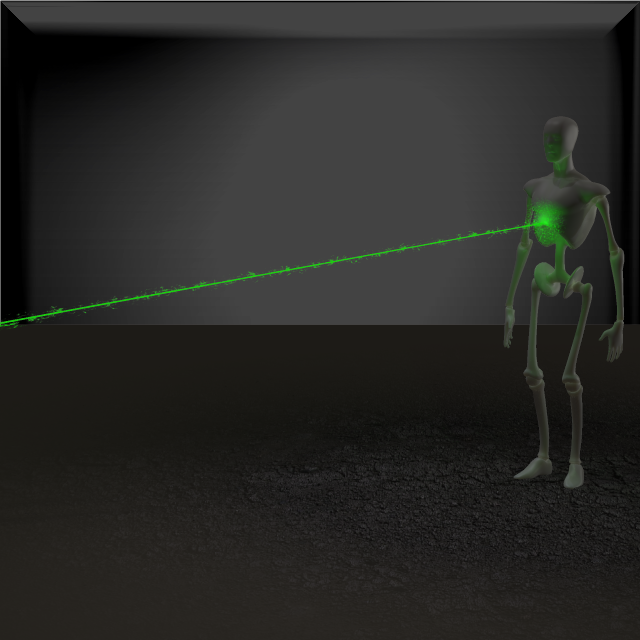
. Laser beam with "hit" burst at the end, in pz3. Copyright seachnasaigh 2011. EULA: This model is free for both personal and commercial renders. Do not redistribute.
.
Poser 12, in feet.
OSes: Win7Prox64, Win7Ultx64
Silo Pro 2.5.6 64bit, Vue Infinite 2014.7, Genetica 4.0 Studio, UV Mapper Pro, UV Layout Pro, PhotoImpact X3, GIF Animator 5
Ooops. Wrong file. The laser beam (and hit burst) prop -in runtime zip- is here: laser beam prop
Use a weak point light near -but not at- the end of the beam.
Poser 12, in feet.
OSes: Win7Prox64, Win7Ultx64
Silo Pro 2.5.6 64bit, Vue Infinite 2014.7, Genetica 4.0 Studio, UV Mapper Pro, UV Layout Pro, PhotoImpact X3, GIF Animator 5
seachnasaigh - thanks and my apologys for not replying. Late last week I got whacked by a nasty virus (the non computer kind), foolishly went out at the weekend. Took our grandaughter out to a local light show. She got some great shots, but I'm now really paying the price for it. So now way behind with everything right now. But I have downloaded your file and as I'm quarentined for at least a week (literally -not kidding there) I will be trying to catch up on this project and other poser stuff. Especially like as what you've done with the mtl collection, that drag n drop ability should making do this very easy and I'm really greatfull for your help here. Once I've added the materials I'll upload it so everyone can have a play. Plus once I've cleared the decks a bit, I'm also tempted to make a creature like the squid one above and use your files to try and make light up. BTW - No way could I have done this without your input. So thanks again here it's beyond appreciated.
Pinky - you left the lens cap of your mind on again.
Of course there is also this thread that had a long discussion, a lot of theory and info about it: http://forum.runtimedna.com/showthread.php?63342-Light-Emitting-Objects/page9
Attached Link: http://www.poserdirect.com/stuff/files1.zip

Pinky - you left the lens cap of your mind on again.
Attached Link: http://www.poserdirect.com/stuff/thefac_01_p4_beta.zip

Pinky - you left the lens cap of your mind on again.
Attached Link: http://www.poserdirect.com/stuff/exhaust.zip

Pinky - you left the lens cap of your mind on again.
Note: that is indeed a good thread, 3Doutlaw.
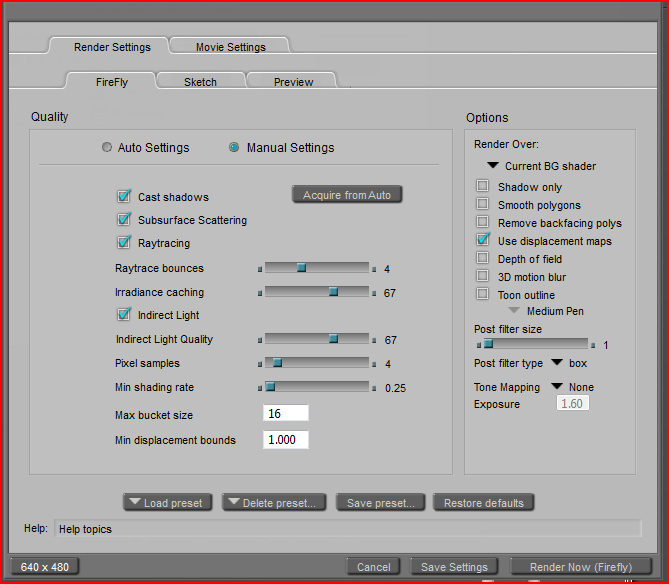
MrSparky: your room appears to have the visible lights, but no IDL emitters. Or perhaps you don't have IDL engaged in the render settings - click the circular "radio" button to manual settings, and when that version of the render settings window appears, click acquire from auto. PP2012 would also have a setting in the right column for gamma correction; tick it to engage it, and the gamma correction factor should be 2.2
. Poser's IDL does not respond in realistic proportion to a softly glowing object (the visible light panel in your scene); you must also use a much brighter unseen emitter to compensate; if you can use a larger surface area emitter, so much the better, as this will even out the lighting.
I'll nose through that zip file and see what's going on.
I like the idea of the central flame cone for the jet exhaust; that has potential. It can be part of the same prop as the jet blast/smoke trail "aura", but a different material zone. It will still need a separate unseen IDL emitter (also with two material zones, for cone and trail). Give me a bit of time to experiment on materials...
Poser 12, in feet.
OSes: Win7Prox64, Win7Ultx64
Silo Pro 2.5.6 64bit, Vue Infinite 2014.7, Genetica 4.0 Studio, UV Mapper Pro, UV Layout Pro, PhotoImpact X3, GIF Animator 5
Oh, snap. When I open the pz3, it asks me to find CCWall3.obj; Try saving the wall (include all attached separate props) as a prop, then using RunZip to pack the prop (if you have RunZip). Otherwise, you can use Poser's Python script to gather a scene inventory, and pack that.
Ooops. Just noticed the other zip in the second post. Stand by...
Aaargh. The thefac zip shows as corrupted and I can't open it. Update: it did make a runtime folder; but I don't know if parts/textures are missing.
Poser 12, in feet.
OSes: Win7Prox64, Win7Ultx64
Silo Pro 2.5.6 64bit, Vue Infinite 2014.7, Genetica 4.0 Studio, UV Mapper Pro, UV Layout Pro, PhotoImpact X3, GIF Animator 5
Nike! Got the sci-fi wall scene loaded up. :D OK, you have the softly glowing visible lights, but you need the unseen IDL emitters (must be a seaparate prop!), and aura props would be a nice touch, though not needed.
Give me a bit of time and I'll post a wireframe screenshot of where the emitters should go. 
Poser 12, in feet.
OSes: Win7Prox64, Win7Ultx64
Silo Pro 2.5.6 64bit, Vue Infinite 2014.7, Genetica 4.0 Studio, UV Mapper Pro, UV Layout Pro, PhotoImpact X3, GIF Animator 5
seachnasaigh - thanks for the feedback about the room. Heres a new zip..... http://www.poserdirect.com/stuff/thefacbeta.zip ...tested and it downloaded/installed OK. It's been zipped with an older version of winzip on a PC. Which I know can cause problems with macs. IDL certainty is NOT set in the render settings. I'll try that tommorow, I'm using P9. Not 100% sure if P10 is still installed. Also do you know if debut has this feature? As for the actual model, theres no IDL emitters on the actual model or materials. Not sure how to add those. Instead I've created materials on the parts that are meant to emit light/glows and given a name so the artist knows thats a lightable part. It's something I've been doing for ages now so the poser models can be used on apps like vue. Which allows a single "shader" to be applied to a poser materal. But, and please correct me if I'm wrong here, with P9 do I have to add an extra mesh thats then defined as the emmitter and another mesh thats used as the aura? Re - the aura. Thanks for the thoughts there. Thats only a very rough piece if you need something else made just shout. PS - whats RunZip?
Pinky - you left the lens cap of your mind on again.
Miss Nancy, I'm making a containment box, with the near wall missing to allow for the camera; this wall has been replaced with a low-intensity (but large surface area) emitter, so that issue is covered.
Could you elaborate on using high dynamic range images (how to? benefits of?) Sounds like something I should be using. :P
Sparky, you won't see the IDL tick-box in the render settings until you go to the manual settings.
Your visible lights look good, but yes, it needs extra pieces for the emitters and aurae. I already have them modeled up, UV unwrapped, and parented to your model. I'm experimenting with an animated procedural material for the aurae. Cameron is grinding out a test render now.![]()
Oh, and RunZip is one of D3D's Poser utilities. Basically, it's a zip/unzip app, but one which is specialised for packing Poser content. It cleans file paths, gathers all dependent files (texture images, OBJs, morphs) automatically, and generally automates what would otherwise take several tasks to accomplish.
Poser 12, in feet.
OSes: Win7Prox64, Win7Ultx64
Silo Pro 2.5.6 64bit, Vue Infinite 2014.7, Genetica 4.0 Studio, UV Mapper Pro, UV Layout Pro, PhotoImpact X3, GIF Animator 5
hdri has 32 bits per channel, whereas ordinary jpeg has 8 bits per channel (RGB). hence in poser, hdri is much brighter light source than jpeg texture, with greater range between darkest and lightest colours. to boost brightness of simple colour, increase value of light-emitting channel. simple colours burn out in poser GC renders if value is too high, but some colours won't burn out in some HSVTM poser renders. boosting value of jpeg will make it brighter in poser, but it won't have wide range of brightness.
Miss Nancy...interesting idea there and being a photographer I can see how that could help and work. Greater tonal range as well. Indeed converted a few renders myself for fun, even got some examples somewhere on this forum. Though from SM's comparision chart it seems thats only possible in PP2012 and PP2010 :( Then again it's not a biggie to get around. Most cameras don't automatically create HDRI in-camera anyway, it's normally a post-shot process using 3-5 images in something like Photomatix. Even there, and especially with incamera HDRI, one issue is slight motion between the shots. Either where the camera or something in shot moves. something you can see on many HDRI images by looking at leaves at the end of branches. An effct thats often compounded if ND grads/long exposures are used. Which is obviously something that renders don't have. So you can use this to your advantadage. Render once, adjust the gamma/contrast etc etc on copys of the renders, then chuck the lot into your HDRI app. Voila, one HDRI image! OK. it's not a 100% true HDR image, which might get the purists choking on their coffee, but really who cares. If you need something in a certain style you need it, doesn't matter how it's done, it's about getting the results. For example, a while back I rendered out some high quality car models in vue. Done on a totally white background using metalic shaders and GI or GR lighting. Bit of gamma correcttion, added some bokeh and them mixed these renders with some photos. Most folks, including many self-styled experts, couldn't tell what was a photo and what was a 3d model! seachnasaigh...thanks for the tip on the render settings. Also had a feeling it needed more bits for the emitters and aurae. can these be built into the model during construction phase rather than having to create/add something in poser later on? Oh, and RunZip... Do you mean this one? http://www.renderosity.com/mod/bcs/runtime-zip/50761 Don't have that, though do have D3D's excellent embedgeom for stripping out OBJ's from the CR2. Thats a brillant tool, cleans up the mesh as well.
Pinky - you left the lens cap of your mind on again.
Anyone else unable to download that demo-panel zip file? I get a message stating that the file was removed from the website.
Intel Core I7 3090K 4.5 GhZ (overclocked) 12-meg cache CPU, 32 Gig DDR3 memory, GeoForce GTX680 2gig 256 Bit PCI Express 3.0 graphic card, 3 Western Difgital 7200 rpm 1 Tb SATA Hard Drives
Quote - Anyone else unable to download that demo-panel zip file? I get a message stating that the file was removed from the website.
Odd. I see it in my 4shared album. In any case, what I posted should be a direct link (you don't have to find the correct button on another web page; a prompt box comes immediately). Hmmm. Tried a different zip and the link is also dead. I think the problem is with 4shared; in any case, I don't know how to fix it. I could try sending it by e-mail, if you want to site mail me your addy.
In other news, I realized that I had overlooked the green soffit light and the light inside the pipe chase of Sparky's beta piece. I have added IDL pieces for them, and Cameron is working on test renders now, to get the material settings dialed in. I'm hoping that the animated procedural aura works!
This is frame 016 of Sparky's beta. There are no Poser lights on. Cameron is working on the animation test now.
.
Poser 12, in feet.
OSes: Win7Prox64, Win7Ultx64
Silo Pro 2.5.6 64bit, Vue Infinite 2014.7, Genetica 4.0 Studio, UV Mapper Pro, UV Layout Pro, PhotoImpact X3, GIF Animator 5
Click image to run ShockWave Flash animation test of Sparky's beta wall. No Poser lights are on.
. I've packed the IDL prop set into a zip, mrsparky, but I guess you'll need to send me a site mail with an e-mail addy, since 4shared seems to be bollixed.
Poser 12, in feet.
OSes: Win7Prox64, Win7Ultx64
Silo Pro 2.5.6 64bit, Vue Infinite 2014.7, Genetica 4.0 Studio, UV Mapper Pro, UV Layout Pro, PhotoImpact X3, GIF Animator 5
yes, sparky, some recent version(s) of poser can export renders as hdr or exr images, but most recent versions (e.g. poser 8, 9) can use hdri as illumination sources in renders.
p.s. when a jpeg texmap brightness is increased by using an hsv node, it can have the same effect in total range as an hdri, but it introduces a step function into the colour gradients. hence the brightness is increased for illumination purposes, but the lighting detail (the total information available to FFRender to calculate IDL) is far less than an hdri.
Privacy Notice
This site uses cookies to deliver the best experience. Our own cookies make user accounts and other features possible. Third-party cookies are used to display relevant ads and to analyze how Renderosity is used. By using our site, you acknowledge that you have read and understood our Terms of Service, including our Cookie Policy and our Privacy Policy.


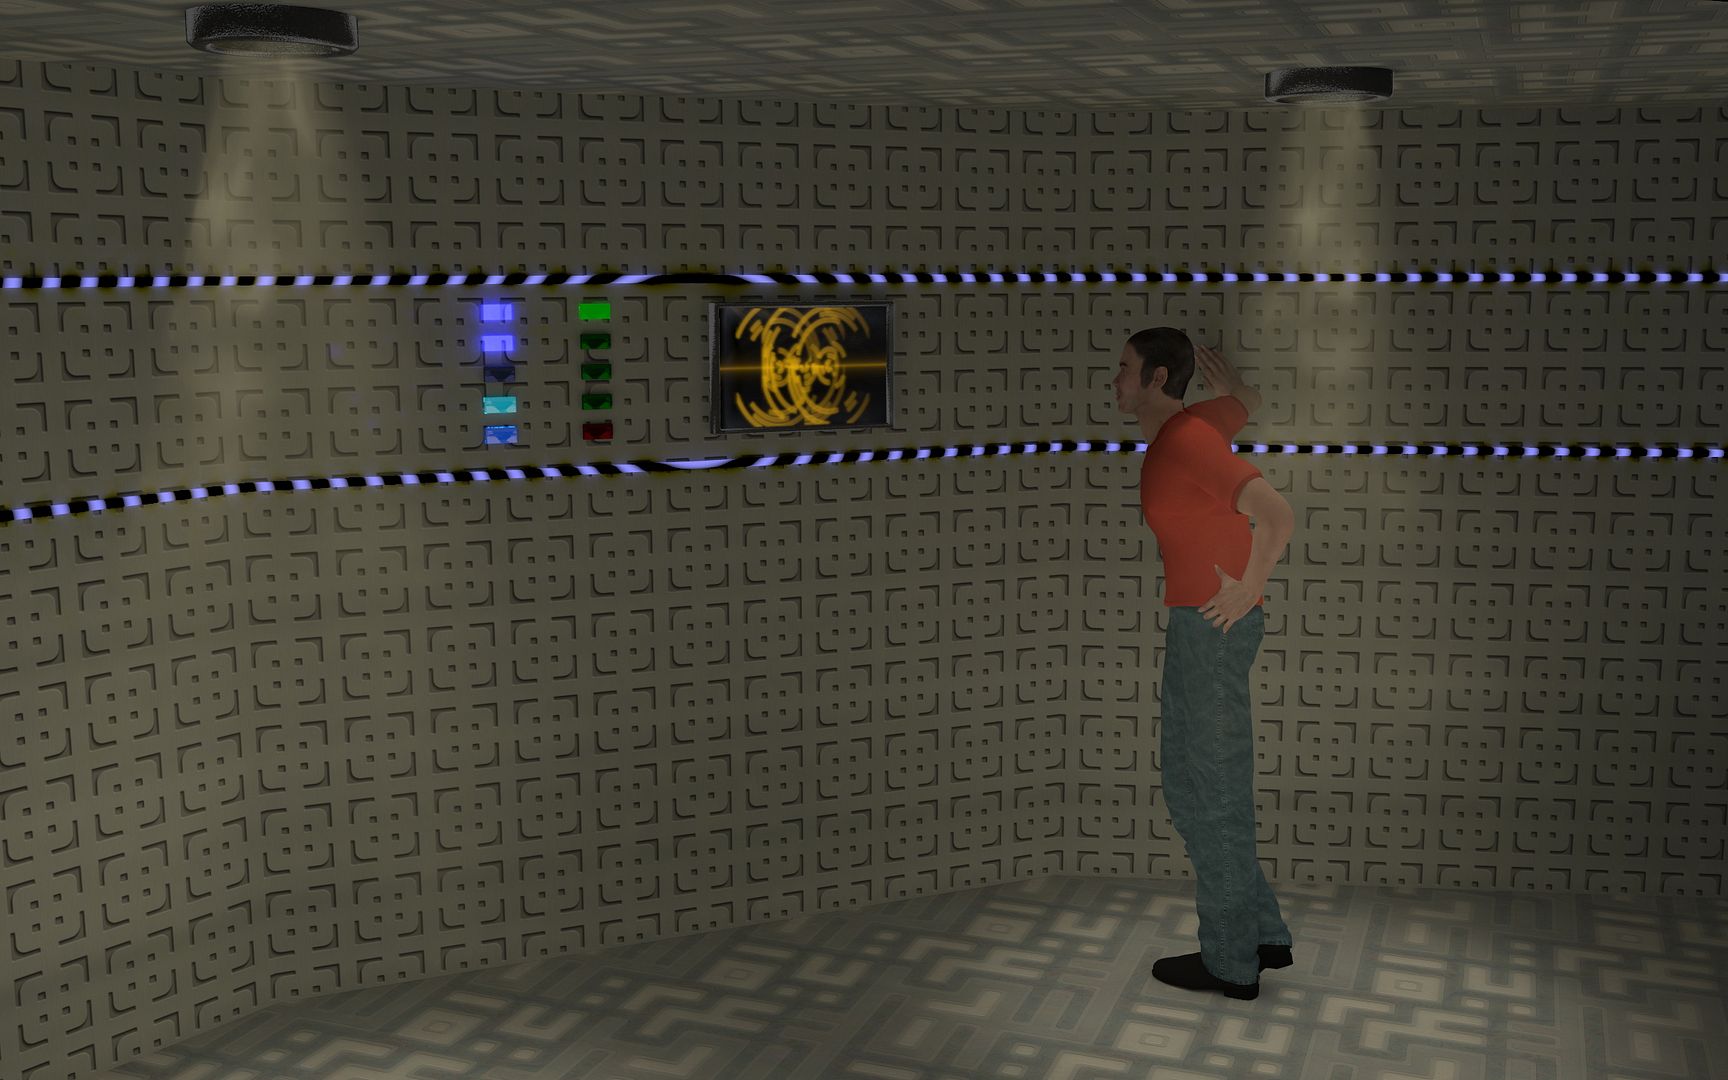
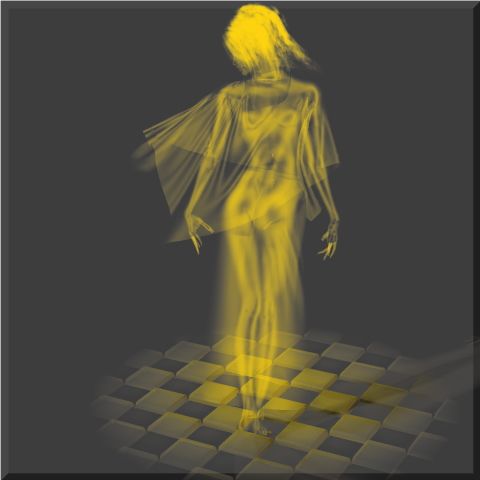


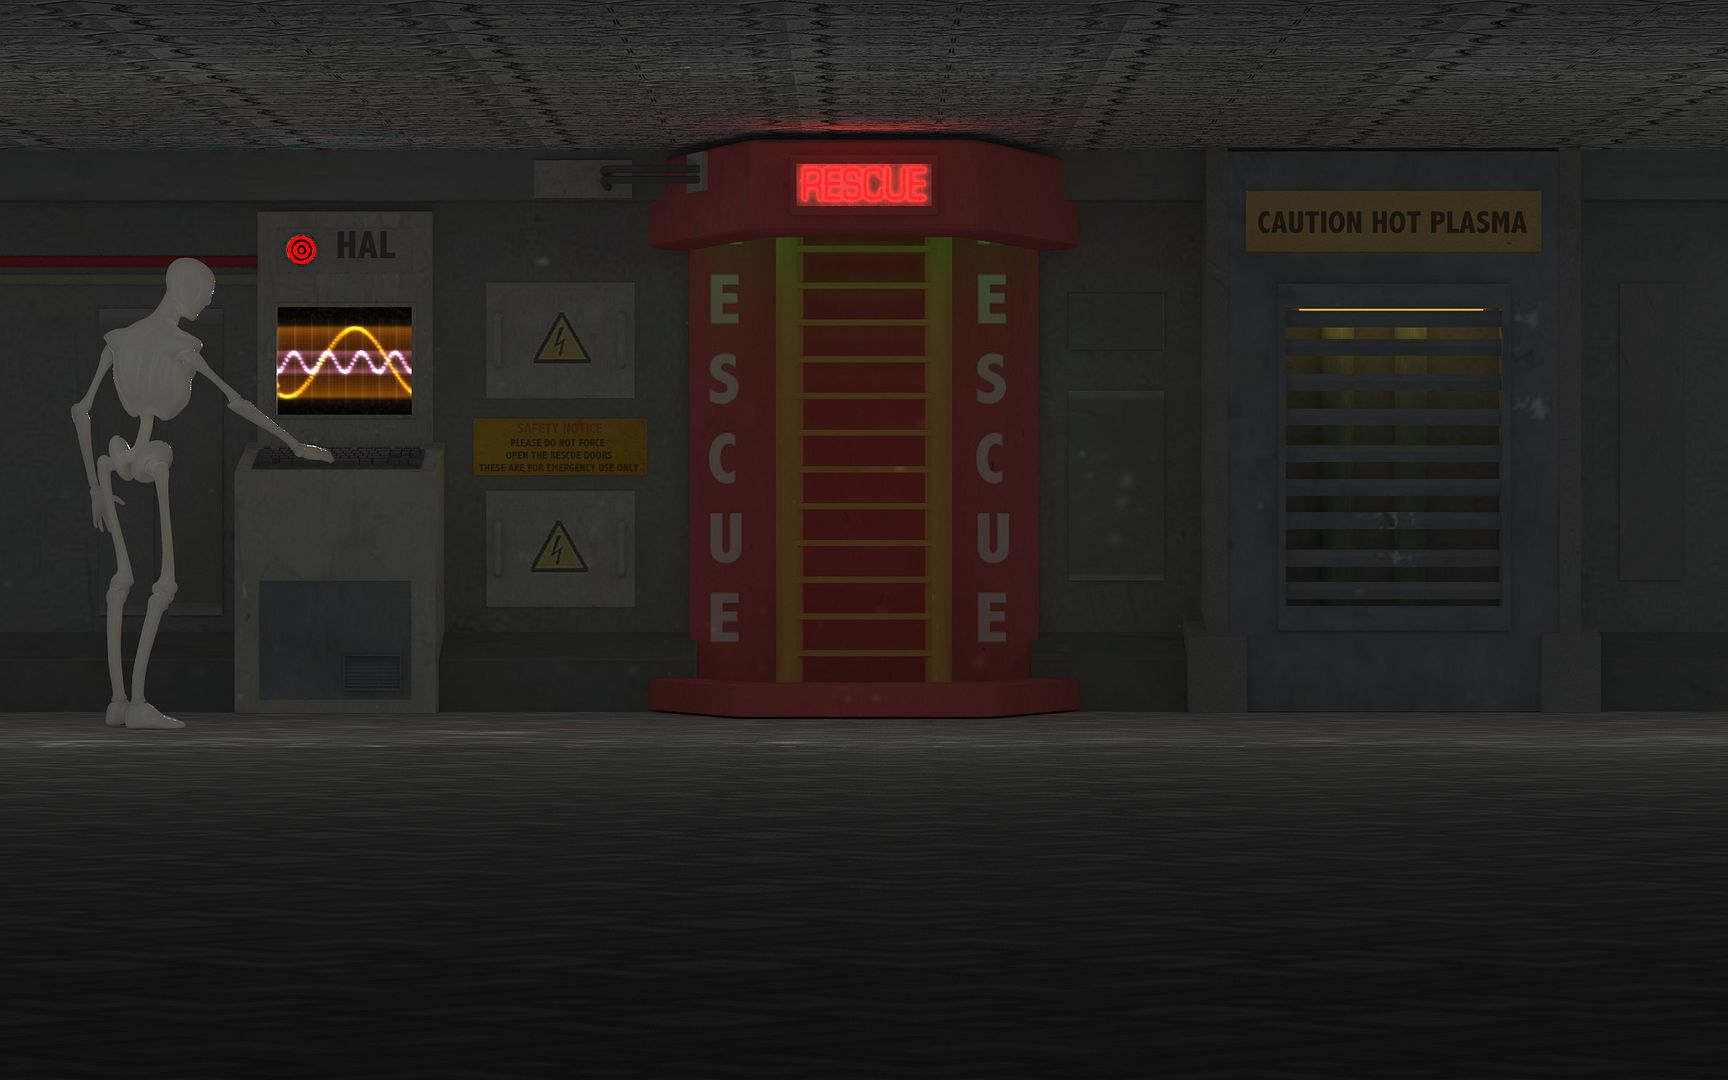


Thanks to the very nice people at CP I've now got Poser 9. So I'd like to try out the new lighting feature, which according to the ads allows a mesh/material to become a light and actually emit light. Or more precisely I've made a freebie which has different parts, which are designed to either glow or emit light. The idea being you' can use the actual model to light itself. Theres some pictures below to show what I mean here. But I don't know how to set up the P9 lighting to make it work. So could anyone help here ?Pinky - you left the lens cap of your mind on again.