Renderosity Forums / Poser - OFFICIAL
Welcome to the Poser - OFFICIAL Forum
Forum Moderators: RedPhantom
Poser - OFFICIAL F.A.Q (Last Updated: 2025 Feb 24 11:54 pm)

Subject: A question from the noobiest noob

Select the dress and go to the Figure option in the menu and select Conform to... and select V4 from the list.
LukeA

Quote -
Cool, it worked!! Thank you for the help! So this is what I should do with all the add ons that are meant for V4?
Not everything is conforming. Some things are smart props, and that includes hair. Some are conforming, some are props. You can usually tell which is which - conforming items are always in the Figures folder, smart props in the props folder (tho not all props are smart props) and smart propped hair in the Hair folder. You don't need to conform smart props like you do conforming - smart props normaly pop on to a certain body part as soon as you load them.
Laurie


Note!! It may be a well-established convention that figure clothes are in the Figures category, but that is not required, and in fact SM has been trying to change that. Some P8 conforming clothing is actually found in the Props category.
They are trying to address the illogic of the whole system. As a new user, the idea that a shirt is a figure (a character) is really confusing. Only those of us who have used Poser for quite a while find any logic in that. To people who are new to the program, a shirt is not a character like Vickie or Mike - it is a prop.
Then, too, you have Material collections masquerading as Poses. Again, those of us who are very familiar the weird hackery that was used for mat-poses are fine with it, but new users find that really arcane. Thus we now have proper material collections in the materials folder, even though technically they are structred like poses. Hahah.
There's only one rule you can safely put in advise to Poser users - there are few rules, and even fewer people who know them all.
Renderosity forum reply notifications are wonky. If I read a follow-up in a thread, but I don't myself reply, then notifications no longer happen AT ALL on that thread. So if I seem to be ignoring a question, that's why. (Updated September 23, 2019)

Except I also don't think of clothing as a prop either. For me a prop would be furniture, scene items, backgrounds, etc. Clothes don't fit that bill to me.
At this point, I'd never think to look in the props category for clothing (maybe dynamic) because things that have been rigged are figures. I've even set up my figures category into sub categories like hair, clothing, animals, etc. because at this point, that is what seems natural.
WARK!
Thus Spoketh Winterclaw: a blog about a Winterclaw who speaks from time to time.
(using Poser Pro 2014 SR3, on 64 bit Win 7, poser units are inches.)


The following is a great deal of information to process, but it's only meant as a guide and not to be memorized. I have it broken up into sections. My advice is to read it through once, print it out and keep the print out next to your computer for reference as needed.
Here is an essay of information that I have been compiling which is geared to the brand new user. **It has links for free characters, tips on clothing, file organization, newbie tutorials etc.
**
V3, M3 and Aiko are free. 3D Models Pack Free from Daz at Download.com
You just need the morphs packages to change their shape.
A picture to show you the file structure of a Poser Runtime can be found here:
http://www.daz3d.com/support/faq/index.php?id=94
Basically, what it boils down to in a nutshell:
If you are looking for a Character or a piece of clothing/shoes, in Poser you will find them in libraries/character. These files have the extension cr2 (uncompressed) and c2z (compressed)
If you are looking for hair, you will find them in either library/character/hair OR library/hair
If you are looking for character texture addons, hair textures, clothing textures, you will find them in library/poses. These files have the extension pz2 (uncompressed) and p2z (compressed). Sometimes on the rare occasion, a merchant will package their textures so that they go into the "Camera" folder (.cm2 files). If that is the case then you can either apply them from there, or do what I do and change the file extension to .pz2
If you are looking for props, they are located in library/props. These files have the extension pp2 (uncompressed) and ppz (compressed)
Sometimes you will find clothing and hair or shoes in library/props too, depending on whether the item is actually created and saved as a figure, or it was created and saved as a prop.
Figure (cr2) items like hair and clothing are "conformed". Figure items like wings are "parented"
Props are parented. Some props that are made for a specific figure will seem to go where they are supposed to and "stick" without you having to do anything. Those are called "smart props". You can use those on other figures, but you have to use the XYZ trans dials to place it where it belongs on the different figure. Then you need to parent the item to that new figure's body part.
If you are just starting, it's best to get started on the right foot. DO NOT just install files into the runtime! That will only lead to frustration because you won't be able to find anything, and not all files are packaged equally and land up all over the place.
Here is a link to a tutorial on using multiple runtimes.
http://forum.daz3d.com/viewtopic.php?t=9060&start=0
http://www.drgeep.com/p5/run/run.htm
Another tip is to never just unzip or install anything directly to your runtime. Always unzip or install to a separate folder. Then browse through the folder to have a look at the structure of where things are going and make sure that it's in "proper runtime structure" so that when you move it to the runtime, they get into the proper folders.
Once you get your files installed, the next thing you want to do is to start making things :)
Here are some great newbie tutorials that will get you through the bare basics. They are for Poser 5, but it is still the same in newer versions:
http://trekkiegrrrl.dk/tut1.htm
http://www.poserguide.nimprodaction.com/issues/issue2/cover.htm
http://www.poserguide.nimprodaction.com/issues/issue3/cover.htm
http://www.poserguide.nimprodaction.com/
http://www.canary3d.com/tutorial/3d-intro.htm
http://www.ebonshire.net/tut-posb/index.php
http://www.cooltuna.com/poser/poser-tutorials.html
Dr. Geep Studios ( Basic to Advanced Tutorials. Periodically offers free classes for Poser)
http://www.anniescorner.net/posertuts/GettingStartedinPoser5.htm
If you don't have the Daz V3 or the V4 figure, you should pick one or both. I'd personally suggest that you go with the V3 one as it's been around for years and there is a TON of freebies around for her, as well as a TON of stuff in the various Poser stores. It will be a couple of years before V4 catches up with clothing content and stuff, especially FREE stuff and V3 stuff won't work on V4 because they are different figures. There are work arounds to getting clothing from a figure to fit another figure. I've included information on that further down.
3D Models Pack Free from Daz at Download.com
But if you want to change the look of her face and body, or use any of the available character addon packages, you need to buy the head and body morphs.
The V3 head and body morphs are here:
http://www.daz3d.com/shop.php?op=itemdetails&item=3008
There is also "Michael 3". He is available free at the link above at download.com. Again, like Vicky, you need the head and body morphs to change the shape of his head and body. Those can be found here:
http://www.daz3d.com/shop.php?op=itemdetails&item=3009
If you have both figures, you can get both of their head and body morphs in one package, here:
http://www.daz3d.com/shop.php?op=itemdetails&item=3010
NOTE: You can use the textures from the character addon packages without having the head/body morphs.
If you want to change the look of the head/body and have the head/body morphs, do the following:
Install the head and body morphs.
Locate the morphs you want to use in the "Poses" folder.
Find the set of morphs you want to inject IE: Full Body, Full Head.... or just certain parts.
Left click the picture
Click the Single Checkmark at the bottom of the page.
Go to your Parameter Dials and start turning dials. (make sure that you have the part of the body you want to adjust as the active one IE: Morphing the ears, make sure you have the had selected.
Also, you can find many, many free morphs and textures for Vicky, and Aiko, and some even for David and Michael. So you don't have to turn any dials if you don't want to. Here are a couple links to get you started.
http://www.renderosity.com/mod/freestuff/index.php?user_id=55140
http://www.renderosity.com/mod/freestuff/index.php?user_id=178490
http://www.renderosity.com/mod/freestuff/index.php?user_id=105158
Using ready made character addons is pretty easy. You need to have the figure and it's head and body morph packages installed.
Load up the figure IE: Vicky
Go to the Poses folder, and instead of looking for your morphs from the packages, look for th character you want to use. Left click the image that has INJ, click the SINGLE checkmark at the bottom and the morphs for that character's look is injected into your figure. No dial turning necessary. Of course if you want to tweak the settings you can, but that's not mandatory.
Next locate the textures (if the package has some). They will be usually in the same library menu as your INJ that you used. Left click the image for the texture and use the SINGLE checkmark to apply it. If you don't like that texture, apply another one overtop.
You can even use a texture from another package. IE: Morphs from package A and textures from package C. Or morphs from packag A, texture from package C, eyes from package D, lips from package E. the combinations are endless :) If the packages have their head morphs seprate from the body ones, you can mix and match morphs too. IE: body morphs from package A with head morph from package D. That allows for even more versatility.
There are lots of sites out there that has free V3 character addons, and some that have for Aiko, Michael and even David.
Hair, clothing and textures are all figure/item specific, which means:
Michael 3.0 needs hair and clothing and textures made for Michael 3.0
Victoria 4.0 needs hair and clothing and textures made for Victoria 4.0
Victoria 3.0 needs hair and clothing and textures made for Victoria 3.0
Victoria 2.0 needs hair and clothing and textures made for Victoria 2.0
Aiko needs hair and clothing and textures made for her.
Like figures, a texture made for one hair style can only be used on that hair style.
Clothing is also specific when it comes to textures. A texture for a pair of pants, won't fit all pants... just the pants that it was made to fit. Same with all clothing items.
Sometimes you can manage to clothing item to fit another figure by tweaking of dials and increasing or decreasing the scale percent, but that doesn't always work. Sometimes a clothing item for Victoria 2 will fit Victoria 3, but their joints are different so posing a figure wearing clothing not made for it specifically will be hard.
Some figures can share items more easily than others, here is a link that will help sort that out:
http://market.renderosity.com/mod/forumpro/showthread.php?message_id=2682279
There are 3 types of clothing:
Dynamic: This is clothing that you use inside the Cloth room. It takes longer to work with and there is a bit of a learning curve, but it's not too bad, but the results are more appealing in that the clothing actually looks more natural instead of "posed and stiff". I have included information about this type of clothing further down.
Confroming- Non Morphing: This is clothing that you conform to a figure. The clothing is made to fit the base figure. If you change the shape of the figure you will also have to refit the clothing, which isn't always easy if there aren't any corresponding body morphs in the clothing. Plus posing a character in positions where they are not nearly upright is difficult. But many prefer this type of clothing over dynamic.
Conforming-Morphing: This is the same as conforming-non morphing, only there are morph dials that you can turn that have corresponding body morphs for easier fitting. This is the preferred type of conforming clothing because it's easier to fit.
Using a clothing item on a figure that it is meant to be used on, after you have added morphs and adjusted the shape of the body, can be problematic because the clothes are made for the default figure shape and not the new morphed up shape. So the clothing no longer fits and you get parts of the body showing through the clothing after you add morphs and change the shape of the body.
There are programs that can help fit clothing from one figure to another, or even from the same figure to one that has been "morphed up" using their morph packages.
The Tailor, which can be bought here:
http://www.daz3d.com/shop.php?op=itemdetails&item=677
Wardrobe Wizard (I use this one and it's great). It can be purchased from PhilC's site here:
http://www.philc.net/WardrobeWizard.htm
Clothes Converter, which can be bought here:
http://www.daz3d.com/shop.php?op=itemdetails&item=3069&cat=131
Things like hair can be used across all figures just by tweaking the scaling and trans dials and then parenting the hair to the figure.
Poses are something else that can be used across most human-like figures with just a bit of tweaking to dig out a hand, or fix a shoulder.
Dynamic Clothing (more information):
A nice thing about dynamic clothing is that you can easily use clothing on various figures.Here are some tutorials on how to use dynamic clothing in the cloth room:
http://www.renderosity.com/mod/forumpro/showthread.php?thread_id=2665209
http://www.philc.net/CC_sampleVideo.htm
http://www.poserfashion.net/howvic3dress1.htm
http://drgeep.com/p5/cr/cr.htm
Here are some links to some great FREE dynamic clothing:
http://www.renderosity.com/mod/freestuff/index.php?username=mapps
http://www.renderosity.com/mod/freestuff/index.php?username=svdl
http://www.renderosity.com/mod/freestuff/index.php?username=Stegy
http://www.renderosity.com/mod/freestuff/index.php?username=carib98
http://www.renderosity.com/mod/freestuff/index.php?username=teyikung
It's also possible to make conforming clothing into dynamic clothing:
http://www.renderosity.com/mod/tutorial/index.php?tutorial_id=868
And it's possible to take a conforming outfit and work with it in the cloth room so that parts of it act dynamic.
http://www.renderosity.com/mod/forumpro/showthread.php?thread_id=2517340&page=1
"It is good to see ourselves as
others see us. Try as we may, we are never
able to know ourselves fully as we
are, especially the evil side of us.
This we can do only if we are not
angry with our critics but will take in good
heart whatever they might have to
say." - Ghandi
Organization in Poser is very important. Libraries grow quickly and it soon gets to a point where you can't find anything.
So far as organization goes...
You have 2 options that can help you with organizing and being able to find things:
1. Create sub folders inside the library folders.
This is the preferred method for many. It uses one single runtime with lots and lots of sub folders within the main library folders, in order to organize the content. The learning curve is minimal. If you can right click and create a new folder and drag and drop, you can do this. The learning curve is knowing what folders you can move files around in and what folders not to touch.
You can move around the files inside the library sub folders.
Don't move, touch or rename files or folders in the top level of the library folder that carry the name of the merchants, or the "Morph" or the !DAZ folder because those are morphs and need to stay where they are.
Just work with the standard ones inside the Library folder such as camera, faces, hand, pose, props, hair, lighting, character.
Leave the files inside the geometries and texture folders alone.
Right now you have a hodge podge of files for various figures in each folder plus props, poses, lights etc.
Open the character folder and create sub folders for each of your figures IE: V3, V4, M3, D3, Aiko, Apollo etc. Do the same for each of the other library sub folders. You can also create other folders too, such as "Poses" or "Props" or "Backgrounds" or "Hair" etc.
Then go through your files in each of the library subfolders and move them into the appropriate folder for the figure they belong.
Things like lights, and poses and hair and props are universal items really, and can be used across figure, so I like to have those separated instead of filed by "figure" because I often use V3 poses on Aiko and hair for Posette on V3 etc.
You will run into a problem for items that are for more than one figure. Like where do you file those? For exxample an outfit that is for V3 and M3 and Aiko and SP3: where do you file them? If you put them in the V3 folder, then you forget that they can be used for M3 and Aiko and SP3 too. It was this complication that prompted me to move onto using external runtimes (described below).
I did it this way at one time and it worked well enough,well except for items that could be used on a few figures like I described above. I decided I wanted even more organization, and I didn't like having one huge runtime because it was impossible to really burn it to a CD/DVD without having to break it into bits and pieces. Plus it took Poser forever to load because the runtime was so big. So I tried option 2 below.
**2. Multiple External Runtimes
**
Many find this method difficult to learn. It does have a small learning curve, but once mastered many like myself wouldn't use any other method to organize their content.
It's important to understand that a runtime is a runtime is a runtime no matter where on your hard drive or external hard drive it sits.
All an external runtime is, is a runtime that is not inside the Poser folder.
All "multiple external runtimes" mean is that you have more than one runtime sitting outside the Poser folder. They all have the same folder structure as the main runtime in your Poser folder. I have 42 at last count and I know exactly what is inside each one and I know where to look for files.
Another nice thing about external runtimes is that you can have specialty runtimes for various holidays such as Christmas or Halloween or different themes that you like to use sometimes but not everyday. The benefit of this is that the runtime is often small enough that you can burn it to a couple CD's or a DVD and save yourself some hard drive space instead of having stuff on your hard drive that you only use once or twice a year.
The following is the link where I learned to create and use external runtimes. When I was trying to do it I was really confused about the concept but I eventually caught on and now I won't ever go back to using just one runtime.
http://forum.daz3d.com/viewtopic.php?t=9060&highlight=runtime
Some of the runtimes that I have are:
V3 Character addons (includes the V3 figure and her morphs)
V3 Clothing
M3 Character Addons (includes the M3 figure and his morphs)
M3 Clothing
Aiko
Christmas
Halloween
Angels and Faeries
Mermaids
Millennium Kids
Backgrounds and Environments
Props
Poses
Hair
Lighting
etc. etc. etc.
I like knowing that when I want to add some hair, that all I have to do is go to my "Hair" runtime and all of my hair files are inside. If I want a prop, then I go to the "Props" folder.
If I want to make a mermaid, I go to my "V3 Character" runtime and load V3, apply a MAT POSE and morphs. Go to "Hair" runtime and find a hair figure/prop that I want to use. Go to "Mermaids" folder and load up my mermaid tail and textures and anything else mermaid related including mermaid poses. Go to "Lights" and find a nice set of lights that fit my scene and then render.
I know some don't like to go runtime to runtime, but I find that having so many runtimes that each one isn't gargantuan and doesn't take very long to load. And as I said I love to know where I can find things directly without having to search through unrelated stuff. If I am looking for V3 clothing, that's all I want to see. I don't want to wade through M3 and Aiko things or Poses and Hair etc.
Setting up an external runtime is easy.
- Create a new folder;
- Name it whatever you like IE: V3 Character Addons;
- Open folder;
- Create new folder called "Runtime";
- Right click and create a new text file. Change the name to "Poser.exe". Accept the warning that changing the file format etc. You want to change it.
- Create a new folder called "Readmes". Use this to place all of your readme files for easy reference.
- Create a new folder called "Templates". If you do texturing you can place the texture templates that come with some packages in there. Or you can just delete them if texturing is not you thing. In that case you won't need a "templates" folder.
- Open "Runtime"
- Create the following folders inside "Runtime"
- Geometries
- Libraries
- Reflection Maps
- Textures
That's it, your done. Copy this structure for as many runtimes as you want to create and rename them to whatever you want your runtimes to be called.
Your runtime paths will then be something like this:
Runtime Folders V3 Clothing Runtime
Runtime Folders M3 Characters Runtime
Runtime Folders Halloween Runtime
Runtime Folders Christmas Runtime
You can place your runtimes anywhere you like. On my old computer I had them inside "My Documents" on my C Drive in a folder called "My Runtimes".
On my new computer I have them on my partitioned D Drive in a folder called "Poser Runtimes", and I back them up on my G External Drive..
You might also read my post in the following thread on how to further organize your multiple runtimes using naming continuity so that you know what belongs with what as you go from folder to folder in your library.
http://www.renderosity.com/mod/forumpro/showthread.php?thread_id=2704637&page=1#message_3024920
"It is good to see ourselves as
others see us. Try as we may, we are never
able to know ourselves fully as we
are, especially the evil side of us.
This we can do only if we are not
angry with our critics but will take in good
heart whatever they might have to
say." - Ghandi

Quote - bagginsbill:
They are trying to address the illogic of the whole system. As a new user, the idea that a shirt is a figure (a character) is really confusing. Only those of us who have used Poser for quite a while find any logic in that. To people who are new to the program, a shirt is not a character like Vickie or Mike - it is a prop.Then, too, you have Material collections masquerading as Poses. Again, those of us who are very familiar the weird hackery that was used for mat-poses are fine with it, but new users find that really arcane. Thus we now have proper material collections in the materials folder, even though technically they are structred like poses.
Having only discovered personal 3D halfway through the P6 era (I chanced upon an ad for P6) I can confirm this. I recall wondering "why do I have to go to the pose folder to change the materials, when there is a specific materials room right here?"
For clothing, I would prefer if it had its own library category, with conformal and dynamic sections. But given a choice of existing library categories, I would agree with the choice of props.
Poser 12, in feet.
OSes: Win7Prox64, Win7Ultx64
Silo Pro 2.5.6 64bit, Vue Infinite 2014.7, Genetica 4.0 Studio, UV Mapper Pro, UV Layout Pro, PhotoImpact X3, GIF Animator 5

One thing to consider about Poser files - all Poser files - there are really only two types. One type loads geometry, the other type acts on it in some way.
Hope your rl issues are sorted out ok.
BTW, you'll find most people here are helpful. BB is a bit of a grumpy git (sorry Bill) but he's really nice underneath.
Coppula eam se non posit acceptera jocularum.
changes to materials can be done via a pose file, and if lucky they are names as Mat Poses. This is just how poser handles the pose file, which alters setting for the figure.
Mt5 and mc6 files are available in Poser to do the same job , but people are used to mat poses, and it can be hard to get them to change.
Its easy to tell if something is a prop or a figure, just load it to the scene , and see if it appears in the figure pulldown , or the props list. Figures should conform, props should parent, but not allways.
Figures,props,hair all may load geometry
Pose,face, hand libraries are all poses.
Privacy Notice
This site uses cookies to deliver the best experience. Our own cookies make user accounts and other features possible. Third-party cookies are used to display relevant ads and to analyze how Renderosity is used. By using our site, you acknowledge that you have read and understood our Terms of Service, including our Cookie Policy and our Privacy Policy.
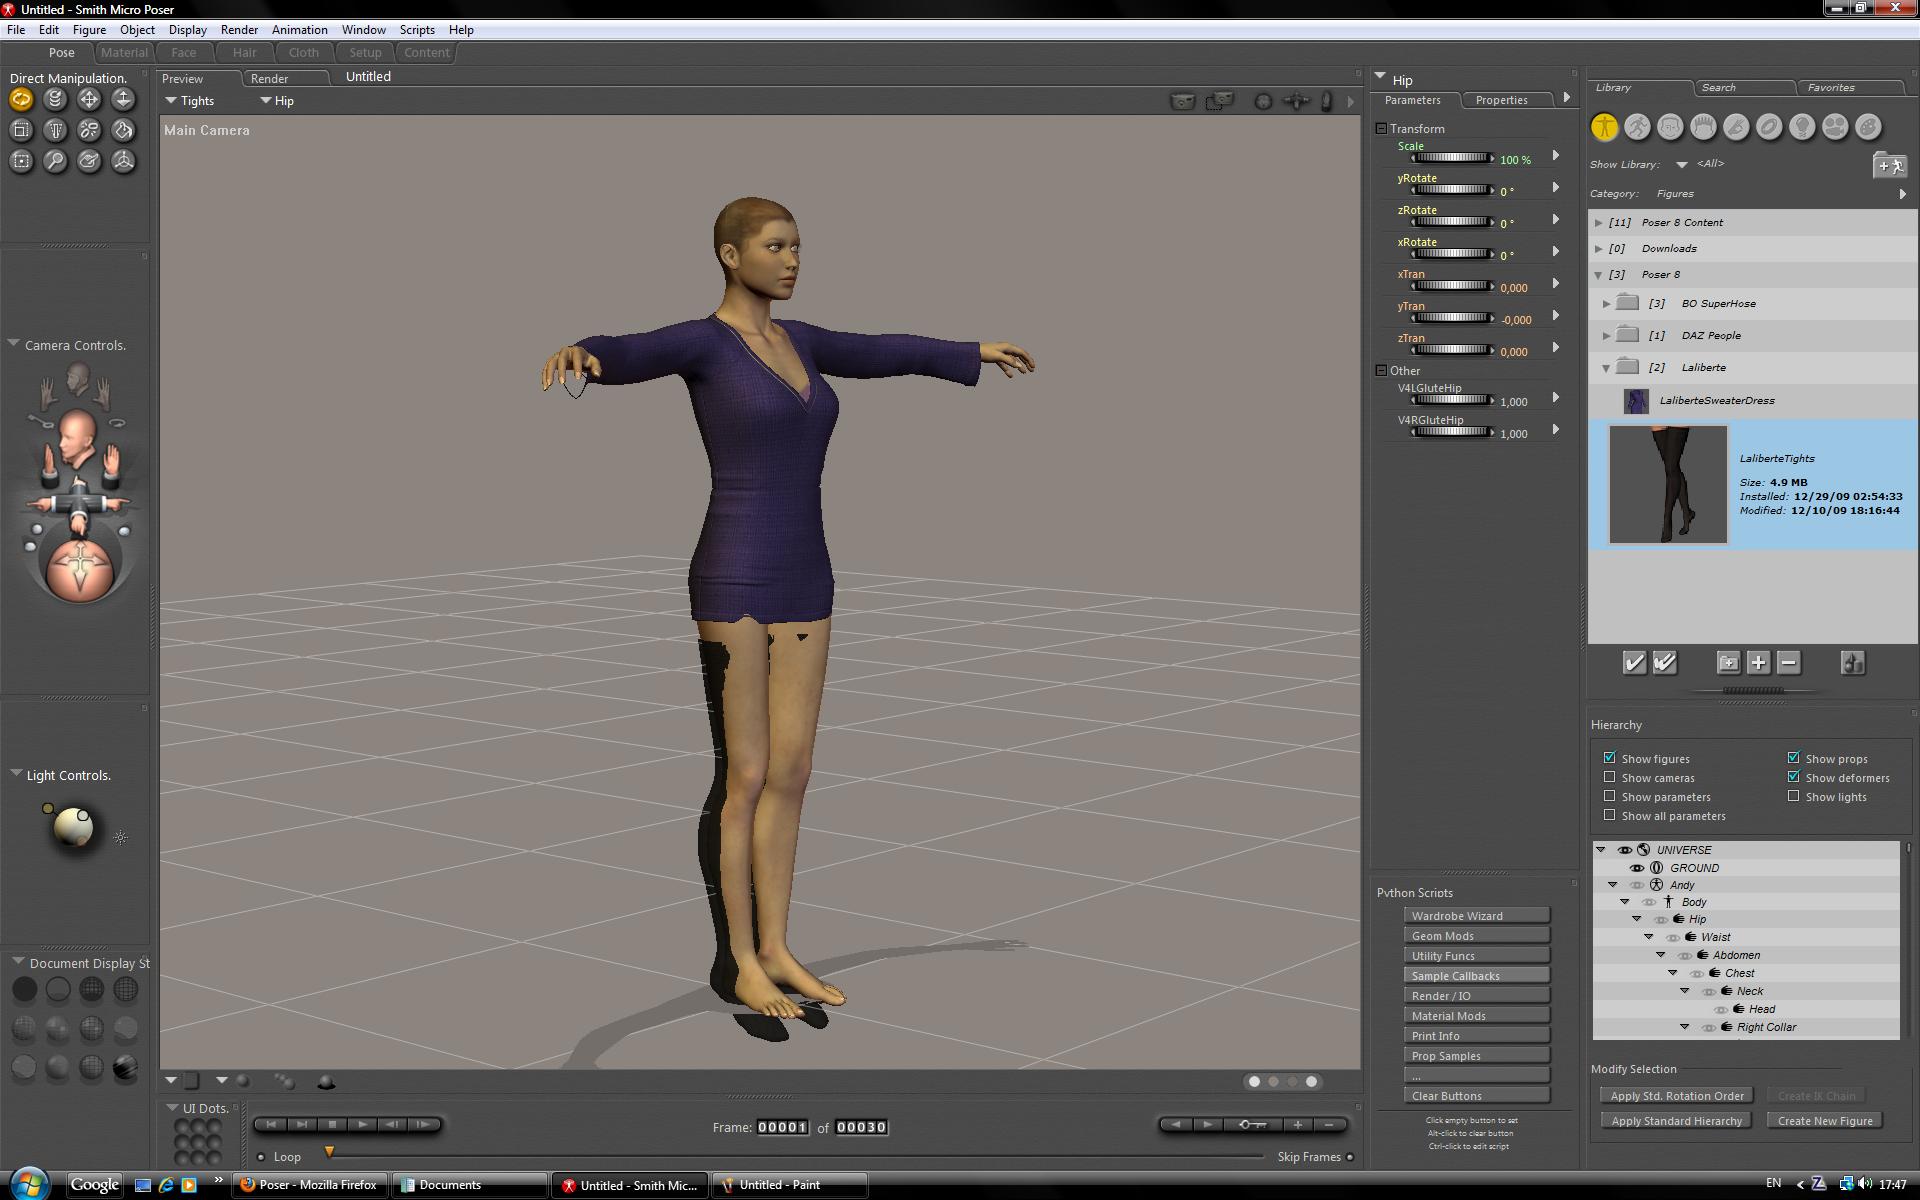
Hello allI bought Poser 8 a few weeks ago and it is the very first time I used this program so, naturally, Im having some difficulties . Im using Victoria 4.2 base free. I bought a few add ons but they're not "working" for me. Adding clothes to Victoria don't fit the figure. Is that because Im using the free version of Victoria 4.2 or is it because the add ons I bought are meant for Victoria 4? I apologise if this topic has been covered before I just didn't have time to read all the posts.
Thank you