Renderosity Forums / Poser - OFFICIAL
Welcome to the Poser - OFFICIAL Forum
Forum Coordinators: RedPhantom
Poser - OFFICIAL F.A.Q (Last Updated: 2025 Jan 07 11:07 am)

Subject: Pipeline Question: Rigging Non-Human Character in Poser Pro 2012

- 1
- 2

I would set up my bones manually in the set up room rather than rely on any kind of PHI automation. IK is established via the hierarchy editor, no need for anything else. It's easy; I set up IK on a 120 body part figure in very little time. You want your grouped mesh to be welded/unbroken in its final form and referenced in the .cr2 to the geometries folder. Broken meshes are a thing of the past and cause nothing but headaches for further customization. Even Posette is a welded mesh. Your final .obj should be clean and of your choosing; don't let Poser arbitrarily generate and reference your .obj for you. As far as Zbrush creating split meshes... I've never encountered that. In fact I'd say that it repects single mesh multi grouped meshes. I don't create my base models in Zbrush however but use it for morphing and displacements. I'm not sure how Blender handles groups (whether it breaks a multi grouped .obj into component seperate objects or not).
W10 Pro, HP Envy X360 Laptop, Intel Core i7-10510U, NVIDIA GeForce MX250, Intel UHD, 16 GB DDR4-2400 SDRAM, 1 TB PCIe NVMe M.2 SSD
Mudbox 2022, Adobe PS CC, Poser Pro 11.3, Blender 2.9, Wings3D 2.2.5
My Freestuff and Gallery at ShareCG
Nice model BTW.
W10 Pro, HP Envy X360 Laptop, Intel Core i7-10510U, NVIDIA GeForce MX250, Intel UHD, 16 GB DDR4-2400 SDRAM, 1 TB PCIe NVMe M.2 SSD
Mudbox 2022, Adobe PS CC, Poser Pro 11.3, Blender 2.9, Wings3D 2.2.5
My Freestuff and Gallery at ShareCG
Thanks Donnena. Poser newbie asking advanced questions - uh oh! ;D
Ah, thank you EldritchCellar! So the pipeline I was looking at really isn't relevant anymore. Your input is so reassuring. So far, the only time I have only seen ZB export obj's with polygroups suddenly split into separate objects was when I've imported said obj into Blender. In the ZBrush to Poser tutorial the instructor mentions that that can happen, and it can also reorder verts when creating morphs, so maybe it will be nice to have UV Mapper just in case. Even if I may never need it.
So you would recommend that I export a solid obj with no groups from ZBrush, and create body parts, name and order them all in Poser? I have used GoZ to export to Poser once before, I don't remember anymore if it brought over my groups or if I had them on the model. If I don't have to do that though, then it doesn't matter, does it? :)
Thanks for your compliment.
I group in a modeler. Wings3d, it's a little complicated to explain because I manually re-edit g and usemtl lines in the .obj file to arrive at my final grouped mesh. Whatever you do, do not attempt grouping your mesh in Poser. A workaround to Poser's crappy grouping polygon selections is to assign all of your proposed body part groups as material regions in a modeler, thus not splitting the mesh, opening the .obj in a text editor and changing the line usemtl to g. You'll then have a solid mesh with groups. You'll have to set up materials after the fact. There's many ways of doing this. There's no one decisive workflow, and there's a lot more to figure creation than just grouping and rigging. Not to discourage you but if you are new to Poser and not familiar with .cr2 internals, erc, joint parameters, weight mapping, etc. you have a long road ahead of you... especially for a figure such as you propose.
W10 Pro, HP Envy X360 Laptop, Intel Core i7-10510U, NVIDIA GeForce MX250, Intel UHD, 16 GB DDR4-2400 SDRAM, 1 TB PCIe NVMe M.2 SSD
Mudbox 2022, Adobe PS CC, Poser Pro 11.3, Blender 2.9, Wings3D 2.2.5
My Freestuff and Gallery at ShareCG
It's truly beyond the scope of my time to explain step by step how to go about creating your figure but I'll attempt to lend help as you run into obstacles if you post your problems here as they arise, and it's within the scope of my knowledge. Lol. Your model is very ambitious for a first figure, just be forewarned. Wings... yikes.
W10 Pro, HP Envy X360 Laptop, Intel Core i7-10510U, NVIDIA GeForce MX250, Intel UHD, 16 GB DDR4-2400 SDRAM, 1 TB PCIe NVMe M.2 SSD
Mudbox 2022, Adobe PS CC, Poser Pro 11.3, Blender 2.9, Wings3D 2.2.5
My Freestuff and Gallery at ShareCG

Nice model What EC said in terms of pipeline.
If you haven't done this before, I recommend Darkedge Design's videos on RDNA. I think they're currently on sale. They might give you some hints in places where you might get stuck.
I use Modo for model grouping after ZBrush, but if you don't already have it, there are other tools which are much less costly.
-K
@ EldritchCellar: Thanks for your thorough and clear explanations, and your willingness to guide me through obstacles.
@ Kerwin: Yes! :) I actually bought all three of Darkedge's tutorials. The "Redux," and another one for rigging non-humans in which he uses the PHI Heirarchy Builder, and "ZBrush to Poser" which is where he really goes into how to group the model - but he's using Max. They're awesome tuts and I've been watching and re-watching to try and grasp the general idea and despite some missing pieces in my toolbox, and for the most part it makes sense. That's why I brought up PHI heirarchy builder since that's what he used. Ray (Darkedge) also mentions UV Mapper Pro for, mainly, re-ordering verts on welded and modified versions of the obj in case the verts get arbitrarily re-named by whatever application - such as ZB. (UV's I haven't touched with a 60 foot pole as far as Poser goes, and that's going to come next, but I did make some in ZB today. Can't see any seams so I'm happy. Big map tho - it's resolution is 8192, and have no idea if that'll work yet.)
I have no doubt that this is a big project. I know I will need to clean up the weighting once I get the groups and IK into Poser, and at least that's concept I'm actually pretty comfortable with. I've rigged and weighted in Blender and gotten pretty savvy with it over there. I've watched videos of how it's done in Poser 2012, with the two kinds of weighting. As an artist, I can't wait to get to that... It's figuring out the ideal pipeline for me that's been the biggest struggle. But as long as there's a way where I don't have to code, lol.
So okay, it's looking like I was more or less on the right track, overall. I'm glad that it seems we're all on the same page about what my goals are, and what means I'm working with. ...Again, I can't express how much I appreciate the tips you have been able to give. It's helping me feel like I'm not flying blind, since it's all theory to me right now.
So, the immediate obstacle is still grouping and so my questions are: What modelers out there are confirmed to work as far as naming and making groups for Poser? Modo looks good, if expensive, but there's a free 30 day trial. Kerwin, do you happen know if Blender might work?
Sorry if I missed something and I'm backtracking, but just want to be totally sure: What if I didn't' actually -need- another application? Is it possible to get a ZBrush obj to export my polygroups as un-welded parts, then still weld them in UV Mapper. Can I name them there?
I wouldn't recommend Modo just for grouping. Way too expensive these days. Modo is a fine design tool for SDS work and a handful of other things, but if you do not already have it, then it probably isn't a good starting point. Tony (above) recommends Blender--I'd give that a try (notes here: https://www.renderosity.com/mod/forumpro/?thread_id=2888830). Wings and Silo are also well liked but I can't speak to the polygon tagging capabilities. I haven't used UVMapper Pro in a long time, but I think you can do you naming in it as well.
The main trick is that in general there are two kinds of polygon tagging going on in a poser .obj file. One kind of tag identifies which materials are used to color the polygons. The other kind of tag is used to identify which polygons stick to which bones. It is also vitally important that the bone tags get names so that the name of the bone is the same as the name of the group of polygons.
.obj files are fundamentally text files in their native format. You can edit them with Notepad++ (recommended, free.) Polygon groups are named by the "g" (for group) tag. The "usemtl" tag will identify the material or texture to be used. These tags can be manipulated by hand if needed. There are some tuts on .obj files on the web, but I'd consider this a last resort.
Cheers! -K
Wings, zbrush, modo user here. Can't comment on blender as I don't care for a slavish reliance on keystrokes in apps. Maybe that's changed, I haven't played with it in close to a decade. The UI never really bothered me like it does most though. Blender seems to draw a certain type of cultist attitude that I find bizarre, otherwise I understand it to be comparable to any other fully featured 3d solution. Obviously it comes down to the abilities and goals of the end user.
W10 Pro, HP Envy X360 Laptop, Intel Core i7-10510U, NVIDIA GeForce MX250, Intel UHD, 16 GB DDR4-2400 SDRAM, 1 TB PCIe NVMe M.2 SSD
Mudbox 2022, Adobe PS CC, Poser Pro 11.3, Blender 2.9, Wings3D 2.2.5
My Freestuff and Gallery at ShareCG
.obj files I find to be incredibly easy to edit. But, I've been fiddling around with them for a while simply because of Wings weird way that it handles materials and groups, writes such, and perhaps being a long time mac user has made me comfortable not relying on windows only utilities to edit Poser related files. Necessity and whatnot.
W10 Pro, HP Envy X360 Laptop, Intel Core i7-10510U, NVIDIA GeForce MX250, Intel UHD, 16 GB DDR4-2400 SDRAM, 1 TB PCIe NVMe M.2 SSD
Mudbox 2022, Adobe PS CC, Poser Pro 11.3, Blender 2.9, Wings3D 2.2.5
My Freestuff and Gallery at ShareCG

Hi, The assignment of groups for the bones that you will add in the Poser Setup room can easily be done in Blender. I am assuming that you know your way around the Blender interface and can navigate in the 3D window. There are probably other ways of doing this process. My method is a bit tedious, but it works for me.
- First, I define each group (i.e. such as the chest region) as a material by selecting all the polygons in the 3D viewpoint that I want to correspond to the chest and then assign it to a material (which I create in the properties tab under materials and label as chest).
- I define each group down the centerline (i.e. head, neck, chest, abdomen, hips, tail01, etc….) as separate materials.
- I then work only on the left or right side of figure with respect to the limbs (assuming that it has a bilateral plane of symmetry) and assign the groups that I want to create as materials. Therefore, working on the right side, I would assign the following groups as separate materials: rShoulder, rArm, rForearm, etc… Note that for the symmetry command to work in Poser you need to use a lowercase “r” and “l”.
- I then go about splitting the mesh into parts by using the material selection and then the ‘P’ command. So for the chest, I select all of its polygons by using its material to select them. Then in the 3D viewport, with the chest region selected, I push “p” and a small dialog window will come up with three choices. Pick the top choice, ‘by selection’. This will split the chest region away from the rest of the figure. If you defined a colored material for the chest, it will go back to white once it is separated from the rest of the figure. In the properties window, your 3D mesh dropdown list will now have an additional mesh. So if you named your original figure’s mesh “Dragon”, there will now be two entries (in addition to the default light and camera objects): “Dragon” and “Dragon.001”. Dragon.001 will correspond to the mesh that you just separated from the main figure. Rename “Dragon.001” to “Chest”.
- When you finish splitting the groups down the figure’s centerline, I make mirrored groups of the limb parts by doing the following. I still use the material property to pick the region that I want to split away from the mesh, but now I also use the “Select Mirror” command to separate the opposite side. Therefore, if you want to define your shoulder groups, I would pick the rShoulder area using the material that I had assigned to it. But then I would hit the spacebar and type in “Select Mirror”. This will highlight all the polygons that correspond to the lShoulder (making a perfectly mirrored copy). I then use the ‘p’ command, go into the list of 3D objects and rename the newly added mesh as “lShoulder”. I then go back, select the rShoulder by material and separate it from the main mesh.
- Once your entire figure has been split into separate meshes that correspond to groups that you will link to bones in the Poser setup room, you are ready to export the obj. file. Note that I delete the camera(s) and light(s) from the scene before exporting, otherwise you will have to select only the mesh objects that correspond to your figure for export.
- In the obj. export options, only three buttons should be active. These are “export UVs”, “Objects as OBJ groups”, and “Keep Vertex Order”.
After I export the Obj file, I check it in my modeler of choice (Note that in 3Dcoats the groups will be visible as separate entities but not labelled). Your individual group names should be obvious but you might have to edit them. If you don’t delete the material groups after splitting off the meshes from the figure in Blender, it adds on extra text to the mesh objects, such that “chest” becomes labelled as “chest_Dragon.001”. You will have to go back and edit these changes.
When you import the Obj into Poser, make sure that you have selected the Weld option. Don’t worry, you won’t lose your groups. With the Obj loaded into Poser you should be able to see your groups in the Setup room using the Group Editor.
I totally second EldritchCellar’s suggestion to avoid using the PHI editor. It won’t save you any time. The model will load in Poser with the bones in scattered orientation. You will have to spend more time in the JP editor sorting things out.
Good luck!
Well, considering the company present, and chks2033's generous offer, looks like you'll have all the help you'll need with the dragon figure there podcreature. I wish you good luck. Please update with your progress, I'm interested in seeing how it turns out. :)
W10 Pro, HP Envy X360 Laptop, Intel Core i7-10510U, NVIDIA GeForce MX250, Intel UHD, 16 GB DDR4-2400 SDRAM, 1 TB PCIe NVMe M.2 SSD
Mudbox 2022, Adobe PS CC, Poser Pro 11.3, Blender 2.9, Wings3D 2.2.5
My Freestuff and Gallery at ShareCG
_Do NOT use the "P" command to separate the groups.
=> ==> => What you are doing by separating the groups is creating double vertex at each weld. <= <= < = ALyson2 died because of that issue. (She has the double vertex at all her welds, a complete nightmare.)
Poser can read these files because Poser will reweld them at obj file import, but having double vertex at each weld is an absolute No-No and will bring you grey hairs further down the line..
_
Weld identical won't fix that issue tony?
W10 Pro, HP Envy X360 Laptop, Intel Core i7-10510U, NVIDIA GeForce MX250, Intel UHD, 16 GB DDR4-2400 SDRAM, 1 TB PCIe NVMe M.2 SSD
Mudbox 2022, Adobe PS CC, Poser Pro 11.3, Blender 2.9, Wings3D 2.2.5
My Freestuff and Gallery at ShareCG
I could see weld identical not being a viable option for an already established figure with specific vertex number/content dependant requirements but it should resolve any such issues where the maintained number is not necessary (unmorphed/basemesh for instance)?
W10 Pro, HP Envy X360 Laptop, Intel Core i7-10510U, NVIDIA GeForce MX250, Intel UHD, 16 GB DDR4-2400 SDRAM, 1 TB PCIe NVMe M.2 SSD
Mudbox 2022, Adobe PS CC, Poser Pro 11.3, Blender 2.9, Wings3D 2.2.5
My Freestuff and Gallery at ShareCG
I said number vilters, not order. Did you happen to read through my first post in this thread? Lol. Don't make me sic moriador on you. Lol. As far as "trying to make morphs", I think I did ok on the over 300 fbm/pbm on my last 2 figures. You wouldn't know that though I guess... you just willy nilly lecture whoever without any real conception of your own actual abilities. Poser Ambassador indeed. What a friggin' joke. He he.
W10 Pro, HP Envy X360 Laptop, Intel Core i7-10510U, NVIDIA GeForce MX250, Intel UHD, 16 GB DDR4-2400 SDRAM, 1 TB PCIe NVMe M.2 SSD
Mudbox 2022, Adobe PS CC, Poser Pro 11.3, Blender 2.9, Wings3D 2.2.5
My Freestuff and Gallery at ShareCG
The joke, if there ever was one, is that the "reweld unwelded groups at import" is one of the oldest bugs in Poser. But SM can not "fix" this bug because it wants to stay compatible with the old content. And unfortunately, the old content has lots of unwelded groups in them. The most widely known example being Posette-Dork.
Go over Posette-Dork or ALyson2 in a modeling app, and all double vertex start flying through the sky. And one does not have to be an ambassador to see that. LOL. (But not all apps show it either)
Then comes the fitting room, then comes the "how is it possible that clothing does not fit", then comes: "I get weld cracks". Then comes "props or clothing does not stay on".
Splitting groups is one of the things builders have to avoid at all cost. (As is loosing symmetry).
It is OK to split groups if that is where your workflow stops.
When my mike is repaired, I"ll upload a video on YouTube with the correct procedure to group object files , maintaining symmetry, and get all the tips and tricks sorted out. I had been planning to make a YouTube series for Poser11 and Poser11Pro, I might as well attack this one first.
Wow! Thanks everyone for all the info. Don't worry, I can't be given too much at this point. I'm glad to see that I seem to have options. @Kerwin: Yeah I was thinking the trial could serve for now, but why learn another program that I'm inevitably not going to buy? Might as well focus on the one's I'll be using in the end. Notepad++ ...noted. I'll grab it. So there don't happen to be any video tutorials on this subject? Hell, I'll be an art slave for some tutoring if anyone wants to show me how to navigate an obj in text format. I'm a very visual learner, and more creative than technical. It's why ZBrush is my comfort zone.
About welding changing the vertex order: In the tutorial by Darkedge, he copies the vertex order from the original, and imports it back to the modified and welded one. Or something like that. I need to re-watch. But yeah, I'd just be doing it for a base mesh at this point, though I'll be morphing later, my morphs -shouldn't- break things unless ZB has a brain fart. I've made quite a few morphs for fun on the legacy models just to experiment and only a couple times did ZB reorder verts. (I didn't modify topology, only sculpted, on all tests.)
@Cnolte: What a great walkthrough! Thank you, and as a Blender user, I'm extremely likely to try this out. I have to un-rust every time I navigate in Blender, but I'll catch on. I'll most likely come back to this and test it for myself once I share the next baby steps in progress I've taken with you guys. Since I've decided to experiment a little.
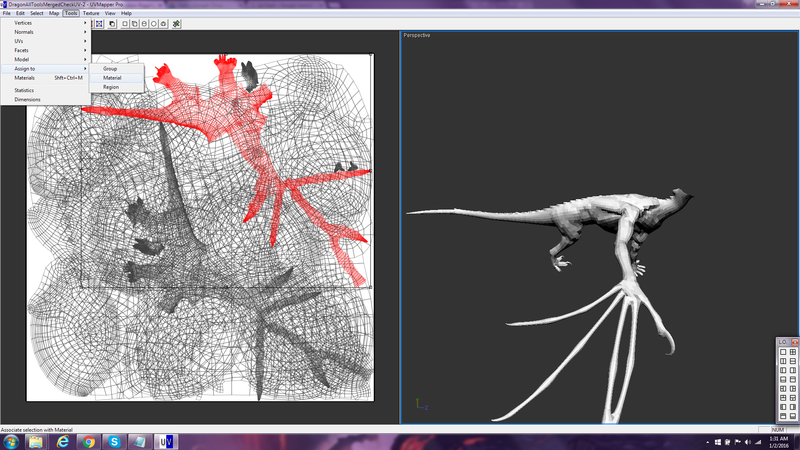
Ok, so I decided to just export my model from ZBrush grouped and bring it right into UV Mapper Pro to see what happens. It actually looks like this is on eof those times ZBrush didn't export the polygroups split up. Maybe only importing to Blender did that, I am not used to working with ZB and other applications. I selected all vertices and hit "weld" so hopefully that fixed anything that I might not have noticed. It reported 0 vertices welded, so there must have been nothing to fix. The UV's came over too so that's kinda neat. I mean they should but in my ignorance I always expect things not to work. I didn't know if ZB materials would make it over but they seem to have, which, I don't really need... I was kindof thinking of just keeping the texture and bump map, but thought I might add materials later. How do I keep the groups and get rid of the materials in UV Mapper? Or is that just a bad idea?
The groups were never given proper names. I don't think I can do that in ZBrush - Googled but found no answer yet. I can rename the parts in Poser though, right?
In UV Mapper: Group
Yeah you can rename your groups in poser. This will only propagate to a poser saved .obj file though. I tend to stay away from any in Poser modified .obj files, I don't like the variables and additional lines of Poser specific (useless IMO) whatnot that Poser adds.
Quick tip: take your .obj and change the extension .obj to .txt.
Open that file in a text editor.
Let's say you have a group named AB1 that you would like to rename abdomen.
Search/find with the text editor: g AB1
The text editor will locate the line g AB1
Change that line to g abdomen.
Save your file (always keep an unmodified backup though) as .obj or drop the .txt extension.
What you have just done is located the group AB1 and changed its name to abdomen. It's that simple.
W10 Pro, HP Envy X360 Laptop, Intel Core i7-10510U, NVIDIA GeForce MX250, Intel UHD, 16 GB DDR4-2400 SDRAM, 1 TB PCIe NVMe M.2 SSD
Mudbox 2022, Adobe PS CC, Poser Pro 11.3, Blender 2.9, Wings3D 2.2.5
My Freestuff and Gallery at ShareCG
.obj anatomy as relates to Poser:
#: a comment line. I usually sign and date my models with a comment line.
v lines: this indicates vertex coordinate positions, it's possible to create something called a squished morph with an .obj containing only these lines. Such a morph target will only move vertices to the indicated position and contains no facet data. It's a rather old school way of redistributing morphs without sharing the model itself.
vt lines: this will contain (in a basic sense) the models uv information.
vn lines: this is the normal data for the .obj, it's not required by Poser as poser establishes this during import.
f lines: here's the meat and potatoes of the .obj file. You'll find your g tags (groups) and usemtl tags (material regions) here. You'll see how the f lines are broken into sections defined by those 2 tags. Sometimes you'll also find a mtllib reference, this indicates a reference to a .mtl file if one such is generated by the app you created or saved the .obj out of.
That's the very basics of .obj. Hope that's a start.
W10 Pro, HP Envy X360 Laptop, Intel Core i7-10510U, NVIDIA GeForce MX250, Intel UHD, 16 GB DDR4-2400 SDRAM, 1 TB PCIe NVMe M.2 SSD
Mudbox 2022, Adobe PS CC, Poser Pro 11.3, Blender 2.9, Wings3D 2.2.5
My Freestuff and Gallery at ShareCG
The groups were never given proper names. I don't think I can do that in ZBrush - Googled but found no answer yet. I can rename the parts in Poser though, right?
IMHO You cannot rename the internal names of parts/group/materials easily in Poser. In particular, the group for a body part like "lForeArm" must match the internal bone name exactly. I'm pretty sure you can set the name on the dial, but the "internal name" is the name in the .obj file. That's why when you look at the properties for a body part, you see to fields called "Internal Name" and "Name". For your own sanity, I recommend you give groups meaningful names by renaming them after leaving Zbrush. (The ZB names are usually just numbered as Groupxxxxx where xxxxx is an internal number for ZBrush's purposes.)
This is something I do in Modo, but I'm pretty sure UV Mapper will let you rename the groups too. To do this in UV Mapper, use select by group (ctrl-G) and then use Tools -> Assign To -> Group. Type a meaningful name and UV Mapper will ask you if you want to create a new group. Do this for all your model's groups. You can set up you materials with the Tools -> Assign To -> Materials at the same time. By cleaning up the Zbruish model's names before rigging in Poser, you save yourself some pain in the long run.
If you're happy with the UV's, you can leave them as you have them in UV Mapper (and while your at it, generate a template for painting: File -> Save Template.)
HTH,
-K
"How do I keep the groups and get rid of the materials in UV Mapper?"
Open UVMapper (I only use classic, for creating templates and quick operations such as this. Otherwise it's buggy in regard to high poly/high # of groups models. I've had it omit polys from groups before. For templates and .obj chopping operations it works fine. I assume classic and pro have basically the same export options).
Open your .obj in UVMapper.
Go to file: export model. Uncheck Export: single group, usemtl.
Save your file. UVmapper will chop out the usemtl tags. You'll have a single material with an arbitrarily assigned color upon import to Poser. Preview. There's no way around this... your model would be invisible otherwise.
As far as doing this all within UVMapper pro without export? Dunno. Select: Material: Edit: Delete?
W10 Pro, HP Envy X360 Laptop, Intel Core i7-10510U, NVIDIA GeForce MX250, Intel UHD, 16 GB DDR4-2400 SDRAM, 1 TB PCIe NVMe M.2 SSD
Mudbox 2022, Adobe PS CC, Poser Pro 11.3, Blender 2.9, Wings3D 2.2.5
My Freestuff and Gallery at ShareCG
Crosspost Kerwin. And I defer since you use UVMapper pro. Guess I'm not much use in this discussion. Back to my thingies.... :)
W10 Pro, HP Envy X360 Laptop, Intel Core i7-10510U, NVIDIA GeForce MX250, Intel UHD, 16 GB DDR4-2400 SDRAM, 1 TB PCIe NVMe M.2 SSD
Mudbox 2022, Adobe PS CC, Poser Pro 11.3, Blender 2.9, Wings3D 2.2.5
My Freestuff and Gallery at ShareCG
EC, I wouldn't defer to me on anything. My brain turned to mush years ago. ;)
UV Mapper (Pro or otherwise) isn't my specialty. I keep it around, but I'm a Zbrush-Modo-Poser Pipeline (with occasional stops in things like UVLayout Pro, Quixel, xNormal,Photoshop, D3D's tools, and the like) and I can barely keep up with those. Between Modo's new MeshFusion tools and all the cool stuff in ZB4R7 (and R6 and R5 and R4) I can't remember half the stuff I did with shareware tools. UV Mapper is really in my bucket of tools that I used to use.
To delete all materials (as far as I can recall) you have to re save the model with "Don't Export Materials" checked. This is where I usually get out Notepad++ and check for myself that the "usermtl" tags are gone...
Yeah. I posted the workflow for that above, using classic. You got the gist though, save model with usemtl unchecked. Frankly the forums give me an ulcer (all of them in fact, not just rendo)... going on hiatus. I waste too much time blabbering to no profit when I should be working on my projects. Forum activities don't fit into my plans. Funny how the most interesting vendors/artists using Poser are never seen on the forums, for me all the interesting things stopped being discussed productively years ago. Meh. Anyway, you're an allright dude Kerwin. Nice having met you.
W10 Pro, HP Envy X360 Laptop, Intel Core i7-10510U, NVIDIA GeForce MX250, Intel UHD, 16 GB DDR4-2400 SDRAM, 1 TB PCIe NVMe M.2 SSD
Mudbox 2022, Adobe PS CC, Poser Pro 11.3, Blender 2.9, Wings3D 2.2.5
My Freestuff and Gallery at ShareCG
EldritchCellar posted at 10:52PM Thu, 31 December 2015 - #4246662
Yeah you can rename your groups in poser. This will only propagate to a poser saved .obj file though. I tend to stay away from any in Poser modified .obj files, I don't like the variables and additional lines of Poser specific (useless IMO) whatnot that Poser adds.
Quick tip: take your .obj and change the extension .obj to .txt.
Open that file in a text editor.
Let's say you have a group named AB1 that you would like to rename abdomen.
Search/find with the text editor: g AB1
The text editor will locate the line g AB1
Change that line to g abdomen.
Save your file (always keep an unmodified backup though) as .obj or drop the .txt extension.
What you have just done is located the group AB1 and changed its name to abdomen. It's that simple.
That does sound incredibly simple! Thanks Eldritch! Since I already have it open in UV Mapper, I tried Kerwin's method and the option to assign to group was grayed out. I can select the group, but can't assign it to a group again for some reason. So, for now, I think that changing the name in text file will work, and I can refer to the model in UV Mapper to see what group is what since I could never remember what they are as currently named, haha.
So, I'll export without materials, keep this version open for reference, and start re-naming the groups in the version I exported. Unless I have no real need to wipe the materials? Will it save me time? Will it actually show up in Poser with the texture maps and stuff I've assigned? It didn't long ago when I used GoZ. I'm just paranoid and don't trust ZBrush. When maps are always flipped, things like that... Figured to keep a clean slate and manually add on textures and materials after I got a rigged model.
It's actually great to have two or more people saying the same thing though because, in my newbishness, I tend not to budge on something unless I know EXACTLY what is going on and I don't like to assume I understood someone until I heard it said twice and both descriptions seem to mean the same thing. So, for me, it's super helpful. I'm also getting multiple options which is nice when balancing time saving methods with solid backup plans.
Eldritch, I actually love the way you explain things, you and Kerwin both are helping me understand this software so much better. But definitely, I don't break your back or lose any sleep over it. :) I totally understand where you're coming from. You've set me off in the right direction.
I will try to apply what I learned and update soon.
Weird!
So, before I got on with trying to get my dragon into Poser, I had to go back and get all the other body parts and merge them while retaining their VUs. (Eyeballs, jaws, eyelids, claws, etc.) It kept the UV's but the textures are no longer assigned to the tools. I think that's fine, because the UVs are there and I can export the textures from the un-merged versions and maybe re-assign them?
In case the "merged tools to one obj" version had reordered verts, breaking the textures from fitting the UV's, I have also exported the individual tools as obj, with their UV's , textures, and verts in the order the textures "know." That way I can hopefully copy and apply them to the merged versions in UV Mapper...? Not really all that much extra work, but maybe not necessary...
So, OKAY, that's not even the problem I'm having, lol. What went down is, I brought the merged model into UV Mapper just to check if the UV's did in-fact survive, (since I couldn't check seams in ZB this time I merged, for whatever reason) and, yes they did make it, but the odd thing is... this time in UV Mapper, I CAN re-name the groups, it's not grayed out. Another behavior has also changed. When I select a group everything else disappears. Maybe it's in some different viewing mode, idk, since it's not showing me selected verts as highlighted like before. I selected everything and welded all vertices. It reported 0 verts removed, so I guess there was no duplicates, and it's an intact object?

Sorry for tripple posting! Okay... I think I was just on "select by facet" mode before... I switched to "select by vertex" and it looks like before. Such a newb! Still, my only question at this point is, why can I assign new groups now, when before I couldn't? What was broken with that other obj, if anything? Or did I just hit a wrong button last time right after importing? Oh well. I'll update again soon if I get really stuck.
Pod,
You on the right path. In the parlance of .obj files, groups and materials generally make sense only as facets (faces) in Poser. (.obj is not a very modern format.) When you make a selection in UV Mapper, it will only show that selection and hide the rest. Just use "Select All" (ctrl-A) to make the whole model re-appear.
Since you are using multiple UV maps on the same model (which is common with poser figures) you will definitely want to also create selections of the pieces that belong to each UV map and assign a unique material to each. This will allow you to apply the separate UV maps later in Poser's material room.
-K

cnolte posted at 10:53PM Fri, 01 January 2016 - #4246425
I totally second EldritchCellar’s suggestion to avoid using the PHI editor. It won’t save you any time. The model will load in Poser with the bones in scattered orientation. You will have to spend more time in the JP editor sorting things out.
Good luck!
I don't believe that's a logical reason why not to use PHI Editor. You are going to have to create bones one way or another, if you create them inside of Poser then you are left with naming them correctly and then creating your hierarchy after that...the naming and hierarchy is done for you with PHI Editor. Yes, you have to manually place the bones inside of Poser but using orthographic view ports this usually takes me 5-15 minutes depending on the skeletal structure.
Comitted to excellence through art.
kerwin posted at 2:22AM Sat, 02 January 2016 - #4246816
Since you are using multiple UV maps on the same model (which is common with poser figures) you will definitely want to also create selections of the pieces that belong to each UV map and assign a unique material to each. This will allow you to apply the separate UV maps later in Poser's material room.
-K
I see, I looked and there's the same default material assigned to each of the UV's. So, you are saying I should create a unique new material for each pretty much the same way I created a name for each polygroup?
I don't have to actually get/fabricate an actual material that's going to appear there right now, just make sure it is named separately so Poser recognizes that something can be assigned there later? Sorry for being so simplistic. lol
@DarkEdge: Hey, thanks for the input! Someone else was telling me I really should at least see for myself how PHI fits into the workflow, and really, I don't know much about Poser's interface, and your tut gives me a very good visual step-by-step to follow with Phi, so I was probably going to just try it for myself before dismissing.
So... I just spent many many many hours naming groups in UV Mapper, lol... - largely, to be blamed on the sheer number of parts this model has, I suspect - but, would the naming have been simpler in PHI? Less clicking on a model and navigating around a 3D viewer anyway?
Either way, headed to PHI next just so I can keep following along with the tutorial. Since I don't know Poser's interface really at all yet. Just know from messing around that I like the way I can interact with my models in there when posing and such.
DarkEdge posted at 8:32AM Sat, 02 January 2016 - #4246888
I tend to name my Groupings and Materials inside of my modeling program. The only thing I use UVMapper for anymore is to add a Grouping and/or Material to an existing obj file.
Yeah, that was the only step in the series that threw me off, and that's not criticism or anything, I just didn't know what program I should use myself, or if I could go ahead and make groups in ZB without adding any more programs to the pipeline... for me it's easier (cheaper) to just use UV Mapper or something free. The main reason I came here was to figure out the simplest way to name groups and without spending money.
...And I can report that I was able to follow the rest of your monster rigging tutorial and actually got this dragon into Poser with body parts! Woo!!! PHI builder was a breeze to use. Fortunately I'm a neat-freak with names in general, so my hierarchies didn't need too much cleaning actually.
I don't think my obj was perfectly centered, though, since the weights aren't symmetrical. I'm going to see if I can fix and start over in PHI. Not sure what happened there.
I screenshotted what I mean. I feel like a dork!
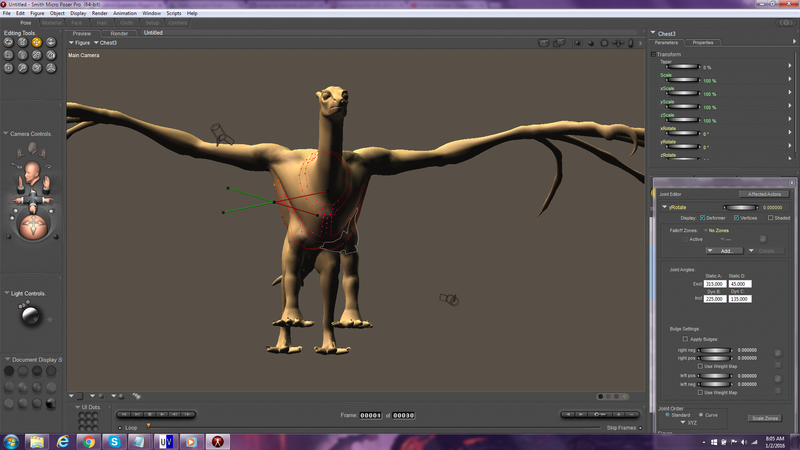
To set materials in UV Layout Pro, you use the selection tools to isolate the polygons and then use Tools -> Assign To -> Material command. Just keep in mind that "groups" and "materials" are different (and overlapping) selections of polygons. "Groups" are what connect polygons to bones; "Materials" are what connect textures to polygons. It's easy to get confused the first time you rig a model.
Glad that the PHI technique works for you. I didn't originally recommend it because it's a somewhat non-visual technique, but as DarkEdge points out, it is a big time save when you have lots of bones and saves all the worry about matching names to bones if you use a tool to make your PHI file.
Just to chime in, I've never used PHI myself. Always kind of seemed that automations like that just leave you with a lot of loose ends to clean up... this fellow I made a while back has 120 some odd bones that I just named and added manually, plus I'm just really starting with figure creation so I feel doing most things manually (erc, rigging, file editing) is a good discipline. I'm an archaic mac user/aficionado so I'm not even certain that PHI would be an option for me at this time, I am going to get myself a beefy windows workstation in a while though so maybe I should look into PHI again. It'll be nice to have some of the windows specific tools that make Poser content creation easier...

W10 Pro, HP Envy X360 Laptop, Intel Core i7-10510U, NVIDIA GeForce MX250, Intel UHD, 16 GB DDR4-2400 SDRAM, 1 TB PCIe NVMe M.2 SSD
Mudbox 2022, Adobe PS CC, Poser Pro 11.3, Blender 2.9, Wings3D 2.2.5
My Freestuff and Gallery at ShareCG
At this point in my content creation plans, I hope to manage to release at least 1 free figure or expansion every couple months. I work 12 hour (usually) days as a construction worker so I think the fact that I've managed to share 3 figures (not goldy the robot) in the past 3 months (plus win a couple of contests) indicates my dedication to this. I look to guys like Sixus1 for inspiration and to keep my goals in mind, the amount of free figures he's given to the community boggles the mind. I can only hope to have done a fraction of what he's achieved over the next few years. Sorry for the OT, but just being conversational and giving a little personal bio. This is about the only personally interesting thread happening on any of the store forums, it's all arguments over other people's dolls mostly or complaints about software crashing. Back to lurking.
W10 Pro, HP Envy X360 Laptop, Intel Core i7-10510U, NVIDIA GeForce MX250, Intel UHD, 16 GB DDR4-2400 SDRAM, 1 TB PCIe NVMe M.2 SSD
Mudbox 2022, Adobe PS CC, Poser Pro 11.3, Blender 2.9, Wings3D 2.2.5
My Freestuff and Gallery at ShareCG
I've used both methods (PHI and Setup Room) with equal success. The big advantage of the PHI method is when you have a tool like PhilC's hierarchy builder (or one of the others) it reads and matches all the bones from your .obj, avoiding typos. You can then also set up rotations and IK chains in a tree view and inspect it before creating bones. Since I touch every single joint several times in the joint editor to setup bends and blends, it doesn't matter to me the bones are all linked up head to tail on the first go--I just fix up my bone pointing as I go. (The align button in the Joint pallet is a go-to as I'm fixing things up.)
Manual bone setup works well (the setup room has been quite stable for me these days) and it's visual. It also allows you easily borrow rigs from other models which is a handy time saver for conforming items.
With beginners, I usually tell them to do it by hand in setup room because they can see what their doing more intuitively. However, when repeatedly fudging with geometry and such, I like to avoid all the bone name typing that a PHI building tool saves me.
On a Mac, I used to run Parallels or VMware fusion just so I run a number of Poser tools like Easypose, D3D's collection, etc. (I converted to PC's about six years ago.)
Cheers!
-K
"Yes, you have to manually place the bones inside of Poser but using orthographic view ports this usually takes me 5-15 minutes depending on the skeletal structure."
Well you make mostly vehicals though Darkedge. Nice ones. But that's all I've seen... I'm not a very informed content buyer/consumer though. I think I have your asian style bridge freebie from years ago. I think you pretty much went straight to vendoring hard edge stuff at RDNA after you spent some time asking technical questions here back in the day IIRC. I remember being snobbishly lectured by you years ago. Lol. All respect of course. :)
W10 Pro, HP Envy X360 Laptop, Intel Core i7-10510U, NVIDIA GeForce MX250, Intel UHD, 16 GB DDR4-2400 SDRAM, 1 TB PCIe NVMe M.2 SSD
Mudbox 2022, Adobe PS CC, Poser Pro 11.3, Blender 2.9, Wings3D 2.2.5
My Freestuff and Gallery at ShareCG
When I say archaic mac I mean pre intel, parallels aren't an option. But it's moot, I'll be joining the throng shortly enough. For right now I can make my humble creations with the tools I have. People seem to like them regardless of the masterful avant garde whatsits attitudes. I'll try looking about for some of your things Kerwin, I've only managed to find some posts on the Daz forum but I know you've been kicking around the community for a long time.
W10 Pro, HP Envy X360 Laptop, Intel Core i7-10510U, NVIDIA GeForce MX250, Intel UHD, 16 GB DDR4-2400 SDRAM, 1 TB PCIe NVMe M.2 SSD
Mudbox 2022, Adobe PS CC, Poser Pro 11.3, Blender 2.9, Wings3D 2.2.5
My Freestuff and Gallery at ShareCG
No disrespect was meant towards you Eldritch, so sorry if I came across that way. I am much more successful communicating in person (or as in my videos), posting on forums is difficult for me and usually comes across wrong. I just finished rigging a WWII Corsair, it has 50 bones in total for all of the flaps, elevators, joystick, etc. Hierarchy was a bitch but through good naming techniques and PHI I was able to pull it together. Again, everyone/anyone should use what works for them! :)
Comitted to excellence through art.
I don't publish any of my Poser work. I was a DAZ PA at one time and it was a terrible experience--one I don't intend on repeating. I've been a Poser user since V2 and ZBrush since V1.5. I didn't start making my own figures until shortly after B L Render's book was published. These days I teach sculpting (both digital and traditional) in the gaming industry and for a few private students.
-K
That's cool. Thanks for the background. I come from a traditional art background myself; just a BFA: Sculpture. I've been a production artist at Heath Ceramics in the bay area california and have messed with gallery contracts for my ceramic sculpture/slip cast or hand built work. Totally self taught digital art. Living on the east coast now, working for a maverick private contractor. My obsession for digital art keeps me out of trouble in the RW. I've recently called a moratorium on using any pre made content in my art... so kinda puts me at odds with the whole forum going experience. Not that I have anything against that Poser peculiarity, it just doesn't feel right using other peoples models for art making anymore. Still don't have the heart to dump my giant runtimes full of ephemera I'll never use though. I like collecting figures mostly like some collect comics I guess, look at it and put it away. I'm sure there's a great many Poser users like myself, you just don't find them talking too much. Overall I'd say my interaction experiences on the forums have have been the most unsatisfying I've ever encountered in the art world. Love the software, the community is deeply troubled. Shrugs.
W10 Pro, HP Envy X360 Laptop, Intel Core i7-10510U, NVIDIA GeForce MX250, Intel UHD, 16 GB DDR4-2400 SDRAM, 1 TB PCIe NVMe M.2 SSD
Mudbox 2022, Adobe PS CC, Poser Pro 11.3, Blender 2.9, Wings3D 2.2.5
My Freestuff and Gallery at ShareCG
- 1
- 2
Privacy Notice
This site uses cookies to deliver the best experience. Our own cookies make user accounts and other features possible. Third-party cookies are used to display relevant ads and to analyze how Renderosity is used. By using our site, you acknowledge that you have read and understood our Terms of Service, including our Cookie Policy and our Privacy Policy.
Before I state my problem, and ask my question, I will share what software I am using/can get.
I use ZBrush pretty fluently now. So far I've done all my sculpting, posing and rendering there. I've poly-grouped, textured, UV'd, retopologized, and other things.
I also have at my disposal: Blender, Poser Pro 2012, PHI Heirarchy Builder (as I understand it, it's to create IK chains and establish best hierarchy for Poser), and UV Mapper Pro (mainly to reorder vertices and weld seams if ZBrush splits up all the groups or decides to rename verts.)
I can not get: Any software that costs a lot of money. I don't have student access to any pay-for programs at this time.
What I am trying to do: Rig a dragon I created in ZBrush 4r6 in Poser Pro 2012. Model Texture Model Topology
What is my problem? As it relates to getting my .obj grouped in a way that UV Mapper Pro and/or PHI Heirarchy builder will be able to recognize, I want to know if I need another software to do that. I want to make sure I'm not missing a link in my pipeline and hope to get some advice if there's a best way. There's not a lot of info out there, and I am wondering if I am looking at obsolete methods too.
In other words; Can I polygroup all the parts of my character in ZBrush, and export it to obj, fix the un-welded seams in UV Mapper Pro, import that to PHI Builder, and have that work?
Or do I need to make the groups in Blender or another application? Anyone have a software they'd like to recommend for grouping?
The video tutorial I bought shows the poly-groups being made, and named, in Max. Unfortunately, I don't have it.
A final question. Is the heirarchy thing even necessary? Wasn't it Poser Pro 2012, in which they introduce weight painting? Can Ik/heirarchy be controlled or set directly in Poser with a basic .obj?
I have some steps in mind to test, but I would greatly appreciate some advice before I pick a path and potentially waste a bunch of time and energy.!