Renderosity Forums / Poser - OFFICIAL
Welcome to the Poser - OFFICIAL Forum
Forum Coordinators: RedPhantom
Poser - OFFICIAL F.A.Q (Last Updated: 2025 Jan 03 8:14 am)

Subject: Hair room / skullcap experiments

I should also add that in render settings, I was using Sinc 1 and a .2 minimum shading rate. I'm now testing lowering the MSR only on the skullcap and render settings and seeing what happens.
It may also be that another post filter type will result in less artifacts than Sinc 1.
______________
Hardware: AMD Ryzen 9 3900X/MSI MAG570 Tomahawk X570/Zotac Geforce GTX 1650 Super 4GB/32GB OLOy RAM
Software: Windows 10 Professional/Poser Pro 11/Photoshop/Postworkshop 3

Of course, they might also go away altogether if I crank Irradiance Caching. But at the moment I'm aiming for something usable for medium quality renders.
______________
Hardware: AMD Ryzen 9 3900X/MSI MAG570 Tomahawk X570/Zotac Geforce GTX 1650 Super 4GB/32GB OLOy RAM
Software: Windows 10 Professional/Poser Pro 11/Photoshop/Postworkshop 3

______________
Hardware: AMD Ryzen 9 3900X/MSI MAG570 Tomahawk X570/Zotac Geforce GTX 1650 Super 4GB/32GB OLOy RAM
Software: Windows 10 Professional/Poser Pro 11/Photoshop/Postworkshop 3
My suspicion about Gaussian being less jarring with artifacts than Sinc turned out to be largely unfounded. The resulting area render looked like the artifacts were arguably slightly less defined, but minimally so at the very best. (That with both render settings having Irradiance at 24.)
Am doing further experiments with shutting off IC altogether—which of course slows rendering to a crawl—as well as softening my shadows further. (Currently the shadows on the lights are set at 2.9.)
______________
Hardware: AMD Ryzen 9 3900X/MSI MAG570 Tomahawk X570/Zotac Geforce GTX 1650 Super 4GB/32GB OLOy RAM
Software: Windows 10 Professional/Poser Pro 11/Photoshop/Postworkshop 3

______________
Hardware: AMD Ryzen 9 3900X/MSI MAG570 Tomahawk X570/Zotac Geforce GTX 1650 Super 4GB/32GB OLOy RAM
Software: Windows 10 Professional/Poser Pro 11/Photoshop/Postworkshop 3

______________
Hardware: AMD Ryzen 9 3900X/MSI MAG570 Tomahawk X570/Zotac Geforce GTX 1650 Super 4GB/32GB OLOy RAM
Software: Windows 10 Professional/Poser Pro 11/Photoshop/Postworkshop 3

sorry to interrupt, but I don't understand what you're doing. Things that popped up my mind when reading:
- skull caps are meant to remain invisible
- filter: sinc is sharper than gaussian (see the manual)
- filter: 1 means NO filter, 2 means soft (female skin), 3 means crisp (hair and male skin) and 4 is too much for about everything
- min shading rate .2 means at most 1/.2=5 subpolys per render pixel. It mainly affects displacement sharpness and texturemap subsampling. Lower is sharper. The value should stay in sync with Pixel Samples.
- IDL splotches are the result of a too small amount of rays at a too high intensity. Irr cache rebalances these at the cost of render time. Use 80 for final, 40 for draft. IDL Quality supports that without the rendertime penalty. Keep that at 80 or so.
- Increasing the size of the IDL light sources in the scene (and reducing their strength) might be an option as well. Usually, having lightsources with Ambient > 2 is an indicator for blotches coming up.
- the working of Direct-Light Blur Radius depends on the kind of shadow (raytraced / mapped) and the kind of light (infinite or point/spot). Your 8.5 sounds low for spotlight, to me.
For raytraced shadows, it's adviced to keep the blur-radius : shadow sample ratio on 1 : 10, so your 8.5 requires a 80-100 samples value.
Perhaps this is a bit of help, questions welcome. Poser lighting and rendering is a horror story, but not a bad one... Please give us your lighting rig to help you with specific issues.
And yes... your last result looks pretty cool indeed. Compliments.
- - - - -
Usually I'm wrong. But to be effective and efficient, I don't need to be correct or accurate.
visit www.aRtBeeWeb.nl (works) or Missing Manuals (tutorials & reviews) - both need an update though
Thanks for the tips, but I think you're missing a lot of the point, which in part is that the skullcap actually should not be Visible unchecked if you want best results. Checking it does introduce other issues, but it also makes the overall rendering of the hair close to the root more believable and requiring less density.
______________
Hardware: AMD Ryzen 9 3900X/MSI MAG570 Tomahawk X570/Zotac Geforce GTX 1650 Super 4GB/32GB OLOy RAM
Software: Windows 10 Professional/Poser Pro 11/Photoshop/Postworkshop 3
Also, leaving the skullcap invisible means that the roots of the hair do not leave proper shadows, at least in my test.
______________
Hardware: AMD Ryzen 9 3900X/MSI MAG570 Tomahawk X570/Zotac Geforce GTX 1650 Super 4GB/32GB OLOy RAM
Software: Windows 10 Professional/Poser Pro 11/Photoshop/Postworkshop 3
Okay, we're just struggling with you...
Actually, I've observed Poser to have rendering issues when two surfaces coincide exactly. Therefor: is the skullcap over, coinciding or slightly under the skull/skin? I usually do the latter you know, just shrink it 1mm and it becomes invisible whatever the settings, as the head itself is all over it...
Then: do you use (Custom_)Scatter for the head material?
I also assume for the moment that Shadow Bias settings do matter, as they calculate shadows somewhat away from the surface and then project the result upon that surface. Values are in user units, as set in prefs. Perhaps worthwhile to experiment with.
Useful info, anyway.
- - - - -
Usually I'm wrong. But to be effective and efficient, I don't need to be correct or accurate.
visit www.aRtBeeWeb.nl (works) or Missing Manuals (tutorials & reviews) - both need an update though
I try to get the skullcap to be as close to the surface as the head as possible, rather than under it. Under it would certainly be ideal in some respects, but it would create problems with collision, would it not? (Of course, this wouldn't matter if you're not going to run any dynamics simulations, but I presume that Hair Room hair is going to get dynamics treatment sooner or later.)
______________
Hardware: AMD Ryzen 9 3900X/MSI MAG570 Tomahawk X570/Zotac Geforce GTX 1650 Super 4GB/32GB OLOy RAM
Software: Windows 10 Professional/Poser Pro 11/Photoshop/Postworkshop 3

The hair itself needs a bit of tweaking in the back, as I have a little chunk of hair roots intersecting other hair. But overall, really liking how this turned out.
______________
Hardware: AMD Ryzen 9 3900X/MSI MAG570 Tomahawk X570/Zotac Geforce GTX 1650 Super 4GB/32GB OLOy RAM
Software: Windows 10 Professional/Poser Pro 11/Photoshop/Postworkshop 3

The result: the splotchiness is almost completely gone.
The problem of course is that you can't really distribute any such materials on the skullcap, because you don't know what the user is going to be doing with his character's skin.
______________
Hardware: AMD Ryzen 9 3900X/MSI MAG570 Tomahawk X570/Zotac Geforce GTX 1650 Super 4GB/32GB OLOy RAM
Software: Windows 10 Professional/Poser Pro 11/Photoshop/Postworkshop 3
Really curious if e.g. Bagginsbill can give an accounting for this as expected behaviour. As I noted, I expected Visibility off and full transparency would have been equivalent, but it's not even close.
______________
Hardware: AMD Ryzen 9 3900X/MSI MAG570 Tomahawk X570/Zotac Geforce GTX 1650 Super 4GB/32GB OLOy RAM
Software: Windows 10 Professional/Poser Pro 11/Photoshop/Postworkshop 3
just did some tests in a very splotchy IDL setup, and I cannot determine noticeable differences between 100% transparent and fully invisible. Of course, only unchecking Visible to camera leaves the shadows intact. But - in my test - there are no ghost splotches floating around on an otherwise absent surface.
but given your lighting: transparency only works on (alt_)diffuse. Specularity is not affected (unless plugged into alt_diffuse as well). Does it make a difference when the specularity channel is blacked out on the direct lights? Just guessing.
- - - - -
Usually I'm wrong. But to be effective and efficient, I don't need to be correct or accurate.
visit www.aRtBeeWeb.nl (works) or Missing Manuals (tutorials & reviews) - both need an update though
If I was looking for a bug to track down, I would try that. But I don't want specularity off on direct lights, and have difficulty imagining that I ever would. Moreover, if you want to redistribute something, you don't want to be dependent on the user having spec off on the lights.
Right now, my transparency map and value is plugged into the native transparency channel (and is obviously working, or you would actually see the skullcap itself, not just its effects on light and hair). Are you suggesting it will work differently if I use Alt_Diffuse? Edit: and if so, how do I get transparency into Alt_Diffuse. I've never had a reason to attempt it, and don't see how.
______________
Hardware: AMD Ryzen 9 3900X/MSI MAG570 Tomahawk X570/Zotac Geforce GTX 1650 Super 4GB/32GB OLOy RAM
Software: Windows 10 Professional/Poser Pro 11/Photoshop/Postworkshop 3
no, all I'm saying is that Transparency (and all attached to it) works on whatever is in/attached to Diffuse and Alt_Diffuse. But it does not work on Specularity, Alt_Specularity or anything else. And no indeed, there is no node for it.
Since it does work on Diffuse (and therefor on the surface elements that capture and re-emit IDL) but not on Specular, and your lights do have specular for good reasons, I got the idea (and nothing more than that) that the undesired effects you're facing might be a result from specularity, not from diffuse/transparency/IDL at all. To find that out, I suggested to run a test without the specularity, to see if that makes the unwanted effects disappear. It might be of help in looking in the right direction.
I was also implying a difference between invisible and transparent. Transparent means invisible to diffuse, to IDL, but NOT to specularity. Invisible means invisible to everything. So a transparent skullmap still responds to the specularity in your lighting, unless that's switched off on either side.
Note: in another thread on SR4, Vilters has reported that raytraced shadows on dynamic hair are improved / properly working in the new SR. For whatever reason, the availablity of SR4 is not flagged when starting Poser.
- - - - -
Usually I'm wrong. But to be effective and efficient, I don't need to be correct or accurate.
visit www.aRtBeeWeb.nl (works) or Missing Manuals (tutorials & reviews) - both need an update though
artbee, I'm using SR4. I don't see any improvement. But perhaps the improvements are in different conditions.
Now, to your point, no: the artifacts are not from specularity, at least not in isolation from IDL. They are from IDL. I know this, because they disappear if I don't render with IDL, just raytracing. But of course I don't want to do that, since in every other way IDL looks infinitely better.
______________
Hardware: AMD Ryzen 9 3900X/MSI MAG570 Tomahawk X570/Zotac Geforce GTX 1650 Super 4GB/32GB OLOy RAM
Software: Windows 10 Professional/Poser Pro 11/Photoshop/Postworkshop 3
okay, that puts some possibilities out of the way.
re-reading your posts to grasp the situation in full detail, I must admit that I've no info on the hair itself, it's all on the skullcap only. Is light-emiitor for the hair itself on or off? An what about the head (since the cap is made to vanish in some way or another).
I also must admit that I've lost track of the skullcap settings. Do I understand correctly that splotches occur and shadowing improves when the cap is visible and fully transparent and light-emitter off, and that the splotches are minimal under IDL when its visible and fully transparant and uses all the face material settings and light-emitter on? It's mainly the combi of fully transparent AND using all face settings which wonders me. How can material settings (especially: any content in Diffuse / Alt_Diffuse) make a difference when it's fully transparent?
Time for some (Mat Room & Properties) screenshots, I'm afraid.
Interesting anyway, thanks for the puzzle :-)
- - - - -
Usually I'm wrong. But to be effective and efficient, I don't need to be correct or accurate.
visit www.aRtBeeWeb.nl (works) or Missing Manuals (tutorials & reviews) - both need an update though
My settings for the hair itself is for optimal realism, not for speed. Therefore, yes, the hair is set to Light emitter, Casts shadows and all that good stuff.
To recap the skullcap situation:
Visible unchecked: Hair roots exposed and not properly shadowed. If there is a visible part of any sort, the hair density has to be cranked to ridiculous levels to avoid showing too much skull, and even then the shadows near the roots don't look right. On the bright side, no IDL artifacts. This, by the way, is the same as parenting the hair props directly to the character (in this case, V4) rather than to a skullcap.
Visible checked, Light emitter on, Visible in Raytracing on in Properties; Transparency 1.0 feeding to a fully black transparency map: Great hair shadowing, especially at the roots, but varying levels of splotchy artifacts. Just how splotchy varies by playing with other settings.
So far as the difference that using the face's materials goes, the jury is still out, but it looks like it does have an effect, although I don't know why. I thought it would be the SSS, but the SSS pass still shows the skullcap area as dark. So I don't know.
At any rate, the bottom line for now is that using a skullcap set to Visible/Light Emitter/Visible in RT + full transparency results in much better looking root shadowing, but also results in artifacts. I guess this is probably why Vilters thinks the artifact issue with hair room hair is gone: he hasn't attempted to do what I've done here. For myself, the improvement of root shadowing is worth the splotches if I can blur them enough to make them look like natural shadows, but it obviously would be better if I could get those results without the artifacts. Hence all my experiments above.
Unfortunately, I'm almost thinking that the role that the skullcap plays in this case is unintentional, which would mean it may not work forever.
I say this because what is happening with the skullcap should also be happening when the hair is parented to the head without a skullcap (I think), and it isn't. Theoretically, if the skullcap is set to Light emitter etc and gives this sort of root shadowing, that same sort of root shadowing should occur if the hair is parented directly to the head (which obviously is set to Light emitter). But in fact it doesn't.
______________
Hardware: AMD Ryzen 9 3900X/MSI MAG570 Tomahawk X570/Zotac Geforce GTX 1650 Super 4GB/32GB OLOy RAM
Software: Windows 10 Professional/Poser Pro 11/Photoshop/Postworkshop 3

______________
Hardware: AMD Ryzen 9 3900X/MSI MAG570 Tomahawk X570/Zotac Geforce GTX 1650 Super 4GB/32GB OLOy RAM
Software: Windows 10 Professional/Poser Pro 11/Photoshop/Postworkshop 3
can't get my head around it.
So I will set up some tests myself and start playing. May take a while.
- - - - -
Usually I'm wrong. But to be effective and efficient, I don't need to be correct or accurate.
visit www.aRtBeeWeb.nl (works) or Missing Manuals (tutorials & reviews) - both need an update though
Hi, back again.
I've tried to my best to recreate the setup as described in all the above posts:
- One infinite light, one skydome with no ambient (passive IDL deflector), IDL set ON with high quality settings
- Head with only Scatter (in Alt_Diffuse) and specular
- Cap like Head, and transparency
- Hair with regular hairnode setup, and varying densities (1, 10 and 100 hairs/cm2)
- Head, Cap and Hair have all properties ticked ON
Findings:
- Light Emitter on/off on hair does not make any difference in result or rendertime. That's a new one!
- Scatter is not of influence in all this, it's an independant (diffuse) effect that disappears with all other diffuse effects at 100% transparency. Good.
- No difference between 1.0 transparency and 1.0 transparency with black color attached, so there is just one kind of "100% transparent", as expected
- Main difference between 100% transparent and (total) Visibility OFF is in specularity (in transparent, not in invisible), as expected
- The overlap between 100% transparency and Visible in Camera OFF is in shadowing and IDL emission, both do that. The ViC check only removes the source of the shadows / IDL emission, not the effects on other objects. As expected.
- 100% transparency does leave traces in the render, on darkening/shadows and visibility, when Transparency_Falloff is not 0.0. In combi with the previous: 100% transparency, Falloff > 0.0 and ViC unchecked does leave the darkening/shadows on other objects. IDL emission is minimal.
- So for invisible SkullCaps shadowing on the Head, the Falloff dial is your friend (or enemy). And since the object is invisible in camera anyway, transparency can be reduced a bit too. That will increase shadows and IDL. Then Scatter will have some effect, softening the shadow pattern and reducing brightness somewhat too.
So:
- Put the SkullCap slightly over the head, such that the hair fits the head while the cap warps shadows onto the head
- For the cap, set Visible in camera OFF, give it a dull black material and assign a hair-shadow map to transparency such that the cap is opaque where you want shadows on the head.
- For the cap, set Transparency_Falloff to 0.0 or raise it, put scatter on the cap at will and so on affect the shadowing on the head somewhat. Or leave it all and let the hair-shadow map do the work.
Now the scatter on the head itself might produce some red or cyan artefacts, but that's something entirely different. Custom_Scatter offers uncolored scattering instead.
happy Posering.
- - - - -
Usually I'm wrong. But to be effective and efficient, I don't need to be correct or accurate.
visit www.aRtBeeWeb.nl (works) or Missing Manuals (tutorials & reviews) - both need an update though
Thanks, aRTbee. You're right about Transparency_Falloff ... hadn't noticed that was at 0.6. If that's contributing, that's a good thing, since it's something I can control the amount of—different amounts for darker or lighter hair.
But nonetheless it still does not make complete sense.
For one, if there is no skullcap and the hair groups are parented directly to the figure's head, the hair should be providing shadowing on the head ... but it does not. Is all the shadowing here completely illusion? If so, why does the hair not cast shadows onto the scalp? I always have casts shadows set to on.
Meanwhile, I've got more experimenting to do....
______________
Hardware: AMD Ryzen 9 3900X/MSI MAG570 Tomahawk X570/Zotac Geforce GTX 1650 Super 4GB/32GB OLOy RAM
Software: Windows 10 Professional/Poser Pro 11/Photoshop/Postworkshop 3

Here's an image with the settings I've actually been using.
______________
Hardware: AMD Ryzen 9 3900X/MSI MAG570 Tomahawk X570/Zotac Geforce GTX 1650 Super 4GB/32GB OLOy RAM
Software: Windows 10 Professional/Poser Pro 11/Photoshop/Postworkshop 3
My further experiments indicate that none of the colors in the skullcap materials matter to the render. In my current render, I set all of them, including the transparency background colour, to a very pale blonde, and the render is identical to the previous render. So the question is, where is the shadowing coming from, since the skullcap is not set to cast shadows? Why in this particular circumstance does Transparency Falloff have any effect at all, and what exactly is it picking up?
______________
Hardware: AMD Ryzen 9 3900X/MSI MAG570 Tomahawk X570/Zotac Geforce GTX 1650 Super 4GB/32GB OLOy RAM
Software: Windows 10 Professional/Poser Pro 11/Photoshop/Postworkshop 3
Well ... I set Transparency_Falloff to 0, and I'm still not getting your results. It still renders with the shadowing. So I think we need another explanation.
______________
Hardware: AMD Ryzen 9 3900X/MSI MAG570 Tomahawk X570/Zotac Geforce GTX 1650 Super 4GB/32GB OLOy RAM
Software: Windows 10 Professional/Poser Pro 11/Photoshop/Postworkshop 3

______________
Hardware: AMD Ryzen 9 3900X/MSI MAG570 Tomahawk X570/Zotac Geforce GTX 1650 Super 4GB/32GB OLOy RAM
Software: Windows 10 Professional/Poser Pro 11/Photoshop/Postworkshop 3
This discovery really helps, because now I have access to settings that can attenuate the effect. What I'm doing now is plugging an Edge_Blend node into the Alternate Diffuse for these materials. Results pending, but so far things are looking very promising.
______________
Hardware: AMD Ryzen 9 3900X/MSI MAG570 Tomahawk X570/Zotac Geforce GTX 1650 Super 4GB/32GB OLOy RAM
Software: Windows 10 Professional/Poser Pro 11/Photoshop/Postworkshop 3

Anyway, I learned that under the Env Sphere with high quality IDL settings, what previously looked like artifacts above no longer does so. I may have to experiment again with indoor settings and see if high enough IDL quality fixes it there too.
I almost don't need the faux shadowing here, although it's still on. I added an additional short hair group hugging the scalp next to the part to make things look better.
______________
Hardware: AMD Ryzen 9 3900X/MSI MAG570 Tomahawk X570/Zotac Geforce GTX 1650 Super 4GB/32GB OLOy RAM
Software: Windows 10 Professional/Poser Pro 11/Photoshop/Postworkshop 3
Privacy Notice
This site uses cookies to deliver the best experience. Our own cookies make user accounts and other features possible. Third-party cookies are used to display relevant ads and to analyze how Renderosity is used. By using our site, you acknowledge that you have read and understood our Terms of Service, including our Cookie Policy and our Privacy Policy.
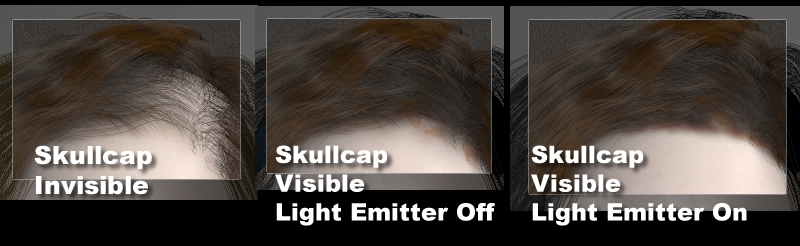
Here's a little lesson on assumptions.[Note: the discussion below relates entirely to Hair Room hair, but I'm sure there are implications that go beyond that.]
I had assumed that setting the skullcap to invisible in Properties would be equivalent to leaving it visible in Properties, but making its material settings fully transparent.
Not even close.
Check out these comparison area renders. Nothing else changed, just the skullcap Properties.
Some things to draw from this:
Maybe all this is old hat to everybody else, but it's valuable lessons to me, especially as someone who uses the hair room a lot.
______________
Hardware: AMD Ryzen 9 3900X/MSI MAG570 Tomahawk X570/Zotac Geforce GTX 1650 Super 4GB/32GB OLOy RAM
Software: Windows 10 Professional/Poser Pro 11/Photoshop/Postworkshop 3