Renderosity Forums / Poser - OFFICIAL
Welcome to the Poser - OFFICIAL Forum
Forum Coordinators: RedPhantom
Poser - OFFICIAL F.A.Q (Last Updated: 2025 Jan 03 8:14 am)

Subject: Poser Based Sky Dome

- 1
- 2

2.) Load it into your scene
3.) Center in the Poser Universe.
4.) Increse it's size to 750,000.
5.) Click the Goup Tool.
6.) Reverse Group Normals button.
7.) Leave the Group Tool Pallete.
8.) Here we are back to our a Smooth Shaded Preview. Note the two strange longditudinal, non-spherical, Deformations; at the top of the prop, where they are most noticeable? They were'nt there before we Reversed Normas? I think whatever is causing these Deformations, is what created the ver straight/dark lines on the surface of the rendered sphere?
I know I'm using a Ball's polygon count, for a Domes', but am inexperienced enough to also know not how far off base that could be?
Lastly, I think the Mirrored Ball is just too dark; but when I tried seeing if the size of the dome mattered, it was hot/cold(a bigger dome burnt highlights fast?)

I'm not sure what you're trying to do here. You see, to me a sky dome should not be shaded with light-sensitive features like an ordinary object. Meaning diffuse and specular reflection should not be involved on the dome's shader, because IT IS THE SOURCE OF THE ILLUMINATION. There is no "specular reflection" off the sky - there is no reflection on the sky - the sky is not an object, but rather a glowing sphere-shaped region.
In all my sky shaders, I generate the color patterns I want with nodes and plug them into the Alternate_Diffuse channel. This channel renders what you plug in, no interpretation. I turn off all the other stuff.
Now if you want to use concentric spheres, and transparency, so you can build up layers of clouds, that's fine. Me - I just blend them in the shader directly and have only one sky sphere to manage at all times.
Theoretically, using multiple sky spheres could let you get some "real world" effects like shadows from one cloud layer falling on the next. In such cases, I'd still set up the "sky" sphere to glow. The "cloud" spheres could then be using Diffuse and Specular effects in the shader. Moving the sun around would produce a different sky then. I'm not sure if Poser can handle the scaling though that would lead to real-life perspective.
Assume your clouds are 1 mile high. The radius of a Poser sphere at 100% scale is 5.16 inches. So the scale you need to set to get the radius to be one mile is 100 * 5280 * 12 / 5.16 which is 1,227,907. IIRC, last time I tried a sphere scaled to over a million percent, it didn't render in the reflections at all - it's like it was too far away to be seen.
Oh and the Poser sphere surely has issues with normals and also its UV map is not right. There is always a seam. I found it better to go into some other tool and generate a new sphere of my own, and imported that. I've had no issues since then.
Renderosity forum reply notifications are wonky. If I read a follow-up in a thread, but I don't myself reply, then notifications no longer happen AT ALL on that thread. So if I seem to be ignoring a question, that's why. (Updated September 23, 2019)

I don't see any lite source in msg1 either. it also appears that increasing the scale of the hi-res poser ball is exposing some deformities that weren't apparent at normal scale, which is counter-intuitive for an infinitely-scaleable object. maybe ya forgot to select all polygons prior to flipping normals.
I, personally, like bright skies for my backgrounds! Having one to fly around in, is equally exciting! It just happening to make for highly detailed chrome renders is a sidekick, but Poser reflections are really tough, because Poser doesn't have the sense enough to apply the Background Color/image to Raytraced Reflections.? The only way for Reflective Materials to actually reflect things and be shiny; is to either use reflection map(that always needs to be updated when you add/move things within your scene,) ...or just have actually shaded geometry; actually protecting Firefly, from the void Poser Scene Space ends in.
"I'm not sure what you're trying to do here."
Trying to keep a perfect sphere, after Normal Reverse. After I Reversed Normals, the Ball Hi-Res prop Deformed?
And see that weird Window looking artifact, on the right side of the front surface(like a bout nine square panes stack in a square?) That is no object in my scene, I can't imagine where they are coming from?
"You see, to me a sky dome should not be shaded with light-sensitive features like an ordinary object.
When the Normal geometry is Reversed the Diffuses Color > Image_Map is applied to the inside, where it can play well with what needs reflecting with within the scene, and light is allowed to pass through from the outside in.
"IT IS THE SOURCE OF THE ILLUMINATION"
...Maybe, soon, I'll look to develop a White Glow material to apply on a single Sky Dome; that would make for an interesting Global Illumination effect, and I could try it on a 2nd Skin figure.
Currently I'm using Infinite lights. My sky doesn't actually Figure lighting much at all, the amount is not noticeable. With the sky dome Visible, or without, my V3 figure renders as her best. The Scale of the Sky Dome only effects the brightness if reflections, the bigger the dome the brighter they get.
"Now if you want to use concentric spheres, and transparency, so you can build up layers of clouds, that's fine. Me - I just blend them in the shader directly and have only one sky sphere to manage at all times."
I'm sure you could keep things nice and simple, until the cows come home, BB...I'd hoped the 3D Textures > Clouds node would effect the entirety of the inside of my Ball HiRes prop, and have tried to use Displacement, but it looks like we're only working with the surface? Can the interior of my Ball Hi-Res prop be MAT'd as well? Meanwhile I'm still waiting on more Cloud nodes(and/or materials,) and my reason for multiple Transparent Cloud Domes/Layers is eventually postion them at respective Altitudes.
"There is no "specular reflection" off the sky - there is no reflection on the sky"
Ah, The Specular value adds whiteness to the clouds, without any ill effect; although removing that causes the clouds to bleach fast, so I let it be.
"Theoretically, using multiple sky spheres could let you get some "real world" effects like shadows from one cloud layer falling on the next. In such cases, I'd still set up the "sky" sphere to glow. The "cloud" spheres could then be using Diffuse and Specular effects in the shader. Moving the sun around would produce a different sky then..."
Thank you!
"I'm not sure if Poser can handle the scaling though that would lead to real-life perspective."
Hmm, me neither. I switched Measure from Poser Native Units, to Feet, but Parameter > Scale > Value didn't change?
"Assume your clouds are 1 mile high. The radius of a Poser sphere at 100% scale is 5.16 inches. So the scale you need to set to get the radius to be one mile is 100 * 5280 * 12 / 5.16 which is 1,227,907. IIRC, last time I tried a sphere scaled to over a million percent, it didn't render in the reflections at all - it's like it was too far away to be seen."
Ouh, that was cool! I could live with a cloud layers about 3/4 a mi. I see what you're saying about scale over 1,000,000; I tried export/importing the Ball UV, easier I knew the Scale Parameter would reset, but it imported at it's original scale?
"Oh and the Poser sphere surely has issues with normals and also its UV map is not right. There is always a seam. I found it better to go into some other tool and generate a new sphere of my own, and imported that. I've had no issues since then."
and
"If your having problems with poser hires ball. I could send you my sky dome prop from lightwave."
Great things to know! How many polygons are we talking, I'm thinking DAZ Figure Weight. V3 is pretty heavy, she's about 72,000 polygons; but M2 is much lighter, at about 32, 000. I suspect anything under 15,000 would'nt be worth testing?
"Also, how about particles for clouds, that way you could animate them."
Particles sound awsome, do you know of any good examples? I've only seen Poser particles for sale, but haven't purchased any yet.

I've had the Ball Hi-Res prop selected, when I've opened the Group Tool, and all of the props polys have been selected by by defualt. I did try to Add All, before Reverse Group Normals, but the resulting Deformations still remained. Also, this was done at normal scale.
I searched this forum on how to do this in P6, but most of the results went to messages with dead links. but you see yer problem. the light source is not the skydome, it's not IBL nor HDRI. trying to do this in poser is extremely slow and difficult compared to more modern renderers. in carrara, one can just click a coupla buttons and it's done, but in poser I can't even find an useful thread here that explains it in terms that don't involve various fake tricks. they always seem to degenerate into a scene that uses infinite or spotlites. unfortunately, I wasn't able to find any threads on how to do it in P7 either. they appear to refer to something else, and often contain erroneous info.


The attached image is the same scene(camera/lights) I rendered the first image, of this thread, with. I'm really surprised the Mirrored Ball Hi-Res prop is so dark?
I hope to get a straight answer to a Sphere Prop Proper Resolution, and Mapping. I should like to incorpporate it into many an Empty Scene of mine, as for V3, M2, David...etc.(...cough.) MBs wo'nt hurt much!
The sphere I created was qemlossed into a hexagonal pattern then triangulated. If you would like to try it out e mail me at chieftanoclan7@sbcglobal.net


Then a big giant spin of the U and V Scales, I wonder why?
Tweaking with a guaged map.
Not sure why the horizon is split to the top and bottom of the image? I'd thought the sphere may be mapped for a square texture, and was wondering if 2:1 would be an option anytime?
And another dark mirror..?


16,000, wow sweet, I bet this could be overkill, how large is the .OBJ export?
I'm definately not one to fight over resolution, Vs. under resoltion; but can anyone vouch any credibility to my one poly/pixle theory? I'msure there is just a sweet spot we need to become familiar with?
*"Could you clarify this for me."
*Something between a 4000, and the 16000 poly model you've generously posted!


Hmm. What effect you want to have exactly?
After reading the posts I'm somewhat confused about everything except the sphere's internal attributes.
The internal attributes, or the atmosphere, are not existant because the sphere is empty for the renderengine. If you make a massive sphere you have of course material attributes at any point inside the sphere as well as on its surface.It should then be transparent on the inside so that you will see something...
Some atmosphere that comes close to the one you posted in your first msg. would have these attributes:
Light wavelength [R,G,B] = 4e-07, 4.25e-07, 6.15e-07
Star Irradiance [R, G, B] = 1350 1250 1400
Transparency treshold = 0.94
Modifier = 0.97 (for an 150km high atmosphere)
Modifier = 0.8 (for an ~ 3km high atmosphere)
AO modifier = 2.7
Twilight width = 0.005 (for r = 17000 km)
Incidence at horizon = 0.165
Out of some meteorological computing...
now, if you want the blue to be less intense or dark, you would adjust it slightly with color math and primarily via the irradiance, transparency treshold and it's modifier.
BB got it somehow right in the description, I think, and that means that you have to cheat a little since you can not input meteorological data 1 to 1. Rape one of the nodes and use poser math to limit the effects.
The artifact that looks like a object which isn't in your scene should be gone after filtering the results. A colorrramp can do some good here. And of course all the +, -, *, mod and clamp stuff.
I can not rebuild the scene like described in post #2 because I fail to see any 2nd dome there or where it was placed. I only see one sky dome ball prop and one small ball prop there.
I just had an hour long response, but the machine ate it!
I zipped up the two "Cloud Node - Ball Hi-Res scenes I made. I'm tryin to upload them, here, as a .DOC, but it's not working. Any tips, which is actually a .DOC text file?
Temporarily, we can try:

(196K)
Zarat - What is a Sphere prop, with internal vertices, known as? Was that Poser Atmosphere recipe?
Patorak - Woops. 16,000 is looking better by the minute? As soon as it's UV Mapped, I'll add it to the scene, and calibrate a Cloud node, and Texture!

Now let's recap. I sent you a sky dome and sky sphere. I did not send you a reflective sphere prop. If you would like a reflective sphere prop I can make that and send it as well.
BTW Are you trying to create a light probe for an IBL image?
Wow, the third one is awsome! I'd love to apply that material to all different things! What does the geometry look like? How did you asign material? A Walk Path would look nice!
I just used the dome twice, this is fine.
Nope. I do'nt ever try to get fancy with AO, or IBL, Spot, Etc., I really like even Infinite Lghts?


Quote -
Cute! gg
... No the atmosphere composition was not directly for Poser. the numbers can be useful to apply the settings from picture 1 in this thread to an realistic dimensioned and and functional atmosphere.
What I would like to know is how you have set up the single balls/spheres to get the artifacts.
And if possible, what kind of sky reflection you want finally and what lights you are using and their settings.
Best would be the scene file without copyrighted content of course. :biggrin:
It's less work than listing all light settings and prop coordinates.
16 million polys and Poser sounds not good...
Your use of turbulence looks great patorak. :)
So sorry I haven't enough time to participate on weekends. Let me just make some brief points - hopefully you can confirm, expand, internalize these on your own.
*) A sky dome is not going to light your scene. You cannot expect the figure to look different by adding a sky dome, except for reflections. The Diffuse and Specular nodes do not look at the environment, even though they should. In other packages, such behavior is called Global Illumination model, or in olden days Radiosity. Poser doesn't have it.
*) Nevertheless, my original point stands. Your should not light your dome! The dome "glows" on its own. You should be able to see the sky even from a scene rendered with no lights. That's what I meant about plugging the sky color (and clouds usually) into the alt-diffuse channel.
*) If you are willing to do the following work, it is worth it. After you have designed a properly glowing sky dome and ground texture, you want to prepare a custom image for IBL that matches the environment. If your central figure is going to be close to any large objects, like a wall, they should be included too. Now I won't go into too much detail, but here's what you do. Put a sphere right where the figure will be. Make it super super tiny. Make your render size square, usually around 500 pixels. Switch to the "Front" camera and adjust dials until the tiny tiny ball exactly fills the preview window. Put a perfect mirror shader on the ball. Turn off all your lights except an IBL, which has BLACK in it to start. Render the scene. This first render, all you should see is glowing sky in the ball. Save the render. Attach it to your IBL - this is your IBL image now. Try setting the IBL strength to somewhere between 50% and 75%. Now render again. The ground is now lit by the sky (and other objects too) and will show up in the mirror ball. Save this render as your new IBL image. Render again, save as IBL image, render again, save as IBL image. Eventually, the amount of light may converge on WHITE or BLACK. If so, lower or raise your IBL strength as appropriate. If it converges on nice mid level tones - you've succeeded in creating a custom IBL image for your scene. You can then continue on as normal.
*) You cannot shade 3d space - I'd sure love to - except using the Atmosphere shader, and that is hard to use and slow and applies everywhere.
*) You can shade multiple cloud layers (domes) - I've never done that very well, but last time I tried I was not so good at shaders as now. I may try again. I can see it being reasonable to light cloud layers with diffuse and specular.
*) A single dome shader can have glowing sky and lit clouds combined. You just do the sky color part without a Diffuse node, and do the cloud part with a Diffuse node. Combining them will look cool and be much easier to give to other people for sky dome work by noobs.
*) This high-resolution business is a waste of time. The no-Diffuse part of the shader gets to decide the color of every single point - it doesn't matter what the geometry is - more polys doesn't change the shading rate. The parameter Min Shading Rate changes that.
*) The Diffuse/Specular part of the shader will be improved by more polys up to a point. However, I think a sphere around 600 polys has achieved 99% of the realism that a 60,000 poly sphere would. Remember that we're really dealing with the difference between the normal on a true sphere, versus the normal on a piece-wise linear approximation of a sphere. Once you have about 30 segments around a circle, the error is very small from the linear approximation. Do not be fooled by the PREVIEW!!! That is not doing per-pixel shading with an interpolated normal. It is doing per-VERTEX shading with an interpolated specular value! This is extremely different (and way way faster) and should not in any way cause a reaction in you as the render will not be using that technique at all. More polys will make the PREVIEW better because, just as you predicted Ay, as you get closer to one-poly equals one-pixel the results look like per-Pixel shading, even though it is per-Vertex preview shading. But who cares about preview?
Renderosity forum reply notifications are wonky. If I read a follow-up in a thread, but I don't myself reply, then notifications no longer happen AT ALL on that thread. So if I seem to be ignoring a question, that's why. (Updated September 23, 2019)


Ok, I think BB will have some fun figuring out how to shade cloud layers. :D
Your method to get an scene-matching IBL image is cool. For some higher quality picture the additional effort surely pays off but the best part is that no other applications are needed except Poser itself.
Patorak, that's as how I understood it at first.
I never saw this kind of artifacts as Angelouscuitry experienced them if doing a skydome.
The confusing part is 1) how exactly he placed the spheres to get these artifacts and 2) what he wants the reflection to look like.
As BB said, the shading area subdivision, or min. shading rate, would make very high poly skydomes useless.
I think up to 1000 ... 5000 polys, depending on hardware performance, are fine for most cases.
Together with figures, hair and clothes that's a heavy load for an PC.
Angelouscuitry, I forgot to answer that sphere-question. A sphere is only the shape, it can be hollow or not like an billard ball, can have an theoretical wall thickness or a real one like an basketball.
The Poser sphere primitive is hollow and that means you can not tell Poser that you want some attributes (colors, shaders) for the sphere volume. There are no points inside the sphere that could store these attributes.
If you model a massive sphere and import it to Poser, you can assign attributes to the volume and create some sort of (animated) atmosphere for example. For an sky you would still need an additional sphere because of the way the texturing works.
1 sphere for the skydome, 1 sphere inside the first one and a tiny bit smaller that simulates some atmosphere that can be faster calculated than the Poser atmosphere node.
For example useful for fog (moving) over the ground, volumetric clouds, rain, ...
Or simply as a mean to apply filter mathematics to the picture. I.e. if you look through sunglassed you would see a filtered version of what you see normally without the sunglasses.


I haven't read through all the thread so forgive me if I'm repeating info here.
I use a hi res sphere generated in UVMapper pro, chopped in half and normals reversed in Poser's Grouping tool. Then I added a set of my own nodes to create various sky effects. I also set ambient to white, value 1.000 and plugged the shaders into the ambient channel.
The beauty of plugging the shaders into the Ambient channel is that you don't have to worry about illuminating the dome.
I'm not at my own computer at the moment so I can't upload my shaders, unfortunately.
Coppula eam se non posit acceptera jocularum.

Quote - Here's what I got for step 3. ...I think I need to redo step 3.
Step 3? What step 3?
"It is good to see ourselves as
others see us. Try as we may, we are never
able to know ourselves fully as we
are, especially the evil side of us.
This we can do only if we are not
angry with our critics but will take in good
heart whatever they might have to
say." - Ghandi
Sam - Ambient channel, Alt Diffuse channel, Alt Specular channel - they all do the same thing - they simply render the exact color of the node that you plug in - no lighting model is applied.
I use alt-diffuse because I only have to set 1 thing, not 2.
Renderosity forum reply notifications are wonky. If I read a follow-up in a thread, but I don't myself reply, then notifications no longer happen AT ALL on that thread. So if I seem to be ignoring a question, that's why. (Updated September 23, 2019)
thanks, bill, for the tutorial. it reminds me of what kupa or colin told me many years ago about a similar technique - put a fisheye camera where the main figure should be, render that, then use it as a reflection map. this was in the days of P3, when things were much simpler. am I correct in assuming that, in the absence of any other light source, the P7 IBL light doesn't allow materials to exhibit optical properties such as reflection, refraction, transparency, shadows, et al.? in olivier's tutorial on IBL, he mentions that they don't produce shadows (hence the need for AO), but I didn't see if he mentioned the other properties.

Here I am in my actually Poser Based Ball Hi-Res Props Scene. If we'ld need to be stuck with the Ball Hi-Res prop's Mapping, then we're going to need to change the idea for the title of this thread, in the sense that we'll be Importing data, for a better .PZ3 Free Stuff item.
") If you are willing to do the following work, it is worth it. After you have designed a properly glowing sky dome and ground texture, you want to prepare a custom image for IBL that matches the environment. If your central figure is going to be close to any large objects, like a wall, they should be included too. Now I won't go into too much detail, but here's what you do.*
bagginsbill - Thanks, again! My biggest fear of this thread is a big fat dead end, having left Infinite lighting; I've tried every other models, especially IBL, without near the success. For the HDRI(...clouds gather, lightening strikes, and thunder claps...)nature of IBL, I'll give it another try:
* Put a sphere right where the figure will be. Make it super super tiny.*
1.) I did'nt make the dome teeny tiny? This handsized Ball Hi-Res prop, is at the Universe center?
Switch to the "Front" camera and adjust dials until the tiny tiny ball exactly fills the preview window.
2.) I skipped the Front camera, and just 0'd the Orbits of my Main Camera?
Turn off all your lights except an IBL, which has BLACK in it to start.
3.) Thanks to Ockham, for all those nifty Light Pythons!
4.) Light Creation.
5.) Define Model for new Creation.
6.) Position the light behind the camera.
7.) Set Light Color to Black.
Render the scene. This first render, all you should see is glowing sky in the ball.
8.) No Glow. What'd I miss?
Patorak - Yow, even more great work! I hear what BB is saying but, I'll still sacrifice a little space to see a finer Smooth Shadded Preview, it'd just be a thing to avoid. Have you had sucess with bagginsbill's IBL, may I have a copy of the scene, to try to reverse engineer? Are that Combustion data coming around?


 *
The insert picture button won't do it for me...
*
The insert picture button won't do it for me...
The weather would be a bit more work. A Brownian motion for clouds could be a good start because this fractal is pretty predictable. Turbulence with some tan() and sin() applied to it could look more realistic than fBm.
The next problem would be the pretty low limit for displacement. A cloud would have several 100m up to ~1km "displacement" in real world. Doing miniature clouds would still require a displacement of a couple 10m. If this is possible, - I have not tried it yet -, then it would slow down rendering coz Poser doesn't like a high displacement value much.
FF seems to be optimized for skin and such things with values for displacement way below 1.
Well, the first part is to have the cloud at a predictable height and location. Using U/V on the volume of a sphere is something that might be not possible with Poser. It's not even with most other apps, IIRC.
Next dirty hack would be to make a hollow sphere with many 2 sided planes towards y=0 and many single sided planes towards y=min/max because there is no 2nd side needed.
One would see only one side of effects at greater height and if looking down from above one would see nothing if there r 2 sides and they r used.
For medium heights and near ground level there can be stripes of volumes as well.
These volumes would act as physical volumes then. E.g. for fog or clouds.
This is such a dirty 1990's hack that I have to wash my hands now just for typing it...
A more elegant solution would be a script that creates volumes inside the sky dome sphere at locations determined by gray-values of the math nodes. For example the lighter gray parts of the turbulence stand for clouds and where it fades to darker gray the cloud grows thinner towards object y=0. This volume is then made partially transparent and some shader does the texturing job. This way any light from sun or from surface can easily be taken into account for reflections on clouds. Shaders without y would require the transformation of the theoretical y into the (x,y) matrix with modified riemann mapping theorem. (like it's done when rendering the final 2D pic)
But there's maybe some need for a biholomorphic map for y. Maybe isogonal mapping is enough since the orientation shouldn't change anywas.
That's now BB's job for next week. Period. :tt2:

Do I really want to lower the Light Intensity; to start pluggin in the renders like this? I plugged it in, after a white light render, and it's made the area I plop rendered much darker?
- 1
- 2
Privacy Notice
This site uses cookies to deliver the best experience. Our own cookies make user accounts and other features possible. Third-party cookies are used to display relevant ads and to analyze how Renderosity is used. By using our site, you acknowledge that you have read and understood our Terms of Service, including our Cookie Policy and our Privacy Policy.
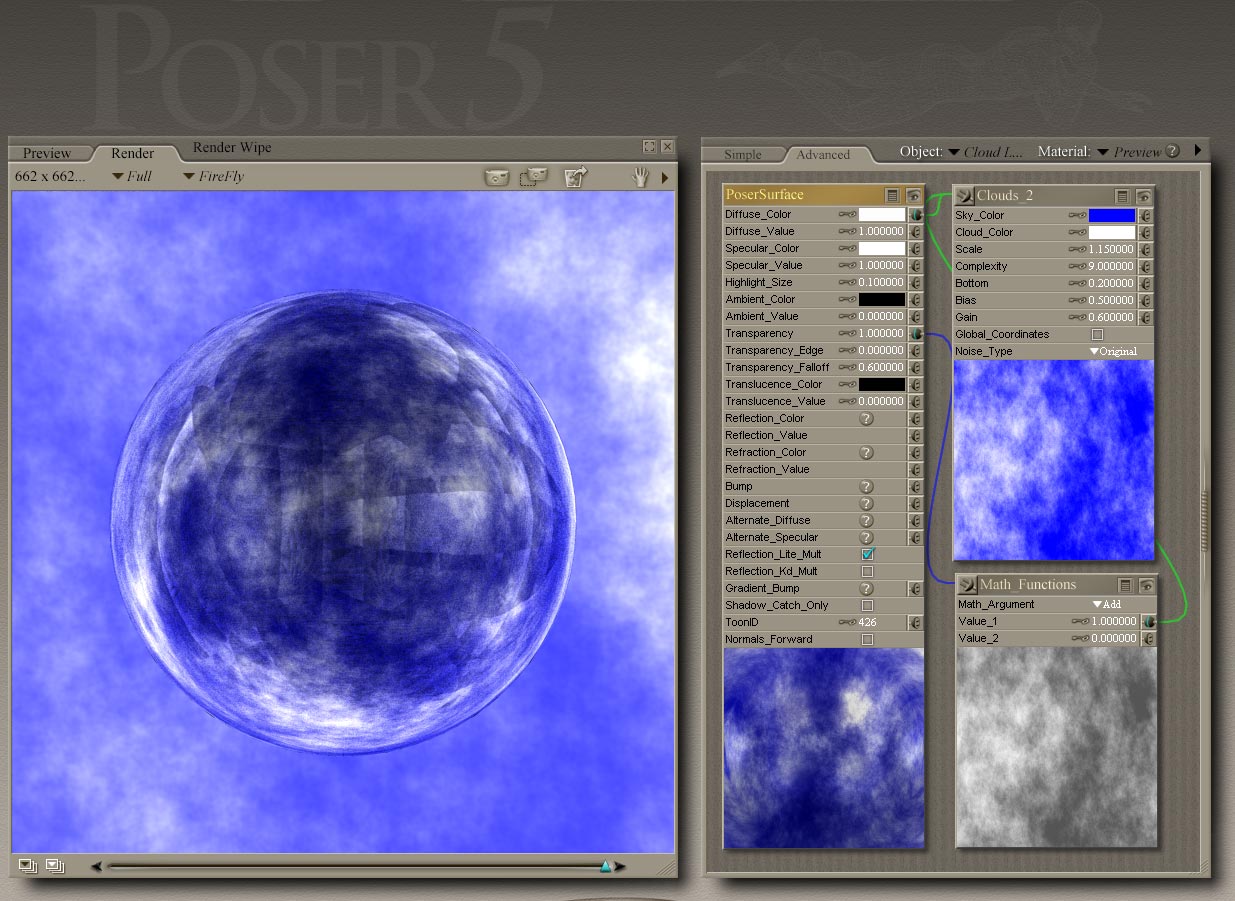
I've read alot about Sky Domes lately, with regard to Raytraced Reflection/Refraction; but I have still not yet created one for myself.Here is how far I've gotten with just Poser 6! I am very pleased with this WIPs promise of reflectivity! I think it looks hard and shiny!
Basically this scene has 3 Ball Hi-Res props(2 Dome, and one Mirrored Ball.) As you can see the Cloud Dome is semi-transparent, hence the need for a bigger Sky Dome outside.
FYI - This was all rendered with 3 Raytrace bounces.
Next I'll explain how I got started, and then where I think I'm stuck.