Renderosity Forums / Poser - OFFICIAL
Welcome to the Poser - OFFICIAL Forum
Forum Coordinators: RedPhantom
Poser - OFFICIAL F.A.Q (Last Updated: 2024 Dec 22 8:51 pm)

Subject: Pipeline Question: Rigging Non-Human Character in Poser Pro 2012

- 1
- 2
It's cool Darkedge. I'd rather be snubbed by a talented dude like yourself than some of these mediocre make art button dipwads I run into anyday! Lol.
W10 Pro, HP Envy X360 Laptop, Intel Core i7-10510U, NVIDIA GeForce MX250, Intel UHD, 16 GB DDR4-2400 SDRAM, 1 TB PCIe NVMe M.2 SSD
Mudbox 2022, Adobe PS CC, Poser Pro 11.3, Blender 2.9, Wings3D 2.2.5
My Freestuff and Gallery at ShareCG
Nice model, Eldritch, saw that in your gallery earlier, and was taken with the traditional art too. Always refreshing to see that stuff. That's an honorable goal, to share with the community. Not sure what the real scope of my goals are at this time. The heart of it is, I want to produce a fan-comic with the dragon, and make a bunch more models for an original story. Also models to aid in commission illustration. Personal stuff for now. As for what DarkEdge said about forum communication - I have some anxieties about them for the exact same personal reasons lol. I appreciate that everyone here has been so cool and can't state enough how thankful I am that you guys have been focused on helping me get a grasp on this and that you've stuck around this long.
@ Kerwin: That's awesome. I've always enjoyed tutoring as much as being tutored... not professionally or anything tho. Just other aspects of art I've been approached about. Do you have rates listed anywhere or a site portal? I was a 4.8 GPA student in college, but took a break to focus on a skill-developing path that fit more the direction I want to go in the immediate future. My ultimate goal isn't to work in a big studio anyway so the diploma can wait a bit. One of the promises I made to myself was that I'd keep learning and get into some mini courses that focus on what I presently need to know.
DarkEdge posted at 11:39PM Sat, 02 January 2016 - #4246953
I just finished rigging a WWII Corsair, it has 50 bones in total for all of the flaps, elevators, joystick, etc. Hierarchy was a bitch but through good naming techniques and PHI I was able to pull it together. Again, everyone/anyone should use what works for them! :)
Glad to hear you're keeping busy with your art DarkEdge. :D I don't think I've seen your newest stuff.
I'm seeing that, about it being more important what works for the artist, I mean the end result is what really matters. I just came in here not really even knowing what a .obj even is... lol. You've all improved my understanding drastically. Anyway, I'm starting to see the tip of the iceberg, as far as the universal language of the. That makes me less anxious about compatibility and pipeline than I was starting off.
********Okay, so I started over and I just have a question now that I'm in UV Mapper again. Should I do more, while naming the VU's and groups, to ensure that my textures can load in into Poser? Here's what's got me confused: ********
My tools were all separated when I first exported the objs and UVs that had the original vertice ordering - assuming that merging all those tools into one and keeping the UVs did reorder things... I'm just assuming that's possible, if not likely... So, how do I get the .psd textures I exported ...on... the UV's all stacked up in UV Mapper? And the bump maps I made. Maybe I should get further with the tutorials now that I'm over the grouping hump to see if there's a demonstration in there. But it doesn't hurt to ask now.
Reading this tutorial and in general trying to understand the idea of UV's better, since, with both the obj and the textures, I have put the cart before the horse and started modeling without really educating myself about these things.

Fortunately, the UV assignment of vertex tends to travel with it despite being compiled into a new ordering. Vertex ordering tends to be most important when it comes to morphs (also called blend shapes) since the description of how vertexes should move is compiled based on the assumption that both the original form and the new form have the same order and number of vertexes. From the UV Mapper screen grab you posted, it looked like the UV's came through intact, just overlapping.
There are three common approaches at this point, assuming you are happy with the unwrapping you have. The first approach to assign different materials to each group of non-overlapping UVs: For example skin_head, skin_body, skin_tail, skin_wings, etc. This way, you have different materials in Poser and can assign different color, bump, normal, maps, to each of these materials.
The second approach is to use a UV tool. I mostly use Modo for this, but there are other tools out there (notably UV Layout Pro from Headus). These have automated tools to "pack" the UV "islands" (each group of contiguous, flat UV mesh) so they don't overlap. It also will spin the islands to pack them optimally and scale individual islands (to give more or less resolution). You can them pack all your islands onto a single map so you only need a single material. I do not recommend this approach because the of the complexity of model and the loss in control of resolution and texture.
The third approach is to optimize your UVs in separate material groups as in the first approach, but then use a UV tool to stitch together some of the islands that may have been unnecessarily separated in the modeling process as well as fix up any overlapping issues. This is also a good time to do some UV optimization and flattening techniques. This is the most time-consuming approach, but gives the best results on complex organic models because you are in complete control of the placement, scale, arrangement of UV islands, as well as reducing the number of UV seams.
Cheers!
-K
Podcreature posted at 7:55AM Sun, 03 January 2016 - #4247037
I have put the cart before the horse and started modeling without really educating myself about these things.
Do be so hard on yourself. ;) You're just going through the same workflow process everyone did at one time. (Model -> UV -> Texture -> Rig) Until you've done it a dozen times, you'll keep finding little "suprises" -- each is an opportunity to refine your technique. Part of the fun for me was that many of tools we use today were still evolving at the same time, so each time I went through the process of constructing a model, new (and usually better techniques) came along to improve the process. For example, I'm just learning about Quixel Suite (Thanks DarkEdge!) for elements of the texturing step. Also, being more oriented as sculptor, I tend to rig before UV'ing and texturing. Since my .obj tends to be fixed down after rigging, UV tools become invaluable.
-K

Agreed on not being too hard on yourself...no has seen me bump into the same wall 50 times when I was first starting out, around bump 51 I started to notice a pattern. :) Ask 3 people and you'll have 3 different workflows...if all of them work then all of them are right! I Model ->UV->Rig->Texture...very similar to Kerwin. Your welcome K I hope it works out for you!
Comitted to excellence through art.
Thanks guys! :)
Oke, so you are saying it's not super important whether I UV before, or after rigging... it depends on if I'll want to go back and change the sculpt based on how the rigging goes. I probably won't, but mainly, I just want to see if I can get this thing to appear in Poser with materials so I can say I've figured out that part. :D
Since I already have the UV's there, anyway right? Just not sure I know what to do next here in UV Mapper before going into PHI again.
How to assign materials?

Ugh, meant to point out those ugly things are the claw textures lol. The claws were all one tool, I exported the textures from them. So should my materials in UV Mapper be based on the textures I exported from ZBrush? Like the two halves of the body map just be assigned to "body". So I can just import the textures into poser?
In general, when defining materials you want as few seams as possible between contiguous surfaces like the body. Sometimes designers will separate the head or face from the body to gain more detail in that area. Size of UV islands (in the same material) should be somewhat balanced by the amount of actual surface the object is using unless it's a really important element like face or eyes where close ups will want for more visual detail.
You should not have overlapping UV islands in the same material.
-K
kerwin posted at 8:11AM Tue, 05 January 2016 - #4247259
You should not have overlapping UV islands in the same material.
Right, I figured that. I wish I knew the terminology so I could pose my questions better. I already UV'd my model in ZBrush, right? I exported the unwraps from each tool, creating textures and bump-maps from my polypaint and HD subdivisions. I just wondered if I should create my material groups in UV Mapper based off the maps I exported from ZBrush.
What's confusing me is I already have my textures out of ZBrush, and mixing and matching UV's contrary to how they are arranged in the BMP files I exported doesn't really make sense to me. Why would I do that and can I even do it?
The body has a texture I exported from ZB has a resolution of about 8k. The eyes about 2k, and the rest 1k.
I follow that people would want nicely detailed eyes. In my case, I'll be doing over those by hand in PS, because they are just color changing compound orbs. The body mattered the most, since I wanted to preserve skin-wrinkles and little details that would be a pain to paint.
If you wish to use the arrangement of textures you generated in Zbrush, you should then arrange your materials to match.
Alternatively, you can come up with a new arrangement of materials, load your update .obj into Zbrush and project (in Zbrush, this is part of the subtool menu) the materials and detail from your original model to the new .obj (you'll probably want to sub-divided it a few times.) To make sure Zbrush sees the new materials (and not the body parts), you'll need to set your zbrush preferences to "Import Mat as Groups" (this is under preferences -> import; by default it is set to "import polygroups", which is Zbrush's short hand for body parts in your model.)
Once your details and polycolors are projected to the new .obj. use Multi-map exporter to create a fresh set of maps matching the new arrangement of material zones.
I usually do a lot of projecting onto the final model after rigging to recover my detail and colors (and to do some touching up.)
-K
P.S. Here's a tut on reprojecting detail: https://vimeo.com/3213597
Oh ok, I think I understand. You were saying that if I wanted to change the arrangement, it would require going back up the pipeline into ZB and making all new maps. I suppose that's not a bogus idea or anything, I'm just thinking in such linear terms right now. I do know ZB is powerful when it comes to projection, and such. Used it only for projecting detail after retoping so many times.. "Import mat as groups" sounds brilliant! Didn't even know it could do that. Seeing how UV Mapper and ZB can work together.
Thanks for the explanation and the tut!!
For the time being, I'll just go with the unwraps/maps I got from each tool, see how they work. Seems organized enough for this model, but good to know I can go back and forth and make things look just right.
So if my dragon's body tool UV settings were at 8k res, will it import the maps to Poser that size?
My thinking to just assign materials based on my current ZB textures should just work straightforwardly then?
Remember that pipeline is moving a product through the steps for finishing. Great tools like Zbrush, Modo, etc. are helpful at many steps of the pipeline. One of the charms of doing it yourself is you have the opportunity to tweak what you've done in previous steps of the pipeline rather than in a formal shop where the mesh gets rejected and sent back to you for "corrections". ;)
So if my dragon's body tool UV settings were at 8k res, will it import the maps to Poser that size?
Unless you re-scale the output maps, then yes. Bear in mind that map size use's memory at the square of the size (that is, double the size of a map on a side and you use four times as much memory) so there is a tradeoff. You want to make sure that you're making good use of the map space at 8K.
My thinking to just assign materials based on my current ZB textures should just work straightforwardly then?
You may have to flip them in Photoshop. I can never remember whether ZB's default UV space matches Posers...
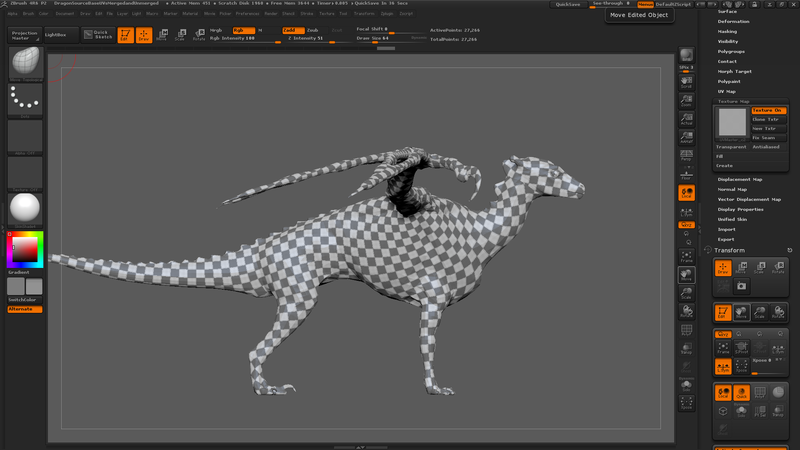
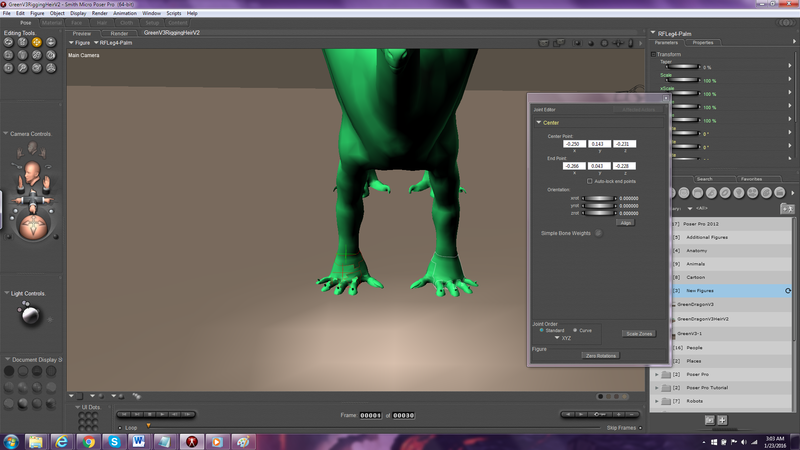
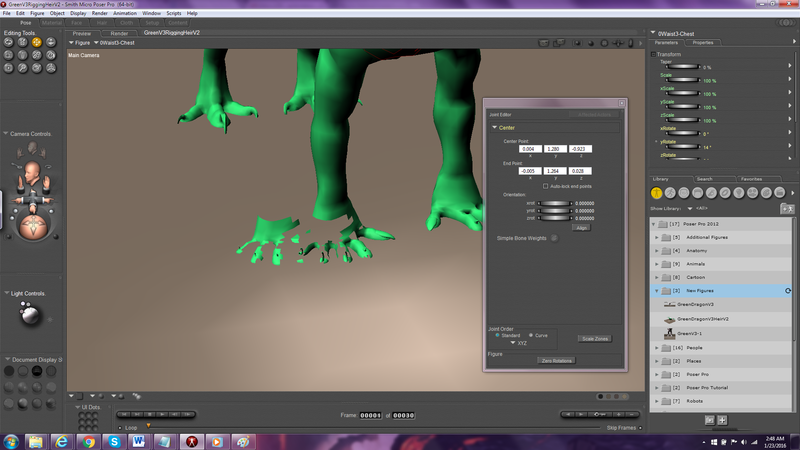
Okay, got pretty far, noticing a weird problem suddenly though. I welded the seams in UV Mapper just to be safe, and checked things over, after importing the obj and the PHI heirarchy file, and it was all fine, I moved bones in the setup room, saved over my figure, and now, randomly, some polygons no longer seem to be connected on one of the feet... Is there a quick and easy way to keep the bones I have, and bring in a fixed version of the obj? : /
Caveat, I haven't gotten past the part in the tutorial series by Darkedge where he's assigning joint rotations to all the body parts. So maybe he covers how to fix something like this.
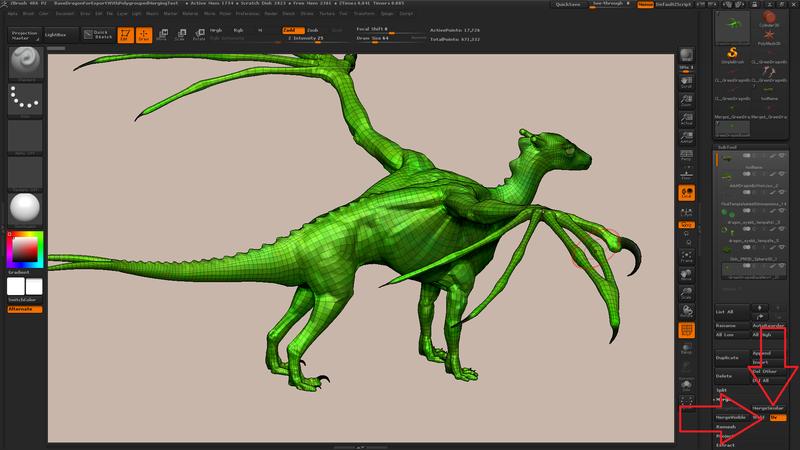
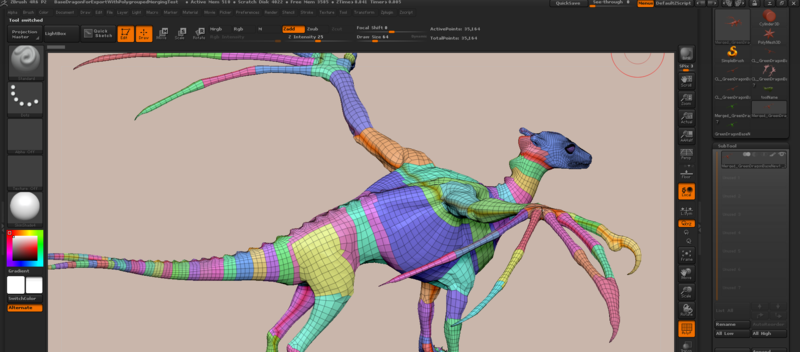
Here's some progress images.
Checking my UV map. - a little stretching at the shoulders, I know I could have separated this into a few more parts, but good enough for my purposes, since I'm going to do a lot of digital painting over the renders.
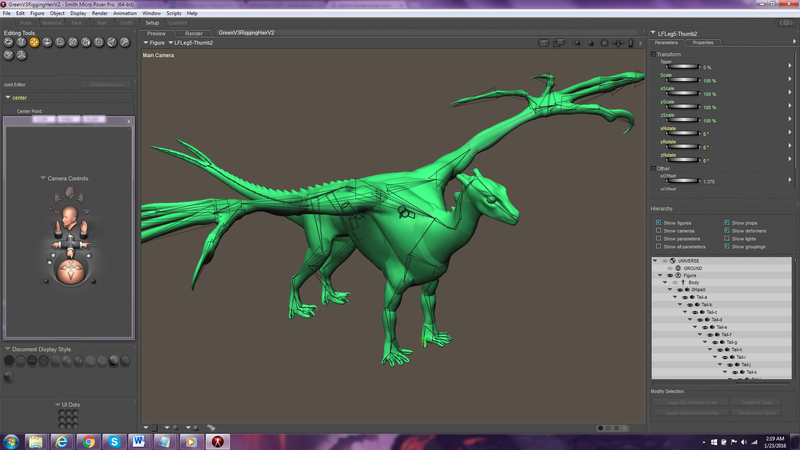
The bones after importing from PHI.
Bones after touch-up. Turned out pretty good, I think. ..I know the hind toe was still messed up there. ;p
Broken foot 2 - maybe the seams aren't what's broken... I hope the bone can be fixed? Guess I can just start over but I hope I don't keep re-living this glitch.
"Is there a quick and easy way to keep the bones I have, and bring in a fixed version of the obj? : /"
Save the busted figure to the library after zeroing the rig.
Regroup the foot checking to make sure your group is neat and includes all the polys necessary.
Load fixed mesh into poser (if you are doing your group poly fixing externally).
With new mesh selected, enter set up room. Load busted figure.
Exit set up room.
W10 Pro, HP Envy X360 Laptop, Intel Core i7-10510U, NVIDIA GeForce MX250, Intel UHD, 16 GB DDR4-2400 SDRAM, 1 TB PCIe NVMe M.2 SSD
Mudbox 2022, Adobe PS CC, Poser Pro 11.3, Blender 2.9, Wings3D 2.2.5
My Freestuff and Gallery at ShareCG
Lol. Crosspost.
W10 Pro, HP Envy X360 Laptop, Intel Core i7-10510U, NVIDIA GeForce MX250, Intel UHD, 16 GB DDR4-2400 SDRAM, 1 TB PCIe NVMe M.2 SSD
Mudbox 2022, Adobe PS CC, Poser Pro 11.3, Blender 2.9, Wings3D 2.2.5
My Freestuff and Gallery at ShareCG
Ahh, but thanks! That's something I needed to know anyway because I made a noobish mistake and didn't have the chest part running between the pecs for the front legs, or the wing shoulders, so both were creating splits in the obj, because the whole, "children can't touch" thing... That was in the tut I'm watching, I just was negligent. So, if I change the shape of a group, and import the new obj, and use the setup room like you just described, to "transfer" my figure rig to this new obj... there probably won't be any issues? As long as the number of bones doesn't need to change or anything?
As long as your object has group names matching the saved actor names the rig saved to the library will attach itself to that new obj. Make sure you have the new mesh selected before entering setup room. It just transfers that rig to the new object. You won't encounter this but... when performing figure surgery, deleting bones etc, and exiting the set up room, the polys that were formerly attached to deleted bones will remain in the scene as 'figure set up' prop. If you don't need those left overs they're safe to delete.
Edit_ extrapolate as you will as to how this might be useful as a quick way to delete polys in poser.
W10 Pro, HP Envy X360 Laptop, Intel Core i7-10510U, NVIDIA GeForce MX250, Intel UHD, 16 GB DDR4-2400 SDRAM, 1 TB PCIe NVMe M.2 SSD
Mudbox 2022, Adobe PS CC, Poser Pro 11.3, Blender 2.9, Wings3D 2.2.5
My Freestuff and Gallery at ShareCG
Thanks!  It was just starting to dawn on me about the names, as I opened up ZB... sure enough ZB renamed everything just because I changed a single polygroup, so, I'm renaming groups UV Mapper again, but it's gotten easy and it's been good practice to repeat this stuff. From what you've said about the setup room, so far, it seems Poser has potential to be a pretty forgiving and straightforward software despite the occasional glitchy things. Rigging imported stuff in Poser isn't turning out to be so hard as it first came across.
Pod, remember there might be an easier way to correct your groupings out of ZB. If you open the original obj file in UVMapper and export your UV's you might be able to open the ZB obj file in UVMapper and reimport the UV's which would correct the Groupings, no need to hand edit each group.
Comitted to excellence through art.
- 1
- 2
Privacy Notice
This site uses cookies to deliver the best experience. Our own cookies make user accounts and other features possible. Third-party cookies are used to display relevant ads and to analyze how Renderosity is used. By using our site, you acknowledge that you have read and understood our Terms of Service, including our Cookie Policy and our Privacy Policy.
I'll look for your Daz work... you seem terribly familiar to me. Gnight.
W10 Pro, HP Envy X360 Laptop, Intel Core i7-10510U, NVIDIA GeForce MX250, Intel UHD, 16 GB DDR4-2400 SDRAM, 1 TB PCIe NVMe M.2 SSD
Mudbox 2022, Adobe PS CC, Poser Pro 11.3, Blender 2.9, Wings3D 2.2.5
My Freestuff and Gallery at ShareCG