Renderosity Forums / Poser - OFFICIAL
Welcome to the Poser - OFFICIAL Forum
Forum Coordinators: RedPhantom
Poser - OFFICIAL F.A.Q (Last Updated: 2025 Feb 16 10:02 pm)

Subject: New to Poser Pro 2010 - what settings to use?

- 1
- 2


I bought PP2010 the first day it was available, and I still feel like a noob! Hang in there.
Here's what I usually use for general rendering. For me, it is a good compromise between quality and speed.
As to GC. I'm one of the people who can't seem to get satisfactory results. The colors always seem to leach out, and regardless of the lights, it makes my scenes lighter than I want them to be. (I tend to favor shadowy, moody scenes, but I want the colors saturated.) I'm sure it's the learning curve, but I'm not there yet. I keep playing with it, but keep coming back to working the lighting by hand.
I DO find BB's Envdome to be invaluable! For general lighting, it is the place I always start. Load it, and one light for shadowing and you've got your basic light set. Then tweak for effect from there.
I follow Poser's suggestions as to where to set raytrace. The highest I've ever set it for was 6 was (as an experiment) and it didn't look any different to me, so I'd say use the guidelines on the pop-up.


I think the RT bounce thing highlights a problem with the default Poser render settings dialogue, that bounces for RT reflections/refractions are linked to IDL bounces - two different effects with often vastly different impacts on render times.
I'd almost never want more than two or three RT bounces for reflections/refractions because of the huge increase in render times, but there are many instances where I'd (theoretically) want to have higher IDL bounces.
That said, I'm not entirely convinced that Poser IDL quite works the way I think tit does at times - just increasing the bounces seems to brighten the same areas that are lit by one or two bounces, whereas I'd expect the area of influence of the indirect light to increase with more bounces. Maybe it does but I'm not regitering the difference.
Anyway, this is the reason that the D3D render dialogue is so useful, because you can set the IDL bounces independently of the reflect/refract bounces.
PoserPro2014(Sr4), Win7 x64, display units set to inches.
www.danielroseartnew.weebly.com
There is with rendering of some elements - dynamic hair and when using depth-of-field being two examles. Typically I wouldn't expect to get great results with DOF with a pixel sample setting of 5 or less - I've gone as high as 14 for a couple of overnight renders where I've really wanted smooth results.
PoserPro2014(Sr4), Win7 x64, display units set to inches.
www.danielroseartnew.weebly.com
I normally leave mine at 10 after getting tired of wasting a lot of renders where I didn't have it set high enough to avoid pixelation to a bothersome degree, which was pretty often - if it looks fine to you at 5 that's kind of the important benchmark, same as raytrace bounces.

I would definitely incorporate Gc into your render strategy. You have quite a bit of gain from it as opposed to not using it. However, you will need to modify your light settings and tone down intensities to accurately create the image you have in mind. Also, do not ignore your material room settings. I have found that many vender settings are not appropriate for PP 2010 and require modification for correct rendering.
Hborre... I'm not baiting you here. I'm trying to communicate what the real delima is for us less-than-techie Poser users.
Quote - However, you will need to modify your light settings and tone down intensities to accurately create the image you have in mind. Also, do not ignore your material room settings. I have found that many vender settings are not appropriate for PP 2010 and require modification for correct rendering.
And there is the rub: the fact that nothing seems to work in default mode using GC. I remember this well from an earlier thread where I asked BB for help, and come to find out, part of the problem was the texture/shaders for the default M4!!! It seems as though, to effectively use GC, one must know how all of the shaders work, plus modify everything we've ever learned about lighting. To me, all of this takes far longer than adjusting the lights by hand using BB's light meter to make sure nothing's burning up.
From the OP's initial message, I get the feeling she's in the boat with me on GC... would like to use it, but can't get it figured out. Can you (or anyone) give some SPECIFIC, step-by-step instructions on how to keep the colors from being washed out (in all renders) and how to keep shadows from becoming over-lit (in dark-toned renders?) From the help you've given me with settings using BB's envdome, I know you have a handle on this. I've read all of the threads, but no one has done a "take you by the hand" to show how it actually works.
Can you point me to one?
Again, I'm not trying to be an ass on this. It's just a source of a great deal of frustration, and I don't know another way to ask this question.
Ah. Lots of great input (I'm finally home from work and now is my SUMMER HOLIDAYS! WEEEE!)
I tried the D3D settings as I've been fond of those in the past, but either I was being blind or stupid, because I couldn't find any mentioning of Gamma Correction in that. Only the tone mapping thing from Poser 8.
And am I correct in assuming that it's either or with Gamma correction and tone mapping? Either GC or ToneMapping, not both, right? I must admit I've never figured out what Tone Mapping did or didn't do so far... but I've always had it turned on.
And as for the light sets. Since I mainly render indoor stuff, I set up my scene to be BB's P8 Soft Studio Lightning which both incorporates the VSS prop AND takes Gamma Correction into account with the amount of light. Plus I love the warm scenes it produces.
Whenever I do outdoor stuff I tend to use the RDNA dome thingie. I have BB's sphere but have so far been unsuccessful in finding proper equirectangular (I think that's what they're called...) maps to put on it. And thus it looks like shite. Gives nice light, but shitty sky. Not the env sphere's fault of course, but I just wish it came with at least ONE suitable picture for the texture :)
FREEBIES! | My Gallery | My Store | My FB | Tumblr |
You just can't put the words "Poserites" and "happy" in the same sentence - didn't you know that? LaurieA
Using Poser since 2002. Currently at Version 11.1 - Win 10.
I think so long as you set GC on in the default render settings then the D3D dialogue will honour that.
PoserPro2014(Sr4), Win7 x64, display units set to inches.
www.danielroseartnew.weebly.com
Ah OK. Thanks Carodan. I wasn't sure of that bit! Will try it out!
(now if only I knew how to tell the difference.. The VSS prop already incorporates "fake" GC...)
FREEBIES! | My Gallery | My Store | My FB | Tumblr |
You just can't put the words "Poserites" and "happy" in the same sentence - didn't you know that? LaurieA
Using Poser since 2002. Currently at Version 11.1 - Win 10.
Pretty sure you should only employ one form of gamma correction, if you have it on any materials you'll want to turn it off or it'll be applied twice (anyone who knows better feel free to correct me).
Yeah, you'd need to set the VSS GC values to 1, so that you don't gamma correct twice.
PoserPro2014(Sr4), Win7 x64, display units set to inches.
www.danielroseartnew.weebly.com
You're correct, basicwiz. I would wish there would be a basic setup to arbitrarily compose your scene and render away to a perfect image. However, there is too much content created under the earlier Poser versions which, back then, were developed to cope with the lack of understanding how image rendering occurred. Even presently, the old conventions are still being applied to new content, but I am seeing more vendors utilizing Material Room mathematics to maximize Poser's potential. Granted, some incorrectness are still manifesting themselves through misconstrued logic, but, just the same, we may be headed in the right direction as the technology is properly developed. Fortunately, there are valued members that are talented enought to write applicable scripts to change specific overall settings to target nodes or analyze particular application situations and switch on/off parameters as needed (i.e., the presence of active render Gc inactivating material based Gc). I definitely agree, a formal documentation of Do's & Don'ts would be most beneficial to newcomers, and old, undertaking PoserPro and gamma correction for the first time. Unfortunately, the marketing strategy for both regular Poser and the Pro series has only led to more confusion and heated debate. Of course, unlearning old techniques is like trying to teach an old dog new tricks.
TG, BB's Envsphere sky images look best if you decrease your camera's focal length between 20 - 25 mm. You would be increasing more lense coverage due to the wide angle nature, making the background image sharper. The down-side is you must bring your camera closer to your subject where it could be influenced by wide angle distortions. Also, there is gamma correction present which must be reset to 1 if using render Gc.
A huge step in getting away from the dreaded "THAT'S POSER" look - stop using depth mapped shadows. They look terrible and have a couple of really serious fundamental flaws - flaws not restricted to Poser, but Poser users tend to be the most flagrant displayers of these flaws. The first big one is frequent incorrect shadow offset, or "light leaks", typically manifesting as the awful nose glow, although there are various workarounds for that.
The other problem is uniform blurriness that simply always looks fake. You can hide the fakeness sometimes with composition but it will always be working against you and will either show itself in your images or you will have to compromise. TrekkieG you ou may remember this old thread:
http://www.renderosity.com/mod/forumpro/showthread.php?message_id=3173588&ebot_calc_page
ps: that technique I was using with multiple point lights is made obsolete by the "samples" setting in raytraced shadow options for any light; I render with it set to 60, very smooth shadows.

I like how PP does hair. Not sure what I'm doing differently, but hair seems to look more like hair and less like clumps of mesh:
[
](http://www.tightbytes.com/Poser/Charlotte/Charlotte252.jpg)
It did mean having to go into the bump map and texture map (everything except the colour map) and setting Gamma to Custom Gamma value: 1. These are extra options that come up in the texture manager dialogue, which comes up when you click on the Image_Source name field.
Monterey/Mint21.x/Win10 - Blender3.x - PP11.3(cm) - Musescore3.6.2
Wir sind gewohnt, daß die Menschen verhöhnen was sie nicht verstehen
[it is clear that humans have contempt for that which they do not understand]
There is definitely a lot of confusion and 'legacy' approach going round, and Poser documentation sucks in this respect. If the approach to shaders was changed between versions, I would expect clear guidance in the documents how to render 'old style' and what to do to old content items to make it look good in 'new style' renders.
On the other hand, let's not forget that Poser is not a scientific tool, but a product intended to make some form of art, and so in most cases for fun. Too much emphasis on the math side would take away the fun for many of us.
Nevertheless, it would be good to have some good examples of images of different styles, with all aspects, light, shader used, and all render settings included and explained, and how modified settings change the result.

Quote - Too much emphasis on the math side would take away the fun for many of us.
But as you get further and further into CG and Poser picks up these extra features, it starts to become all mathematics.
The artistic concepts relating to composition, etc, apply in Poser 1 just as they do to Poser Pro 2010. As each version in between has been released, the techniques learned in art class have not changed... constructing a good scene, conveying emotion in a face, etc, has followed the same rules throughout. The things that have changed are the technical bits, those based on mathematics (mainly the physics of light).
As a result, the natural progression of all future Posers, as far I can see, will involve more and more mathematics and being aware of what value X does to a render. The baseline of artistic knowledge needed to make a good picture will remain basically unchanged.

I just wanted to say thank you for this thread. I was lucky enough to get an 80% coupon from Smith Micro and was able to sidegrade from Poser 8 to Poser Pro 2010.
I am THRILLED with it, and this thread has given me some good pointers on the new GC as well as render settings and lighting settings.
Thank you!
Indi
Quote - [
But as you get further and further into CG and Poser picks up these extra features, it starts to become all mathematics.The artistic concepts relating to composition, etc, apply in Poser 1 just as they do to Poser Pro 2010. As each version in between has been released, the techniques learned in art class have not changed... constructing a good scene, conveying emotion in a face, etc, has followed the same rules throughout. The things that have changed are the technical bits, those based on mathematics (mainly the physics of light).
As a result, the natural progression of all future Posers, as far I can see, will involve more and more mathematics and being aware of what value X does to a render. The baseline of artistic knowledge needed to make a good picture will remain basically unchanged.
Agreed! Fully! The basics of a good image are the same, irrespective whether it is drawn with charcoal, painted oil on canvas, or made using Poser.
Now unless your name is Leonardo da Vinci, the chance that you are both a highly skilled image composer and a genius in math at the same time are slim. Math highbrows in general are not good at imaging, and artists are hardly ever top performers in math, and more likely shy away from it.
Art classes, including instructions about composition, light, etc. are compulsory at school and out of school they can be followed on virtually every street corner.
Math too is compulsory at school, but hardly with the aspects that are used to build or tune shaders.
So, to keep the user-base for Poser, we must try to chew the unavoidable math bit down to a level that can be understood by the average human with some interest in math. Find a way to keep the hairy math 'under the hood', and present suitable options in a manner that can be understood, used and tinkered with by users. A good example is the set of filter functions in Photoshop: The basic operations are lumped into adjustable and recognizable presets that make sense for users.
Quote -
So, to keep the user-base for Poser, we must try to chew the unavoidable math bit down to a level that can be understood by the average human with some interest in math. Find a way to keep the hairy math 'under the hood', and present suitable options in a manner that can be understood, used and tinkered with by users. A good example is the set of filter functions in Photoshop: The basic operations are lumped into adjustable and recognizable presets that make sense for users.
Please allow me to add that the fundamental math like it is now in the materials room would need to remain available like it is now. The idea was to make a sort of 'containers', or function-blocks if you want, to wrap up the hairy bits, into which one can go at will, but that can be left closed if no action needed. See it as a bit of house-keeping. Input nodes would be shown on the outside of the container when closed.
This is the approach I've been hoping for, and still hope will come to fruition.
It's the difference between VSS, And D3D's Perfect Skin. I've used both. I understand that VSS is far more powerful, but I can't figure out how to do anything with it other than what BB set it up to do. With Perfect Skin, I can generate a multitude of various effects almost effortlessly by simplyworking sliders. That's the level of complexity that a 62 year-old can readily understand! ROFL.
It's an argument I've made and seen made before. It's great that the envelope is being pushed, but PLEASE! Someone (who knows how) make it slider-simple for the simpletons like me!
Now THERE is a widget that will make someone a lot of money! Make GC slider simple, and watch me plunk down my cash!!!!!!!
Quote - Make GC slider simple, and watch me plunk down my cash!!!!!!!
Are you using Poser Pro (either version)? If so, then I can't see how you could get it simpler than it already is.
GC workflow in PPro can be done in a few clicks:
- In Render Settings, switch on GC (and change the value to your liking... 2.2 is usually good enough for most scenes so most times it's just a case of one click to activate render GC).
- If you're using any of BB's shaders that don't have automatic GC detection built-in, find the PM:Gamma node and change it to 1.
- For each control texture/map (i.e., those that aren't colours that will show up in your render: transparency maps, bump maps, and so on) change their custom gamma value to 1. Or use the script that's included in PP2010 to make this step even easier.
- Render.
It's only step 3 that might be confusing or difficult at first, but it all comes down to knowing what job each texture map does... if it's colour that shows on your model then leave it alone; if it's used to control displacement, transparency, etc, change its custom gamma to 1. Apart from using the new script to help gather up your textures in one place, there's very little you can do to make it any simpler.
After all, the decision about which maps are textures and which are control data is ultimately a choice only the user can be sure of. An automated routine could only make a good guess, and you'd still have to go through each one and check that it guessed correctly (or read your mind correctly).
Or maybe you mean a one-click or one-slider control that would make your renders look good with GC switched on? In that case... I don't think so. The reason someone's renders look washed out or strangely tinted with unwanted colours when they switch from non-linear to linear workflow is a result of their learning techniques that were made to compensate for lack of linear workflow. So naturally, if you bring these practices that tried to compensate for something that's missing into an environment where the feature is now present... yes, it's going to look horrible, wrong, washed out, whatever. There's no one-click, one-slider solution to making someone change their approach to lighting and shaders.
Hmmm... it seems this thread is demonstrating the Renderosity version of Godwin's Law:
"As a Poser forum discussion grows longer, the probability of it drifting into a discussion about gamma correction approaches 1."
Quote - This is the approach I've been hoping for, and still hope will come to fruition.
It's the difference between VSS, And D3D's Perfect Skin. I've used both. I understand that VSS is far more powerful, but I can't figure out how to do anything with it other than what BB set it up to do. With Perfect Skin, I can generate a multitude of various effects almost effortlessly by simplyworking sliders. That's the level of complexity that a 62 year-old can readily understand! ROFL.
It's an argument I've made and seen made before. It's great that the envelope is being pushed, but PLEASE! Someone (who knows how) make it slider-simple for the simpletons like me!
Now THERE is a widget that will make someone a lot of money! Make GC slider simple, and watch me plunk down my cash!!!!!!!
Boy am I GLAD you wrote this! I was beginning to feel like the only one here who's a total dunce when it comes to math. I don't LIKE math, I've hated it all my life.. As an adult, I came to realise that there are times where the blasted thing is necessary, but I still dn't like it and I don't understand it. I'm like a blind man in a maze whenever I try to recreate some of what the geniusses here (like BB) has done.
And I can't figure out how to add things to VSS either. I've seen it explained countless times. I can follow a step by step explanation - but since I don't know WHAT it is I'm doing, I can't remember it next time I need it.
So yes, a slider based/simple input version of VSS would be awesome. I would happily pay for that. I love what VSS does... I just don't know HOW it does it. Not that it's really necessary either of course. I don't know how the engine in my car works either.. but as long as it does.. who cares HOW? :)
I'm puzzled about all the mentioning of setting Custom gamma to 1... Where, and why?
FREEBIES! | My Gallery | My Store | My FB | Tumblr |
You just can't put the words "Poserites" and "happy" in the same sentence - didn't you know that? LaurieA
Using Poser since 2002. Currently at Version 11.1 - Win 10.
That is for material-based gamma correction - setting it to 1 means it will stop trying do gamma correction, for that material. You probably want a script to do this if you have a whole lot of materials in your scene(s) that make use of gamma correction by material.
If you have materials that are set for gamma correction, and you also enable gamma correction in render options, then it will be applied twice, making that material too bright.

That's my PM:Gamma, not "Custom Gamma". Custom Gamma is the label of the per-image gamma on Image_Map nodes in the material room. Setting it to 1 is necessary for things that are grayscale data, not luminance/color data. For example, a displacement map records a pattern of displacement. It does not work the same if you treat that as a picture. It's not a picture. It's a matrix of displacement amounts. Changing those amounts leads to a different pattern than was intended.
Renderosity forum reply notifications are wonky. If I read a follow-up in a thread, but I don't myself reply, then notifications no longer happen AT ALL on that thread. So if I seem to be ignoring a question, that's why. (Updated September 23, 2019)
Regarding the VSS sliders, while I want to do such a thing, it doesn't change the ease of use.
In my VSS skin shader there are numbers for various control parameters. For example, there is PM:Shine. If you increase that, it's more shiny. A slider doesn't make that any more or less clear. And this doesn't involve math. How I built it involves math. How you use it is simple. You want it more shiny? Increase PM:Shine.
You want more SSS? Increase PM:SSS. Less SSS? Decrease it. It's not math. It's a numerical value, but it's not math. A slider also represents a numerical value.
Even if I turned every VSS skin parameter into a slider, you still wouldn't be able to add mud to the shader. If I give you a mud+skin shader, then you won't need to know. But what you need isn't sliders. You need me to give you the 85 nodes that make a mud+skin shader. Or blood. Or egg yolk. Or stockings. Or warts. Or ...
Most of you will never be able to add such things to any shader system, regardless of whether the control parameters are type-it-in numbers, or sliders.
Go ahead, - show me how D3D's perfect skin system makes it easy for you to add mud or nylon to a skin shader.
The reason that you don't have sliders today in VSS is because I never figured out precisely how to do that without a lot of work on my part. Before Poser 8, you had to use TK, and I hate TK. Plus, it didn't work on Macs.
Now we have P8 and wxPython is built in. But if I use that, it's worse than the Mac-no-TK problem. It would only work with P8 and Poser Pro 2010.
But I'm considering going that route. In any case, the point of VSS Pro (the pay version) is SLIDERS.
Renderosity forum reply notifications are wonky. If I read a follow-up in a thread, but I don't myself reply, then notifications no longer happen AT ALL on that thread. So if I seem to be ignoring a question, that's why. (Updated September 23, 2019)
If everyone will read my posts, I was not trying to start a fight between Perfect Skin and VSS. I was using those two systems as an example of simplicity, purpose, and power.
The purpose of Perfect Skin was not to make Nylon or eggs or whatever... it is to make SKIN look more natural. That's all I WANTED it to do.
My point is, VSS does far, far more than I wanted/needed... because, as you very rightly say, I will NEVER be able to make those shaders on my own. Therefore, since the interface to PS is easy and the one to VSS is more complex, PS serves my needs better.
That's what I was wishing for with GC. I would gladly sacrifice some of the power if it could be made simple.
I don't think there's any fighting going on, so pointing out that you're not trying to start a fight seems unnecessary.
I'm trying to understand your point, or to convince you that your perception of VSS is making it more complicated than it actually is.
For example:
Quote - With Perfect Skin, I can generate a multitude of various effects almost effortlessly by simplyworking sliders.
Yes, and with VSS you can generate a multitude of various effects by simply editing parameters. If the mat room had sliders, then you could use sliders to alter those parameters. But leaving aside the widget, why do you perceive the VSS parameters as being unable to easily produce a multitude of effects, or unable to produce a more realistic skin?
I brought up the nylon and eggs because you said "I can't figure out how to do anything with it other than what BB set it up to do". I thought by that you meant how to do effects that I did not include a way to do. This implies that you do know how to do effects that D3D did not include a way to do. Thus, I made some examples of things that neither offers an easy way to do at the moment. Things that could be added, if one understands the math, but otherwise if there's no slider to do some effect, then the presence of sliders doesn't make that any easier.
If adding new effects is difficult either way, then you must not be actually talking about adding new effects. Rather, you must be simply talking about how to produce variations of basic, somewhat realistic skin shaders.
Both VSS and D3D PS provide ways to make skin look more real, and to alter the shader in various obvious ways to create many variations from the same texture set. But in both cases, you are unable to make it do anything other than what the authors set them up to do, right? You can't add any other effects besides the effects that are built in. Sliders impact how you change a parameter, not what the parameters are capable of. So while I understand that sliders are perhaps more convenient, they're not actually helping with the problem of not knowing how to add a new effect, one that was not set up by me in the first place.
Meanwhile, GC is simple. The complications have nothing to do with GC. You turn it on.
The complications arise because of the exact reasons johnpf stated above. There is a big pile of shaders and light sets in the Poserverse that represent other ways to compensate for monitor gamma. Here's the solution - don't use those. Don't use old light sets made for Poser 5. Don't use fancy shaders that make the materials respond to light in non-linear ways. With GC, simple shaders work great for most things. Stop using the goofy shaders that Daz provides. Use simple ones.
Now it may be that applying a simple shader to a figure is a lot of work, and you need a tool to help with that. Guess what - that's VSS. VSS doesn't just apply my fancy complicated skin shader. It can apply simple ones, too.
I understand that setting it up is more than a minute's work. But the alternative is to go through dozens (perhaps hundreds) of individual materials, tediously loading simpler non-compensating shaders, and then loading all those texture maps into them, zone, by zone. That could take days. But I can do it in seconds with VSS.
This, by the way, is one of the reasons that GC is only part of Poser "PRO". Casual amateurs who don't want to spend a lot of time learning why things work (or don't work) and learning to use tools to avoid a boatload of manual clicking - well they just never find render GC to be that useful. So why supply it? SM decided not to.
If the Poser world began today, then unlearning the wrong ways to do things would not be a task at all. The linear workflow would be your starting premise.
The only reason it seems tedious and complicated is because you're not making your own content, but rather are trying to use 10 years of content developed with the wrong assumptions. If every piece of content and every light set was made for the simpler regime offered by render GC, then you'd not perceive the use of render GC as being complicated at all.
This is why I find it incredibly refreshing. I make my own lights and shaders. I prefer to make simple ones when I can. Render GC makes it possible to use simple 2-node shaders on 90% of the stuff I have to edit. For the remainder (figures) I have VSS, which is a one-click solution.
So render GC makes my workflow much, much simpler. The only time I have a problem is when I try to use some prop that has goofy shaders on it. Then I have to rework them. Most hard (non organic) things work great with a color map, a bump map, and that's it.
Renderosity forum reply notifications are wonky. If I read a follow-up in a thread, but I don't myself reply, then notifications no longer happen AT ALL on that thread. So if I seem to be ignoring a question, that's why. (Updated September 23, 2019)
Quote -
This, by the way, is one of the reasons that GC is only part of Poser "PRO". Casual amateurs who don't want to spend a lot of time learning why things work (or don't work) and learning to use tools to avoid a boatload of manual clicking - well they just never find render GC to be that useful. So why supply it? SM decided not to.
THIS is what I've been waiting for one of the knowlegable people to say! It validates what my own experience has been. I don't feel stupid anymore. (Perhaps lazy in the eyes of some, but not stupid.)
I bought PP2010 because it's 64 bit and I wanted the extra speed. I got that. In spades. I guess where I got side-tracked was a number of people suggesting that GC was going to solve lots of problems for everyone very easily, and therefore everyone should use it. Well, that's not been the case for me, and from the posts, for a large number of, as BB accurately puts it, the more "casual" users.
And I'm good with that. The upgrade was worth it to get the speed, better IDL, and an even better library system. I appreciate BB's candor (as always.) I will now put GC aside and go ahead and use what works for me and gets work through my pipeline with good results, and feel good about it.
Now that I am playing with Poser Pro and rendering with GC, I can see a significant difference between the results I get with that versus rendering with material GC. Different doesn't not imply any sort of qualitative appraisal. I don't feel I have a true sense for renderer GC yet. But in my as yet limited experience, one does not obtain similar results rendering with material GC (set to 2.2) and renderer GC (with same material's GC all set to 1). Must be the lights.
After all, that is an important part of the whole equation, and one that I only ever addressed in IBL before (I linearised the probe image only). Since main light was set to 100% intensity, RGB (1,1,1), no GC was needed there.
Same lights. Same scenes. Different results. Before I start posting images that might have unknown variables unaddressed, I'm going to run some extremely simple test renders on basic, basic materials, and work my way up.
Poser Pro is truly a pro tool, and GC in this setting is a pro feature. I can see that now. It is easier starting with an un-tweaked shader setup and applying render GC, but I have so many saved P7 material-GCed scenes that I'm now bringing into Poser Pro. Very interesting results... and jeez, the quality of the render is PHENOmenally better. Not the GC bit, but just the quality of the image in terms of tonal gradients and like that.
What did they do to the renderer?
Monterey/Mint21.x/Win10 - Blender3.x - PP11.3(cm) - Musescore3.6.2
Wir sind gewohnt, daß die Menschen verhöhnen was sie nicht verstehen
[it is clear that humans have contempt for that which they do not understand]
Quote - But in my as yet limited experience, one does not obtain similar results rendering with material GC (set to 2.2) and renderer GC (with same material's GC all set to 1). Must be the lights.
No, it's not the lights... And the difference is quite easy to explain:
When GC is enabled, the inverse of the chosen gamma correction is done to all image maps *) to linearize them. After rendering the image is gamma corrected. With material based GC the step to linearize the data is not done.
*): according to the gamma setting chosen for the image map (it defaults to the same as the render setting, but needs to be set to 1 for all maps that should not go through that process, like displacement, bump,...).
Sorry, I forgot to mention: I'd read that post, and that was part of the reset process to render in GC: setting all bump, displacement and other non-colour information texture maps GC to custom setting: 1. That script you'd mentioned some tie ago worked a treat.
The differences still exist after this had been done.
I suppose I should show a render or two, but frankly, these are old, poorly-done scenes, and I'm embarrassed. :biggrin: Rather do some fresh stuff and show that.
Monterey/Mint21.x/Win10 - Blender3.x - PP11.3(cm) - Musescore3.6.2
Wir sind gewohnt, daß die Menschen verhöhnen was sie nicht verstehen
[it is clear that humans have contempt for that which they do not understand]
Quote - The differences still exist after this had been done.
Er...
A) You enable GC in render settings and start the rendering
- Poser linearizes ("inverse GC") the maps according to the Maps' or overall GC value
- Poser renders (in linear space)
- Poser GCs the result
B) You disable GC in render settings and start the rendering
- Nothing done...
- Poser renders
- (GC is not done or done by the materials or manually afterwards)
So lacking step 1 in B, the result is different...
Step 3 is of course done at render time in your example, but could be done afterwards, too. That doesn't really matter.
Dizzi, my shader GC materials also anti-GC the incoming color maps. That's not the difference. Well, there is a difference, because bilinear interpolation happens before shader anti-GC, but after render anti-GC, but this is a tiny difference.
I suspect that the reason results are different has more to do with IBL images being anti-GC'd when you enable render GC, and the user is unaware of this.
If you are, for example, using one of my linearized IBL images, made using my GenIBL tool, then that image is already linear when used in Poser 7 or 8. But if you plug that into Poser Pro with render GC enabled, Poser will anti-gamma that image, and it should not because you're using a linear encoded image already.
Similarly, if you're using my environment sphere with IDL as your secondary light source, with 3rd party equirectangular images in JPEG format, my EnvPanoramic shader has a Gamma In and a Gamma Out. Gamma In should be 2.2 if the incoming image is sRGB (i.e. an undoctored photo). But if you enable render GC, then you need to change my Gamma In to 1, and let the renderer do the anti-gamma step.
As to what the Gamma Out should be, the answer is very complicated. It depends on whether or not you're using IDL or not. If you're just using the EnvSphere for reflections, not IDL lighting, then the Gamma Out should be 2.2, unless you're using render GC. Then it should be 1.0.
If you're not using render GC and you are using IDL, then Gamma Out is problematic. There is no single value that's going to be correct both for reflections and for IDL lighting. Furthermore, the issue becomes even more complicated when HSV ETM is used.
On the other hand with Poser Pro and render GC, the setup is trivial and the answer is always the same. Gamma In = 1, Gamma Out = 1, regardless of whether or not you're using HSV ETM and/or render GC. That's part of why render GC makes life simpler. The renderer is handlilng it - no shader hackery.
Renderosity forum reply notifications are wonky. If I read a follow-up in a thread, but I don't myself reply, then notifications no longer happen AT ALL on that thread. So if I seem to be ignoring a question, that's why. (Updated September 23, 2019)

I am using one infinite white light at 95%, and a procedural IBL that has been carefully set up so that the amount of light it produces is the same with or without render GC enabled.
In this render, I'm using shader GC on the figure's skin, but not the eyes, or the chair, or the ground.
Renderosity forum reply notifications are wonky. If I read a follow-up in a thread, but I don't myself reply, then notifications no longer happen AT ALL on that thread. So if I seem to be ignoring a question, that's why. (Updated September 23, 2019)

The skin is identical, including the luminance of the shadowed areas. Meanwhile, the effect of GC, which was not provided on any other parts, has changed everything else.
Renderosity forum reply notifications are wonky. If I read a follow-up in a thread, but I don't myself reply, then notifications no longer happen AT ALL on that thread. So if I seem to be ignoring a question, that's why. (Updated September 23, 2019)
Note: I did not use the standard VSS Template Skin on the figure. Instead, I used a very simple shader - Diffuse and Blinn, Color Map and Bump Map, no other fancy stuff. The only part of it that isn't "simple" is the fact that it has shader GC in it, the new kind that automatically detects the use of render GC, and disables itself.
Renderosity forum reply notifications are wonky. If I read a follow-up in a thread, but I don't myself reply, then notifications no longer happen AT ALL on that thread. So if I seem to be ignoring a question, that's why. (Updated September 23, 2019)
Hmm. I need to correct/amend what I said about anti-GC on IBL images.
I don't know if this is new behavior in Poser Pro 2010 versus Poser Pro (original). But I just did a test in Poser Pro 2010 and no matter what value I use on the the IBL image "Custom Gamma", the results are the same. I'll have to fire up the old Poser Pro to see if this is new behavior.
But I'm still certain (verified it again) that if the light shader has any non-white color chips in it, these take on different values when render GC is enabled.
For example, suppose you plug the image into the Light Color, which is set to white, and you use an intensity of .7 (70%). This means that the effective illumination is 70% of the colors in the image.
On the other hand, suppose you set the intensity to 1 (100%), but you change the Light Color to 70% gray, which is approximately RGB 179, 179, 179. (It's actually 178.5, but this makes little difference.)
Now if you render with shader GC there is no difference. The illumination is still 70% of the colors in the image.
But if you enable render GC, the color chip is anti-gamma corrected to RGB 116.35. The result is the illumination is now effectively 46% of the image color, instead of 70%.
I've talked about this before. Do not use the Light Color chip to darken a light. Use the Intensity dial. The Intensity dial is always linear. The color chips in a shader are "linearized" when render GC is enabled.
This is actually correct behavior, if you assume that the chosen color for a color chip was done by "eyeballing" the color you see on the monitor.
I'm surprised at the fact that the image is not linearized. If one were to draw an IBL probe with a certain hue/saturation, and compare that to the same apparent color used in a color chip with a white IBL image, you'll get a different outcome.
Renderosity forum reply notifications are wonky. If I read a follow-up in a thread, but I don't myself reply, then notifications no longer happen AT ALL on that thread. So if I seem to be ignoring a question, that's why. (Updated September 23, 2019)
I just tested the image gamma setting on IBL in the old Poser Pro. The results are the same. Image gamma has no affect in an IBL light shader.
On the other hand, I tested images used as "gels" on other kinds of lights, and they do experience anti-gamma correction.
This behavior is very curious. I was not aware of it. The Poser Pro 2010 reference manual, page 319, says:
Quote - Local gamma correction is important if you know that not all your incoming data has the same gamma value applied and you know you need to adjust the value for certain textures. Gamma correction on the Texture Manager allows correction per texture.
There's no mention of any difference for images used in IBL shaders.
Renderosity forum reply notifications are wonky. If I read a follow-up in a thread, but I don't myself reply, then notifications no longer happen AT ALL on that thread. So if I seem to be ignoring a question, that's why. (Updated September 23, 2019)
- 1
- 2
Privacy Notice
This site uses cookies to deliver the best experience. Our own cookies make user accounts and other features possible. Third-party cookies are used to display relevant ads and to analyze how Renderosity is used. By using our site, you acknowledge that you have read and understood our Terms of Service, including our Cookie Policy and our Privacy Policy.
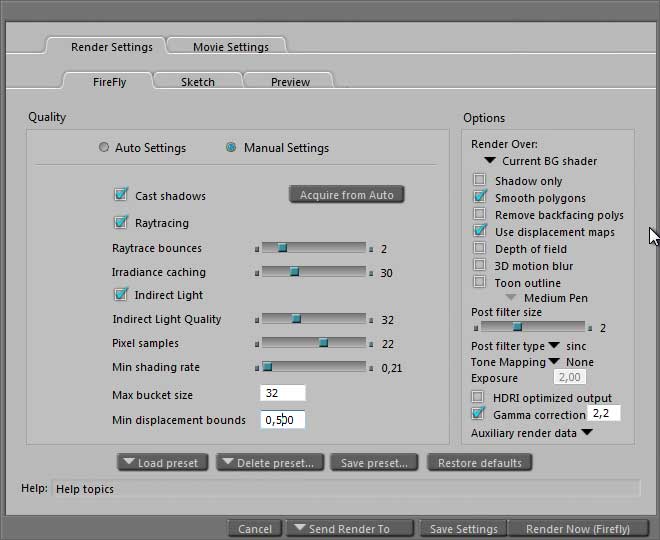
Right. I feel like a complete noob with my PoserPro 2010, because so far I've always just imported my preferrred render settings from the previous version and tweaked them (as in if there's any new bells and whistles added, I look at those)
But now there's this Gamma Correction thingie. The main reason why I bought Poser Pro 2010 in the first place...
And I don't know how to use it.
I know the recommended setting is 2.2 (right?!) but apart from that...
Can someone give me a suggested "all-round" setting I can start with? Attached is my current render settings, but frankly I can't remember the "best" settings of more than a few... and I'm not sure if there's anything else in PP2010 except for the GC that needs to be changed.
FREEBIES! | My Gallery | My Store | My FB | Tumblr |
You just can't put the words "Poserites" and "happy" in the same sentence - didn't you know that? LaurieA
Using Poser since 2002. Currently at Version 11.1 - Win 10.